How do I use a 3D pen?

There are a lot of amazing gadgets out there right now for developing creativity, crafting unique pieces, or having fun in your spare time. One such device is a 3D pen. It is often bought for children as an educational toy. They are also used by artists, designers and other representatives of creative professions.


Preparation
Before you start using the device, you need to prepare for work. Each pen comes with an instruction manual that should be read carefully. The workplace should be spacious enough and free of unnecessary items. Consumables are harvested in the right amount so that it does not suddenly run out during operation.
When creating volumetric figures, you will need enough free space above the work surface, since you will have to raise your hands up during work. Chained movements will deform the lines and the figure as a whole.
The current models of 3D pens have a special shape that makes them comfortable to hold in the hand, and the process of creating a product resembles the use of a regular pen. Many devices have a display that shows the feed rate of the consumable, operating temperature, and other information.

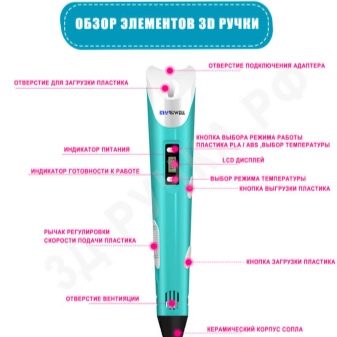
Regardless of the functionality of each model, all gadgets are equipped with a set of basic elements.
-
Button for feeding plastic threads into the heating element. It is located at the top of the case. There are two options for sale - left-handed and right-handed. In the first case, the button will be located under the index finger, in the second - under the thumb. This key will most often have to be pressed during operation.
-
If it is necessary to remove the plastic from the device, press the "back" button. As a rule, it is located next to the feed button. For the key to work, you need to hold it down and hold it for a few seconds.
-
The user can change the feed rates of consumable raw materials. Models equipped with nanotechnology support up to 6 speeds. Adjusting the flow and temperature makes it possible to create different elements - from small parts to large ones.
-
There is another important button at the top, which is responsible for the temperature. It is located next to the display. The minus key decreases the temperature, and the plus key increases it. When you press two buttons at once, the gadget activates the plastic selection mode. Each type has its own temperature.
-
The last basic element is the display. It displays all relevant information during operation. With its help, control and adjustment of modes takes place.
-
To avoid overheating, manufacturers have implemented a protective function in the gadget. If you do not use it for two minutes, the handle will go into sleep mode and is activated only after pressing any of the keys.


Where to begin?
Using a 3D pen is easy, even if the person has no experience with such devices.
The start of the workflow looks like this.
-
The handle is checked for defects.
-
The device works through an adapter, it must be connected to the mains and to the gadget itself. A suitable connector is located in the wider part of the body, next to the plastic feed hole. Now the gadget is ready for use and awaits commands from the user.
-
Set the desired temperature in advance by adjusting it with the keys marked "-" and "+". For each type of plastic, you need to set the appropriate mode. You can find out the required temperature in the instructions or on the website of the manufacturer of consumables.
-
Now the handle needs to be warmed up with the key, which is responsible for the supply of plastic. The fuser will begin to heat up. The screen will immediately display the temperature value through a fraction. The first number will show the temperature in real time, and the second will show the set mode. The element heats up in about a minute.
-
Now the thread of the desired color is placed inside. To keep the line straight, its edge should be cut off. Pressing the "forward" or "feed" button, you need to hold on to the hard plastic until it melts and comes out in the form of a thread.
-
This completes the preparation, and you can proceed to creating products and figures. At the end of the working process, it is advisable to remove the plastic from the device.

How to draw correctly?
A few seconds after pressing the feed button, the material will begin to come out. As long as the thread is warm and elastic, it should be shaped to the desired shape. When set to medium speed, the plastic hardens quickly, but warm plastic can be hand molded without the risk of scalding.
With a high feed rate and temperature setting, the plastic will stay soft for longer, even when painting in air. If you need to speed up the process of hardening, just blow on the thread. To use the gadget as convenient and simple as possible, you need to use it as often as possible.


And in order to get used to it, it will take several sessions. Users quickly get used to working with 3D pens, choosing the optimal speed and temperature to create unique products.
The plastic does not stick to standard office paper, so it can be used as a backing. Before starting drawing, the work surface is cleaned, degreased and wiped thoroughly. It is advisable to use a rough base.


It is forbidden to touch the metal nozzle during operation and for some time after it. This element gets very hot, so you can easily get burned. The rest of the parts, including the buttons and the case, do not heat up. It takes 5-10 minutes to cool down to a safe temperature in energy-saving mode, and the heating rate depends on the room temperature.
Before you start creating complex and three-dimensional shapes, you should practice on simple elements. A modern 3D pen will be a wonderful gift for children, the main thing is to teach the child how to use the device correctly. It is also important to consider the age of the baby when buying a device.

One-dimensional images
Making 1D objects will be a great practice before going to the next level. Made from one or different colors on a horizontal surface. Before starting work, a drawing paper or a sheet of paper is placed on the table. And you can also draw a drawing on paper and embody it by drawing along the lines with the end of the pen and the plastic of the desired color charged into it. The finished object can be placed, turned in the desired direction, combined with other elements, or used in any other way.


Using this method, you can make the following:
-
small figures;
-
pendants;
-
earrings;
-
brooches;
-
Christmas decorations;
-
decor elements.


And also with the help of a 3D pen, you can decorate frames, mirrors and other interior items, covering them with patterns or lace made of plastic threads.
3D Shapes
Now that one-dimensional objects are obtained quickly and without much effort, you can start making more complex and expressive elements. To begin with, it is advisable to make any stereometric figure. It can be a pyramid, a volumetric prism, or some other object.
To make a volumetric pyramid, you need to draw a square on paper, circle it with plastic and then draw the threads up from its corners, securing them at the top. While drawing, the lines need to be tilted slightly so that when they dry they are fixed in the desired position. To obtain a prism, vertical edges are connected at the end, resulting in an upper face.


The skills gained from drawing 1-dimensional images will definitely come in handy when creating more complex elements. After drawing the pyramids and prisms, you can move on to making shapes that combine several colors and textures.
And also with the help of a 3D pen, you can create models of houses, cottages and other buildings. Such a tool will be useful for architects and designers when creating working layouts. They look presentable, but they are done quickly and easily.


Before painting with colored plastic in the air, you need to gain experience in creating various kinds of foundations. For convenience, in the process of work, you can use an old light bulb or a plastic container from under the well-known delicacy Kinder surprise. By covering the base with molten lines of plastic, many useful and interesting elements can be made.
For example, based on an electric light bulb, you can make a fruit of a similar shape in the form of a pineapple or pear.

Experienced craftsmen create real works of art. Handicrafts are highly prized and amazing results can be achieved by combining different techniques and colors. With enough experience, you can decorate your home with homemade caskets, vases, stands, frames and other elements.
Regular use of the 3D pen develops:
-
motor skills;
-
creative;
-
Creative skills;
-
coordination of movements.


