We make applications in the form of fruits

Many children love to make beautiful and bright applications with their own hands. There are many different ideas for creating such products. An interesting option will be these crafts in the form of fruits. Today we will talk about how you can make such applications, what is needed for this.

Simple options for toddlers
To begin with, we will look at the easiest options for young children 2 years old in a nursery. In this case, it is worth preparing several templates in the form of any fruit in advance.
- Cutouts from colored paper according to templates. At this stage, the finished samples are applied to colored paper and carefully cut out. Then, if necessary, the irregularities at the edges are cut off. It is not necessary to make leaves and tails - they can be easily completed with colored pencils or felt-tip pens.


- Blanks from cotton pads. These elements are initially rounded, so they can be taken as the basis for some fruits. At the same time, they are painted with paints of the appropriate color.


- Plasticine blanks... This material allows you to form volumetric applications. At the same time, small pieces are torn off the plasticine of a suitable color, and then, with the help of a stack and fingers, they are given the necessary shape. Leaf blades and tails can also be painted separately on paper.


All the details obtained are laid out one by one on a sheet of paper. Paper items and cotton pads should be glued. If desired, the finished fruit composition can be supplemented with various decorative items (beads, rhinestones, beads). All missing details are completed with colored pencils.
A good option would be applications in the form of a fruit composition in a jar. In this case, it will be necessary to first cut out a blank in the form of a container from paper of the desired color. It should be rectangular, with the ends rounded slightly to give it a more natural look.


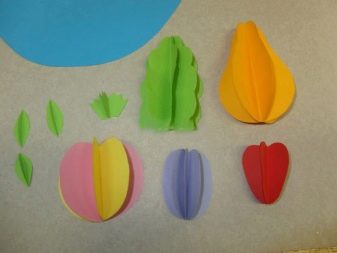
After that, a small piece of other paper, previously crumpled into a neat accordion, is glued to the neck of the paper can. Then you can start making the elements in the form of fruits. A volumetric composition will look unusual and beautiful. In this case, to create each detail from colored paper, several bases are cut out at once using ready-made templates.


The resulting paper elements are glued together only along the center line. The sides are folded back slightly to give the fruit volume. Several different details should be done at once. All of them are fixed with an adhesive to the base.


Fruit on a plate
Such applications can be suitable for children 3-4 years old. To make this composition with your own hands, it is worth preparing the following materials:
- cardboard (red and white);
- colored paper (yellow, green, pink, brown, lilac and red);
- scissors;
- adhesive composition;
- hole puncher;
- felt-tip pens.

When everything you need is ready, you can get to work. First, you need to cut out the background for the future composition. It is made of white cardboard. After that, take a yellow sheet, fold it in half twice, and then apply a pear-shaped pattern to it. It is outlined with a simple pencil and carefully cut out.
In the same way, cut strawberries, plums and grapes from paper material of other colors. Apple-shaped blanks should be in two colors: pink and yellow. Color data sheets are folded in half and the element is also cut out according to the template.


As a result, four elements of each fruit should be cut. Each of them will need to be carefully folded in half. Later, the details of each separate workpiece are taken, a glue stick is applied to one half, while the other half remains free. This is the case with all paper fruits.
When forming apples, it will be necessary to alternate yellow and pink material.... The leaves are folded in half, so that in the end all the fruits are voluminous. Then you need to prepare a plate template of a suitable size, apply it to the paper (you can have any color) and cut it out along the contour.


The resulting plate is glued to a cardboard base. Next, all the fruits are unwrapped again so that they become lush, and then one by one they are fixed on the cardboard. One half of the leaves is glued to the other.
Using a brown felt-tip pen, draw on the basis of the branches of all the fruits. At the final stage, they begin to decorate the plate. In this case, you can make small flowers of any color using a hole punch. They are fixed on a platter. The finished applique is best placed in a frame.


How to make a fruit bowl?
It will look interesting and beautiful craft in the form of a whole vase of fruit... First, using ready-made samples from paper, blanks are cut out in the form of various fruits. In this case, the finished products can be processed with scissors so that they have a middle in the form of a spiral, this will give them a greater volume.
Thus, several varieties of fruits are cut at once. They will only stick to the base with their outer rim. After that, they begin to form a vase. It can also be easily cut from a ready-made template. To make it bulky, it should be carefully folded over a small strip in the upper and central parts. The finished vase is also glued to the base (it is better to take cardboard material).


It is also worth making a tablecloth. To do this, a long strip is cut out of white paper with scissors, it is folded in the shape of an accordion, and then straightened a little. The workpiece can be additionally decorated with a hole punch. The product is fixed on cardboard under a vase.
If desired, you can supplement the resulting fruit composition with products in the form of small flowers with branches. They are cut from paper or cardboard samples, and then attached to the base. They can be both flat and voluminous. In the latter case, to create each flower for a still life, several blanks are taken at once, which are then connected to each other along the central part.


All details can be cut out of colored paper at once. It is also permissible to do all this from a simple material, and then paint it with paints.
More ideas
There are many other ideas for creating these fruit compositions. Let's consider some of them separately.
- Applique fruits in a basket. To create such a craft, first take two cardboard rectangles of yellow and brown colors. They are lined with a ruler and a simple pencil into strips no more than 1.5 centimeters wide. All of them are cut out, then they take one strip of each color, one of them is placed vertically, and the other horizontally, so that an angle is formed. Then the strips begin to be applied alternately in such a way that weaving is obtained, it continues to be done in a checkerboard pattern. As a result, a cardboard "rug" should be obtained, it is turned over with the other side and carefully coated with an adhesive mass. Next, on the back side, draw a basket with a black felt-tip pen, on the back side you need to draw its handle. Later, according to these marks, parts of the desired shape are cut out of the woven base and glued to a sheet of plain white paper. Then you can start making fruits. For this, several sheets of colored paper and patterns in the form of fruits are taken. They are applied to the base and outlined with a simple pencil, cut out. Separately, small leaves and twigs should be made. It is better to draw all streaks with a black felt-tip pen.


You can also complement the resulting composition with various decorative details.
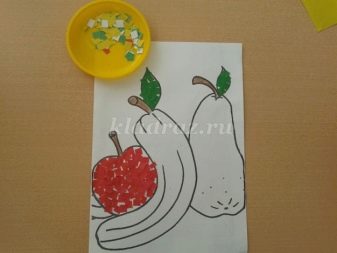
- Cut-off application. In this case, first take a sheet of plain paper. On it, using a simple pencil, they make a sketch of the future fruit composition. Then prepare several sheets of paper of the desired colors. All of them are torn into small pieces to create a mosaic. When such blanks are made, they begin to lay out along the marked contours, while it will be necessary to ensure that individual sharp elements do not stick out. Otherwise, the clipping craft will become ugly.


- Quilling application. This option will be quite laborious, but at the same time it can be perfect for the development of fine motor skills of the child's hands. To make this craft, you need to prepare a cardboard base, take several sheets of colored paper, each of them will need to be cut into strips of the same size. You can prepare fruit templates in advance or make a sketch on cardboard material. When all the strips are ready, they begin to twist them into a tight spiral, while securing the end with glue. After all the necessary twisted blanks are made, a small amount of glue is applied to one side of them, and then they begin to alternately glue to the base, forming each fruit separately.

If desired, twigs and leaf blades can be made using the same technique, which will also be located next to the rest of the composition's details.
- Applique with printed design. To create such an interesting craft, you will need to take natural fruits, apples will be an excellent option. They are cut in half, and then one of the resulting halves is dipped in red paint, and the other in green. After that, they leave prints on a paper or cardboard base. At the same time, you should start making a fruit basket. To do this, you can also take cardboard or paper, strips of the same size are formed from them, a product is woven from them, placing the parts in a checkerboard pattern.


This application will be suitable for older children.
Often, when creating such decorative products, only one large template of any fruit is used. At the same time, several paper blanks are cut out at once to form a voluminous and lush craft. All elements are glued to a cardboard base of any color. All leaf blades and other additional details should be completed with a dark pencil or felt-tip pen.

For information on how to make a volumetric applique in the form of fruit, see the next video.


