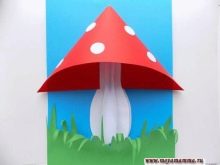
Application for children "Fly agaric"

Amanita is the most colorful and beautiful mushroom. With it, bright, rich applications are obtained, so children are happy to do crafts with fly agarics. In kindergarten, kids 5-6 years old already use scissors quite well and confidently cut out simple figurines of mushrooms. In our article, we will conduct master classes using different application techniques.


Tools and materials
For our crafts, you will need a standard set of materials and tools:
- a set of colored paper in bright shades;
- White paper;
- cardboard for the base of the applique;
- scissors;
- glue stick;
- simple pencil;
- felt-tip pen.
For one of the crafts, you should prepare a photo frame, a brush, strips and quilling tools.


How to make a volumetric applique?
A leg twisted into a tube, a hat rolled into a cone - this is how we will add volume to our work. We offer to make a volumetric fly agaric in two ways.
First option
Step-by-step manufacturing instructions are as follows.
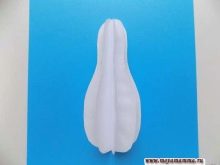
- To make a leg, take two white sheets of paper, fold them together and fold them in half. At the place of the fold, draw a curly outline of the leg, as in the picture.
- Cut out the details according to the picture, there should be four copies of them. Glue all the elements, applying glue not over the entire surface, but only in places of bends. In this way, we will get a volumetric leg.
- Glue the blank in the center of the blue cardboard: this is the basis for our applique.
- Now let's get into the hat. For it, we need a rectangular piece of red paper with a 3: 1 aspect ratio.
- Bend the corners from the two edges of the rectangle so that the bottom line of the workpiece remains even.Apply glue to the formed corners.
- Roll the part into a cone and glue it to the cardboard, encircling the upper half of the mushroom leg on both sides.
- To make the white circles on the hat the same, you need a pattern. Make an even circle on the cardboard and cut it out. Make the rest of the circles using the resulting stencil. Glue the blanks to the hat.
- The mushroom is ready, it remains to complete the grass. To do this, take green paper, cut a wide strip from it, fold the part many times and make a curly cut on one side. Expand the workpiece, cut triangular blades of grass from the side of the curly cut, as in the figure.
Glue the grass to the bottom of the cardboard and peel it back slightly to create volume. The result is a beautiful three-dimensional picture.


Second option
This method is also not difficult.
- Let's start with the hat. Take a red sheet of paper, cut a 16x22 cm rectangle out of it.
- Fold the workpiece with an accordion, making bends in different directions (no more than 1 cm wide). Bend the accordion down the center.
- Take a white sheet of paper to make the leg. To make the part symmetrical, fold the sheet in half and draw half of the leg at the bend.
- Cut out the workpiece, unfold it.
- To make grass, cut a small rectangle piece from a green leaf. Cut one of the long sides into cloves.
- Now let's prepare the fly agaric "skirt": this way it will look more realistic. To do this, fold the small, narrow strip like an accordion.
- We will decorate the hat with circles. Cut them out of white paper.
- When all the details are ready, proceed with the collection of the applique. Place the mushroom leg on the black cardboard using glue.
- Glue the two parts of the cap into a single piece, glue the part to the leg.
- Fix the grass at the bottom of the applique.
- Place the white peas on the hat. A beautiful forest fly agaric is ready.


Other ideas for creating a mushroom for kids
We have prepared several more master classes with different application techniques.
Breakaway method
The meaning of the breakaway technique is to abandon the scissors: all the details are torn by hand.
- Draw the outline of the mushroom on a sheet of light green paper with a pencil.
- Start preparing the parts. Pull a piece of white paper into narrow strips. Now tear each strip into small pieces. Prepare the red paper parts in the same way.
- Form a leg. To do this, glue each white element with a brush and fix it to the leg, filling the drawing with details. Torn pieces can stick on top of each other, but there should be no green paper gaps.
- In the same way, proceed to filling the cap. Paste it from bottom to top with red pieces of paper. To make the mushroom look like an amanita, glue the white fragments on the cap in a chaotic manner.
- Craft the herb. Pull green tapered strips on one side. Glue them at the base of the mushroom stem, thin ends up, as the grass grows. The clipping picture is ready.


Quilling technique
Let's make an applique from several fly agarics and place it in a frame.
- First you need to prepare templates. To do this, draw three mushrooms of different sizes on a piece of cardboard. Cut them out: they will become templates and help in making the details for the applique.
- Place the blanks on white cardboard and circle them with a pencil. The resulting elements will become the basis of the mushrooms.
- Draw the bottom outline of the hats and the "skirt" as shown in the picture. Cut out the mushrooms.
- Cut hats out of cardboard templates. Along the contour, they should coincide with the final drawing.
- Attach the template hats to a sheet of red paper from the seamy side, circle and cut them out. It turned out the details of the caps of the fly agarics. Glue them to the mushroom blanks.
- Start making, using the quilling technique, white circles, typical of fly agaric hats. To do this, cut strips 5 mm thick and roll them up with tight spirals.The job is easier to do with a quilling tool, but if you don't have one, try winding the strips around a knitting needle.
- Remove the spirals carefully so as not to unwind, and stick them on the mushroom cap. Prepare all three mushrooms in the same way.
- Use a wide green strip to make grass. Draw zigzags in the center of the strip and cut them out, making two identical blanks. Place them on top of each other with the green side and shift the levels a little. The result is multi-tiered grass.
- Now glue all the resulting parts on yellow cardboard and frame them.
A beautiful work can decorate a room or become an original gift.


Simple application
A child of elementary grades can cope with such a simple job.
- Prepare blue cardboard as a base for the fly agaric.
- On a white piece of paper, draw the leg of the mushroom along with the "skirt". It should have an extension above and below. To make the part symmetrical, fold the sheet in half and draw half of the leg. Then cut and unfold the workpiece. You will get a slender balanced leg.
- Cut a bell-shaped hat out of red paper.
- Then prepare white circles of the same size.
- Glue the leg in the center of the blue cardboard. Decorate the fly agaric hat with white circles.
- The finished hat can be glued to the mushroom leg with glue, but if you use double-sided tape for this purpose, the drawing will get a pleasant volume.
- It's time to tackle the grass. Take a small rectangular piece of green paper. Make a large number of cuts on one of the long sides.
- From the inside, glue two pieces of double-sided tape and place the grass at the base of the leg with the notches facing up.
To liven up the applique and make it more colorful, make leaves from yellow and green paper, fill in the empty spaces of the cardboard with them, simulating leaf fall. The result is a beautiful colorful picture.


For information on how to make the "Fly agaric" application, see the next video.


