Applications "Autumn tree"

The craft "Autumn tree" is universal. It is suitable for kindergarten classes and can be brought to the school exhibition. It is based on the model of the tree, to which the crown is attached. The complexity of the execution directly depends on the age category of young masters.

How to make from paper?
Basically, the craft is done in the applique style. A dense background is required, usually cardboard or whatman paper, depending on the size of the tree. Further, the crown is attached to it, gluing with separate leaves. The result is a fairly voluminous picture.

To work you will need:
- light cardboard or whatman paper (background);
- colored paper (brown, orange, red, yellow);
- PVA glue or pencil;
- scissors.


First, a tree trunk is cut out of brown paper. If the work is for children aged 3-4 years, then you can make a rectangular or conical tree. The branches are made from thin strips of the same color, you can do without them. For older craftsmen, you can use a ready-made sketch to make the tree trunk more believable. Instead of paper, a tree can be drawn with a marker.

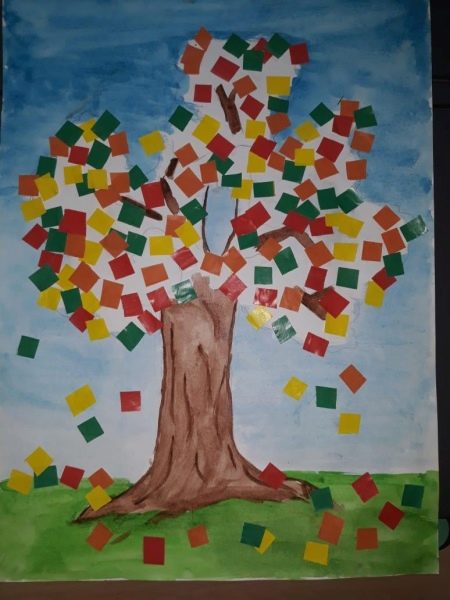
You can arrange a clearing near the tree; for this, stick a strip of light green or brown paper. And you can stick leaves on it, like a crown, depict leaf fall. Next, the crown is made. And here there are a lot of options that have varying degrees of complexity.

Cut out the leaves
Draw a leaf on paper and cut it out. They should be roughly the same size. You can use a ready-made stencil or draw schematically yourself. And to make the work go faster, fold the colored paper 3-4 times.

Geometric shapes can be used instead of leaves. For example, make a crown out of circles, triangles or squares.If a child is just learning to work with scissors, it is much easier for him to cut simple lines.

Additionally, the leaves can be wrinkled with your hands to give texture. At the same time, it is a great exercise for children's fingers. Crumpled paper crown looks more voluminous and more interesting.

Baby palms
Instead of leaves, you can outline a child's palm and cut it out. They look especially good on large crafts, for example, with a Whatman paper. This is a great teamwork option for a children's group or class. The leader creates a model - a tree, and the children outline their palms on colored paper and cut out. Then they are all glued to whatman paper in the area of the tree crown. If desired, each can be signed, and the work itself can be hung on the wall of the office.


Break applique
This type of applique is suitable for the little ones, the crown is created by tearing off colored paper and perfectly develops fine motor skills. For this, a sheet of colored paper is taken, a small piece comes off. It is smeared with glue, it is better to use a pencil, and sticks to the branches. Then the gaps between the branches are filled until the crown of the tree is formed from pieces. Any torn colored paper, leftovers and scraps are suitable for work.

Corrugated squares
For the leaves, colored squares of 3x3 cm are cut. Then they must be folded like an accordion, starting from the corner. The result is a corrugated, elongated leaf, closer to a diamond shape. It is more convenient to glue on PVA.

Rings
You can make a lush crown out of paper rings. For this, strips 1 cm thick are cut from colored paper. The length of the strips depends on the diameter of the future rings. You can make rings of the same or different sizes. Next, the edges of the strip are glued with the colored side outward to make a ring. Then they are glued to the branches and form a crown.

Spirals
The paper is also cut into strips. The thinner, the more beautiful and graceful the spirals. You can also focus on 1 cm of thickness. Next, the strips are wrapped around a round pencil or pen. The thinner they are, the narrower the spirals will be. You can experiment with the length of the strips, but it is important to remember that the spiral itself will look shorter due to the turns. Next, you need to stick one end of the strip on the crown, and leave the other hanging free.

Manufacturing from cotton pads
Instead of paper for the crown, cotton pads are used. Since they are white, they must first be painted in bright autumn colors and dried well.
To work you will need:
- thick light cardboard (background);
- brown colored paper or marker;
- PVA glue;
- cotton pads;
- watercolor or gouache;
- brush or pipette.


First you need to prepare cotton pads. To do this, they are painted with brushes and paints. Cotton wool perfectly absorbs moisture, so it is enough to drip colored water on them. Therefore, instead of brushes, you can use an eyedropper, and tint the water in advance, but so that the color is concentrated.
Leaves with stains look original. To do this, first, yellow paint is applied to the disc (1-2 drops), and then red is added. Beautiful streaks form along the borders of the drops.

Then the cotton pads must be dried well. Better to leave them on the table overnight. And in no case put it on the heater, as the device or the battery will also get stained.
Now you can start making wood. First, a tree trunk is cut out of brown paper and pasted onto the background. Then the leaves are glued.


More ideas
The "Autumn Tree" applique does not have to be made entirely of paper. The crown of a tree can be made from various materials at hand.
For babies, these ideas are unlikely to work, since they require more accuracy and more developed motor skills.
From dry leaves
For the crown, you can use real dry tree leaves. For this, the material is collected in advance and dried.To keep the leaves even, it is recommended to lay between the pages of a paper book. If left to dry simply, they may curl.

There are two options for working with dry leaves. In the first case, small leaves are glued to the tree branches and form a crown. The work is done in the same way as with paper. If it is difficult to work with overdried leaves, they break in the hands, you can use fresh, slightly dried leaves.
The second option is to use scrap. Lightly crush dry leaves so that they crumble into pieces, but do not turn into dust. Further, the cardboard, where the crown of the tree is planned, is greased with PVA glue, and scrap is poured on top. For convenience, the borders of the crown can be drawn with a simple pencil.

The crown can be made from other natural materials such as poplar or maple seeds. Or use dyed rice.
Made from dyed rice and pumpkin seeds
It is better to use acrylic paints, since they do not paint hands during work, like gouache. You can also use safer food colors.
The groats are easy to mow. Dry rice (any) is poured into a deep container, you do not need to rinse in advance. If it is a food coloring, then it is separately diluted in a small amount of water. Pour it into rice and mix thoroughly. Leave on for a short time to absorb the dye.

Then the baking sheet is covered with baking paper, rice is poured onto it. You can dry in the room naturally or use the oven (150-200 degrees). The rice is ready when it becomes crumbly.

If you use gouache or acrylic, then rice is poured into a packing bag (without holes), paint is added there, everything is thoroughly mixed. For 1 cup of rice, about 1 tsp. paint, you can slightly dilute it with water if the consistency is too thick. As soon as the cereal is well colored, pour it on a baking sheet in an even layer and leave to dry naturally.
Now you can start applying. Make a layout - a tree trunk on cardboard. Then mark the borders of the crown with a simple pencil. Lubricate the cardboard with plenty of PVA glue and pour out the rice, carefully distributing it. Wait until it is completely dry. After that, the shelf can be raised to brush off excess cereal.


Such a do-it-yourself craft is suitable for schoolchildren, for an exhibition on the theme of autumn from natural materials, if the gifts of the forest are not at hand.
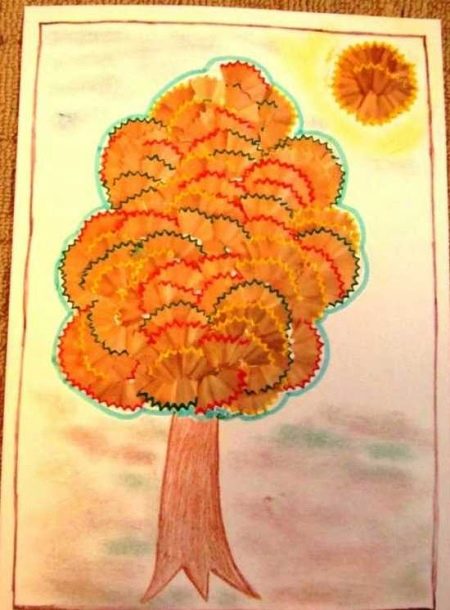
From pencil shavings
If there are a lot of blunt pencils in the house, there is a great opportunity to collect material for the craft. Sharpening should be done carefully so that the shavings from the pencils remain intact.
The layout of the tree is prepared in the same way. Then the shavings are glued to the cardboard with neat fans, rims up, starting from the far border. Put the shavings on top of each other to make a crown. It is better to use PVA as glue.

From threads
It is better to use yarn for appliqué, as it is thicker. Cut the threads into pieces of 1-2 cm. You can use a ruler: wind the yarn and cut along the edge with scissors.
The threads are glued to the crown like leaves. The work is quite painstaking. You can glue each thread or individual bundles. For convenience, apply the glue to cardboard. The work can be complicated by making pompons from threads. In this case, the crown is voluminous.
For manufacturing you need a fork. The yarn is tightly wound around the teeth, then tied tightly in the middle. Remove the resulting bow, cut the loops with scissors. Form a pompom.
The trunk of the tree can also be made from thread, but you will need brown yarn. Cut the thread strips into longer ones and glue them vertically, imitating the texture of a tree.
To make the crown of an autumn tree look bright, it is recommended to alternate the colors of the leaves. You can add some green blotches.

You can revive the picture with paper clouds, painted birds or other elements of the landscape.
How to make a volumetric applique "Autumn tree", you will learn from the video below.


