Application "Peacock" from leaves
The peacock is an adorable colorful bird. Better than nature itself, no one can create amazingly beautiful leaves, painted in autumn in bright colors. It seems that they themselves ask for an applique with a peacock - they are so amazingly accurate for creating its motley curly tail. In this article we will tell you how to make an applique with a peacock figurine using seeds and leaves of different plants.
For all types of applications described in the article, we need dry natural material. You will have to go to the park in autumn during the fall of the leaves and collect the most beautiful carved and variegated leaves. Then place them between the pages of thick magazines or old books, press down with something and wait until they are completely dry. The herbarium will be ready when the material becomes brittle.


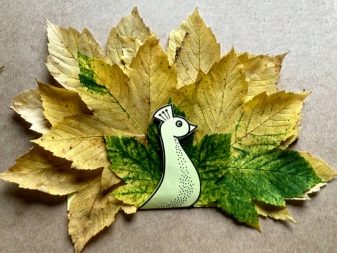

Maple leaf craft
The maple leaf has an unusually beautiful carved outline, it is already ready to represent the peacock's tail, you don't even need to do anything. We will only have to draw the rest of the bird's body on paper, they are drawn simply and within the power of children of any age. In addition to dry leaves, you will need to work:
-
colored paper in yellow and beige shades;
-
scissors;
-
glue;
-
black pen, pencil;
-
some ash seeds;
-
sheet of cardboard.

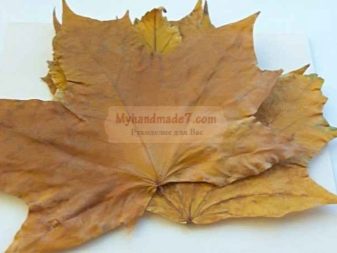
Choose whole, dried maple leaves of different sizes, and use scissors to cut the petioles from each of them.
On beige paper, draw a pear-shaped peacock - an oval body below, then a long neck and a small circle on top representing a head.
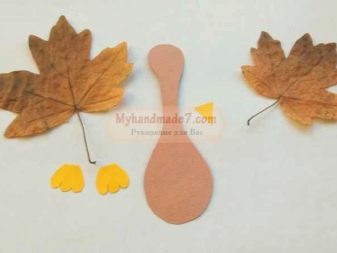
Prepare a tiny triangle beak out of yellow paper. Cut out two small legs as shown in the picture.
Glue the beak and legs to the peacock figure, draw two black dots-eyes above the nose.Make a pretty forelock out of ash seeds.

The peacock is ready, it remains to form its wonderful lush tail.
To do this, glue a few small leaves on the back of the bird's body. Add the material to them a little larger, then even larger. The last row will receive the largest maple leaves. All natural material is connected to each other and to paper using PVA glue.
Use a pencil to mark the grass on the bottom of the cardboard. Glue the finished figurine of a peacock with a voluminous tail above them. Glue the green ash seeds on the bottom along the markings - they will represent the grass cover. Here is such a wonderful peacock turned out from maple leaves.


Product made from birch sheets
We offer two step-by-step instructions for making a peacock applique with your own hands using birch and other types of leaves. Crafts are simple, can be used for preschool children. For work you will need:
-
dry leaves of birch, mountain ash, maple;
-
the basis of the applique is cardboard;
-
blue cardboard for poultry;
-
yellow paper;
-
pink and white plasticine;
-
glue, brush, scissors;
-
sunflower seed.

Option one
Glue 5 fan-shaped birch leaves in the center of the blue cardboard. Fill the empty middle with red rowan leaves, laying out and gluing them in the same fan-like manner.


Cut out the bird's body from blue cardboard, similar to a figured decanter - a wide oval below, a small head on a long neck on top.
Make a triangular beak out of yellow paper, glue the bird to the head, and draw two eyes for it.


Option two
Lay out the birch leaves in a semicircle, as in the first option, and glue them to the base cardboard. Use a bright red maple leaf instead of mountain ash material. Remove the petiole from it, but do not throw it away, but, on the contrary, prepare another one and set it aside for now. Glue the maple leaf over the yellow birch leaves so that they are not completely covered, but create a beautiful outer contour of the peacock's tail.

Now make a bird figurine from pink plasticine... To do this, knead the material well, roll a ball out of it and pull it into an oval. Flatten the workpiece with your fingers. In the upper part of the oval, make a kind of "constriction", that is, sculpt the neck of the bird. Make the head above the neck, and form the body of the peacock below.
From white plasticine, mark the eyes, and instead of the nose, stick a sunflower seed. Fix the bird on a maple leaf. Take the petioles and set them in place of the legs. Handsome peacock is ready.


More ideas
Thanks to the wide variety of colorful natural materials, applications "Peacock" on the theme "Autumn" can be done endlessly. We offer several more options for such crafts.
With lionfish seeds
A sitting peacock with a drooping tail can be made from lionfish seeds (maple, ash, or other plants). For the application, you need to prepare:
-
oblong dry leaves of plants;
-
lionfish seeds;
-
leaf stalks;
-
sequins or beads;
-
glue;
-
cardboard for the base.

Choose narrow and long leaves from the herbarium. On the cardboard, begin to form a bird figurine. In the center, glue a large sheet of ash - the body of a peacock. From the base of the leaf at an angle upward, fix a narrow acacia leaf - the neck. Find a tiny leaf in the herbarium, and attach it to the neck - the head.
Start working on the tail: it should look down at a 90 degree angle to the peacock's body. If the lionfish are double, cut them in half. While gluing the seeds, form a beautiful peacock tail step by step.


Draw a tiny eye on the bird's head with a felt-tip pen. Glue a tuft of leaf stalks on the top of the head, add a beak.
Attach two halves of the seeds in the form of wings to the side of the body. Form the legs from the petioles. They should stand on acacia leaves, which symbolize the grass under the bird's legs. Decorate the peacock's tail with sequins.The result is an unusual bird with a shiny tail, made of natural material.


With boiled leaves
To create a peacock with a beautiful transparent tail, you will need:
-
small and dim autumn leaves;
-
a sheet of thick cardboard;
-
black velvet cardboard;
-
white and black paper;
-
glue.


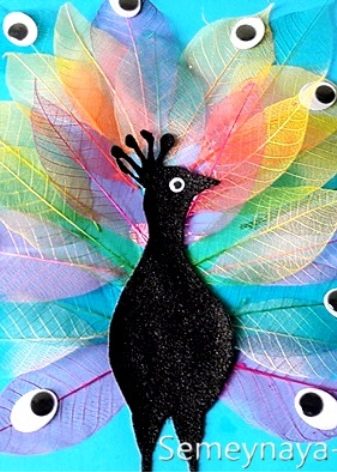
The bird's peculiarity lies in its transparent and at the same time bright tail. For it, you need to prepare the leaves with a special method, that is, to carry out skeletonization. There are different ways to make "skeletons" out of leaves.
1. First way
Place the leaves of the trees in a container, cover with warm water and close the lid. Within three weeks, the soft tissues will rot and decay. It is necessary to remove the material before the decomposition touches the hard veins, because it is for them that everything is started.
When the time comes, pour out the old water from the container and refill with clean water. Gently remove the softened tissue from the leaves, you can help yourself with a toothbrush. Be careful not to damage the veins. At the end of the work, remove the "skeletons" of the leaves from the container and put them under a press to dry.

2. Second way
With this method, you can quickly get the desired result, but you also have to work hard.
Dissolve 200 g of baking soda (not baking soda) in 600 ml of water. Place the leaves in this solution and place on the stove. Natural material must be cooked over low heat for an hour and a half. Then the soda solution is drained, pure water is added to the plants, and boiled for another 30 minutes.
The ability of soft tissues to peel off quickly is tested with a fork. Remove from the fire after full readiness. Carefully clean the veins and place them under pressure to dry.

Finished "skeletons", gently iron and paint with multi-colored gouache, watercolors or paint from spray cans.

When the leaves are dry, you can start making the peacock applique... To do this, collect the leaves in a fan and fix them on colored cardboard. Cut out small ovals from white paper and small circles from black. Glue the black piece onto the white piece. Make many of these blanks and decorate the outline of the peacock's tail with them.
Then, out of black velvet cardboard, cut out a bird figurine along with a forelock and beak. Cut and glue an eye out of white and black paper. It turns out an amazing peacock with a transparent bright tail.

With shavings from pencils
A fun way to make a peacock applique using not only leaves, but also shavings from pencils. Children like this idea, you can feel free to involve them in work. For crafts you will need:
-
a sheet of white cardboard for the base;
-
dry maple leaves;
-
colour pencils;
-
sharpener and shavings from colored pencils;
-
glue;
-
watercolor paints and brush.

Paint the cardboard blue, leaving a white space in the middle for the natural material to adhere better.
Take two beautiful maple leaves and fix them in the center of the base. The petioles should look like the legs of a peacock.


Use colored shavings lined with circles to decorate the corners of the baseboard.
Draw and cut out a bird with its head turned to the side. Color her head and beak, mark the eye with a pencil. Glue a tuft made from pencil shavings in a semicircle.


Starting from the bottom of the bird's body, glue the multi-colored shavings, filling all the space with it all the way to the head.
Place the finished figurine on maple leaves and fix it. The unusual peacock is ready.


The peacock is a majestic bird. If you connect imagination, the applications made with the child using autumn natural materials are beautiful and capacious. They can be offered at an exhibition, gifted to friends, or used to decorate their own room.
Application "Peacock" from the leaves in the video.


