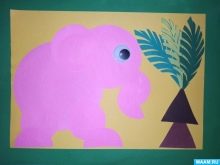
Making an application "Elephant"

Children are happy to make various crafts, because it is interesting and fun for them. In this article, we will look at how to make the "Elephant" applique in a simpler and more complex way.


A simple option for kids from colored paper
A flat figurine of an elephant made of colored paper will delight even kids. Working on such a craft will help develop not only the child's fine motor skills, but also creative abilities. In the process of creating an applique, he will acquire the skills of cutting and gluing parts from paper, as well as developing accuracy and perseverance.
To create a simple version of an elephant for the smallest, you will need the following materials and tools:
- colored paper;
- glue stick;
- scissors (it is better to take with rounded edges).


The algorithm for creating the "Elephant" applique includes several steps.
- You need to take a sheet of pink paper and make one big circle out of it. This will be the body of the future animal. Then make another circle, which will be about half the diameter. The second circle will be the elephant's head.
- Take another pink leaf and make some circles. Two of them will be used as legs, and two more as ears.
- We make two more circles, then we cut them into two parts. Two semicircles will be a continuation of the legs - feet. Two more semicircles are required to form the trunk.
- Next we take the green paper. You will need it to create a palm leaf. Additionally, you still need to make the trunk of a palm tree out of brown paper.
- Now you can go directly to the formation of the elephant - gluing all the details. First, we glue two circles in the center of the sheet - the body and the head. Then we glue the ear on the head, while it will go onto the body.Then we glue the legs - one circle and a semicircle for each of them. We form a proboscis from two semicircles. Now you need to make an eye: you can buy a ready-made one, or cut it yourself out of colored paper.
- Form the trunk of a palm tree from two triangles and glue the leaves.
A funny elephant looks beautiful near a palm tree.


How to make a volumetric applique?
The volumetric applique looks more impressive, so the kids are just delighted with it, while only some details can be volumetric. To create such an elephant, the following materials and tools should be prepared:
- colored paper (white, light green, pink and blue sheets);
- black marker or felt-tip pen;
- compass;
- scissors;
- glue stick.

You should follow a few steps to create a volumetric applique "Elephant".
- First you need to create circles of the same diameter. For our blanks, we will use circles with a diameter of 11 cm. It is enough to prepare only 4 circles. It will take two circles to create the ears.
- Make and cut two smaller circles from the pink leaf. Glue the pink circle onto the blue, thus forming the elephant's ears.
- The third blue circle will be used as the head. It needs to be glued over the already glued ears.
- The fourth circle will become the body of the animal. From the bottom, the circle needs to be trimmed slightly in a straight line.
- Now take a light green leaf, as it will be the basis for the future applique. It is enough to take half an A4 sheet.
- First, we glue the body of the animal on the sheet at the very bottom. Next, we glue the head with ears, while they will go beyond the base, which looks impressive and gives the craft volume.
- Then we move on to creating the peephole. Cut out two small circles on white paper and paint over them in the center with a black marker or felt-tip pen. Glue the finished eyes on the elephant's head.
- To make a proboscis, you need to cut a strip of blue paper measuring 29x3 cm. It needs to be folded like an accordion and glued to the head. Additionally, you can cut tusks out of white paper and also glue them near the trunk. Use a black marker to draw the animal's tail and legs.


More ideas
A wide range of interesting crafts for children is presented on the Internet. Among the applications "Elephant" we recommend paying attention to one more option.
Prepare the following materials and tools:
- gray paper;
- paper cups for baking muffins (2 pcs.);
- a sheet of colored cardboard;
- toy eyes;
- scissors;
- glue stick;
- simple pencil.


The applique creation process includes several stages.
- You need to draw the ears on gray paper. You can use ready-made templates. On the same sheet, 4 strips should be cut out, which will be the legs of the elephant, and another short one for the tail. To create a proboscis, it is better to draw an arc. We cut out all the details.
- Next, take two muffin tins. One mold should be smaller. Color them gray. Wait for them to dry.
- You can collect an elephant. On the cardboard base, glue the ears on the sides and in the center of a smaller cupcake mold - it will serve as a head. Next, glue a large cupcake mold onto a piece of cardboard. She will act as the body of an elephant.
- Now you need to glue the legs, tail and trunk.
Funny eyes will make the applique irresistible.


To learn how to make the "Elephant" applique with your own hands, see the next video.


