Application on the theme "Owl"

Making crafts and appliques with your own hands is one of the favorite activities of children. It not only brings pleasure, but also contributes to the development of the baby. You can acquaint your child with creativity with the help of applications on the "Owl" theme.


Simple option for toddlers
The creation of paper crafts will help develop hand motor skills and the imagination of babies. Despite the fact that special children's scissors are used in the work, one of the adults should help the child.
Flying owl
To create an applique, you will need scissors, double-sided colored paper, glue stick, cardboard or thick paper for sticking figures. We will prepare 4 templates of circles of different sizes in advance.
First we will make the body of the owl. To do this, transfer the outline of the largest circle to brown paper. Next, we will make the blanks for the wings, paws and ears. On paper of a darker color, outline the remaining templates 2 times each.


Cut out all the outlined circles along the contour. Glue the body of an owl onto cardboard or thick paper. It is advisable to take material in blue or purple colors, because owls fly at night. We fold two smaller paper circles in half and glue them to the body for the lower part with the fold upwards - these are the wings of an owl.
Fold the remaining cuttings in the same way. Large circles will go to the paws, smaller ones - to the ears. We turn the bent edges towards each other and glue the blanks at the bottom.


Now the owl needs to be supplemented with a beak and large round eyes. The application is ready.
It is permissible to use paper of any color you like. The cardboard for the base can be taken with a pattern of stars, or you can captivate children with creating a night sky.


Owl made of triangles
Another simple applique for babies. For work you will need scissors, colored paper, glue and cardboard for the base. The first step is to make blanks for the torso. These will be small elongated triangles of different colors.
For the beak and ears, you need large triangles. Cut out 2 large circles for the eyes. Pupils can be made out of paper or drawn with felt-tip pens.


You need to collect the craft from the bottom: glue 2 triangles. Next, layering, add one cut to each line. You should have a body of 5-6 layers. Above the body, glue two round blanks of eyes next to it. Between them is one of the wide triangles, a beak. The final step is to create the ears. Above the eyes, you need to glue two wide triangles, bases to each other.
Triangles for the torso can be made in different colors - the applique will turn out to be bright and will appeal to kids.


How to make a voluminous owl?
It will be interesting for children to make voluminous applications. It's a little more difficult than usual, but the kids will cope with the task. To make a voluminous owl on a branch, you will need scissors, colored paper, glue and cardboard for the base.
- For the silhouette of an owl, colored paper of the same color, but slightly different shades, is useful.
- For the wings, you need to cut 2 large blanks in the form of elongated drops.
- The body of the owl will be voluminous. From dark paper we cut out three rectangles about 10 cm long and 5 cm high, from light paper - 2 similar blanks and one 2-3 cm higher in height.
- The lower part of the rectangle must be made openwork so that when glued it looks like protruding feathers. The same should be done with all the blanks, except for the largest.
- The rest of the rectangle will go over the owl's head. Let's make the bottom edge openwork. Cut out a semicircle from the top. These will be a kind of ears.
- Now you need to make the eyes. Cut out two circles from light-colored paper and make their edges openwork.
- Cut out 3 small triangles from light brown paper. At the base of two of them we will make 3 identical cuts - the claws of the bird. The last piece will go to the beak. Cut out two circles from yellow paper, half the size of the eyes. They will go to the pupils.
- Now you can collect the owl. First, we glue the wings so that they are 1/3 under the body. You need to glue the blanks only for the upper parts. Next, you need to figure out where the claws will be and attach them to the upper corners. To make the composition more voluminous, you can round off the paws using the tip of the scissors, drawing them from the base to the tips of the claws.
- We collect the body, starting with a light openwork rectangle. It should cover the top of the claws. Glue the next rectangle, dark, so that it overlaps 1/2 of the previous one. You do not need to glue the openwork side so that the feathers are voluminous.
- Glue both eyes on the owl's head in the middle. Place the pupils on top. We attach a beak between the eyes.
- The branch on which the owl sits can be cut out of ordinary dark paper and glued under the paws.
The craft will require perseverance and accuracy, but the result is definitely worth it.


Natural material options
You can create a beautiful applique of an owl from leaves. You will get a beautiful autumn composition for a children's exhibition. The first step is to choose the best leaves for the applique. Cherry or maple are most suitable, they are soft and easily take the desired shape. The main thing is that the leaves are small, not withered, bright colors.
For the applique, you will need leaves, threads, cardboard, colored paper, glue or double-sided tape.
- You can glue the applique onto a cardboard base or cut out the silhouette of a bird in advance and work with it.
- Collect the owl from the bottom up. To do this, take 2 large sheets and fasten them together with glue. Next, glue the leaves to the cardboard base in layers, leaving 1/3 of the previous line visible.
- When the body is ready, attach 3 small leaves on top: two on the sides so that the edges stick out above the craft, and one in the middle.
- Cut out 2 round blanks from paper - these will be the eyes. It is better to glue them on double-sided tape. Pupils can be drawn with felt-tip pens or cut out of paper.
- If the leaves are attached to a cardboard base, then the craft can be considered finished. For an applique, glued on a pre-cut shape, you need to attach a thread at the back. This can be done using ordinary tape. You will get a cute hanging toy for children.


More ideas
There are several more popular options for creating an applique with an owl. The simplest of them is the breakaway one. Suitable for very young children. Another version of the composition is a wise owl, which will be a great addition to school holidays.
Broken owl on a branch
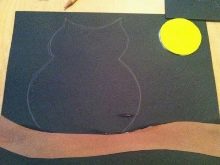
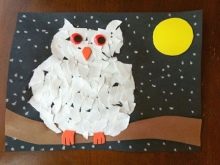
The main material of the craft is white paper, which needs to be torn into pieces. The smaller they are, the more fluffy the bird will be. On dark cardboard, glue a strip of brown paper - a tree branch. Let's draw the silhouette of the bird. Then everything is simple - within the boundaries of the contour, we arbitrarily glue the scraps, you can on top of each other. Cut out the eyes, beak and paws of the bird from colored paper. We glue them onto a cardboard base.
Children can diversify the composition by drawing on the base of the stars or gluing the moon.


Wise Owl
Such an application is suitable for schoolchildren who can make a composition for the holiday on September 1 with their own hands. The work is best done collectively, because it is voluminous and time-consuming. On whatman paper you need to draw a diagram of the future owl, cut out all the details along the contour.
Next, let's prepare brown, orange, yellow, blue and black colored paper. You can take several different shades of brown, then the feathers of the bird will be of different colors. Prepare semi-oval-shaped templates in advance so that the feathers are the same size. Let's outline them on a contour on colored paper.


Now you can start creating the wings. Glue the blanks of feathers in overlapping layers, starting from the bottom edge. We will make the body of an owl according to the same principle. It is important to remember that the wings are made on cut-out blanks, and the body is made on a blank sheet of Whatman paper. Attach the wings on top. This can be done with foam tape - the application will be voluminous.
The eyes, beak and paws of the owl are cut out of paper according to the blanks. We attach them to the applique with glue or foam tape. One of the main attributes of a smart owl is a hat. It is easy to cut out of blue paper. The applique can be supplemented with drawings or paper letters.
Creation of compositions from early childhood teaches kids to distinguish colors, shapes and materials. Applications contribute to the development of creative thinking, hand motor skills, imagination. In this form, children learn about the world and get an interesting pastime.


To learn how to make the "Owl and Owlet" applique with your own hands, see the next video.


