Variety of applications on the theme "Autumn"

Children are very fond of making a variety of crafts. This lesson is only for their benefit, because it helps to develop fine motor skills and imagination, which is very important for the formation of a child. In this article, we will consider master classes on creating a variety of autumn crafts from colored paper and natural materials.

How to make from colored paper?
There are many options for creating do-it-yourself applications on the theme of "Golden Autumn" from colored paper. Not only babies aged 4, 5 or 6 years old will be able to cope with such crafts, but also children in a nursery who are no more than 3 years old.
So, you can make a clipping picture in the form of a maple leaf. This will require a template in the form of a leaf, cardboard, PVA glue, a simple pencil and colored paper.


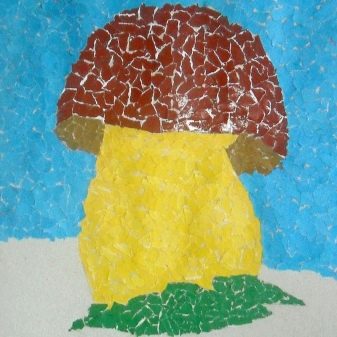
The workflow is pretty straightforward. To begin with, you need to grind colored paper, simply tearing it into small pieces - in this, children are unlikely to need help. Next, you need to trace the maple leaf template on the cardboard using a simple pencil. The most time-consuming stage remains - filling the empty area inside the outlined sheet with torn paper. In this, children, in particular small ones, may need help, otherwise they may accidentally fill the craft with glue.


We fasten the scraps, filling in the area of the leaf. At the same time, it is advisable to use multi-colored pieces to make the craft more beautiful. The cut-off applique is ready!


According to this principle, in general, you can make almost any craft, for example: in the form of a fungus, a still life, a vase of flowers, or even a whole landscape with lush yellowed trees or a flower meadow.
However, the more difficult the job, the more perseverance and patience it will require.Subsequently, such a craft can be attributed to an exhibition in a school or kindergarten.


Crafting from natural materials
Hedgehog
Older children (aged 6–7 years) will be able to make a beautiful autumn craft from natural materials. So, armed with colored pencils, autumn leaves and, if desired, plasticine, you can make a cute hedgehog.

We act as follows. First, draw a hedgehog. There is no need to draw out the details - just the silhouette of the animal will be enough. After that, we start creating the muzzle. If you wish, you can mold it from plasticine, but if you do not have the desire to bother, then the face can be drawn with felt-tip pens or colored pencils.

Having finished with this part, we move on to working with natural material. It must be prepared in advance. First of all, autumn leaves need to be washed well, while removing dust and dirt. Then we send them for drying. To do this, you can use an iron or simply put the leaves in a thick book. The first option, of course, will save you a huge amount of time.
We glue the leaves, forming hedgehog thorns with their help. We try to choose the most beautiful specimens. Moreover, you need to work with them more carefully, because dry natural material is usually very brittle. At this stage, the process of creating the craft is completed, however, if you wish, you can diversify your applique by adding elements such as mushrooms, apples, sun or clouds.


Autumn morning
Another option for creating an applique from natural material is a landscape in which there may be a grove of slender birches or even a whole forest. The main thing here is to turn on the imagination.
For work, you need cardboard, pre-prepared natural material, glue, brushes and watercolors.

To begin with, we mark the base on cardboard, using watercolor for this. We draw the sky, meadow and other elements that match your idea. After that, we are waiting for the work to be completely dry.
Next, we turn to the elements from natural material, usually leaves are taken for this. It is not necessary to cut their stalk: the leaves themselves will act as trees on the applique, and their "legs" can serve as trunks. We glue the leaves, choosing the best and most beautiful among them.
The craft is ready!


Parrot
It will be possible to make a parrot from natural material. Such crafts look very interesting, because with the help of ordinary autumn leaves you can create a very unusual and vivid image of this exotic bird.
Work on the applique begins with the preparation of the material you need, and this is a simple pencil, autumn leaves, which must be washed and dried in advance in a book or under an iron, as well as glue and cardboard.

First you need to draw a silhouette of the future parrot. It can be absolutely anything: a bird can be portrayed both in flight and sitting calmly on a branch - it all depends on your imagination.
Next, we select the leaves that are most suitable in shape and color and lay them out in the desired sequence in order to estimate their location. Only after that you can start gluing them to the picture. Upon completion of the work, the applique can be diversified with various elements like painted twigs and more.

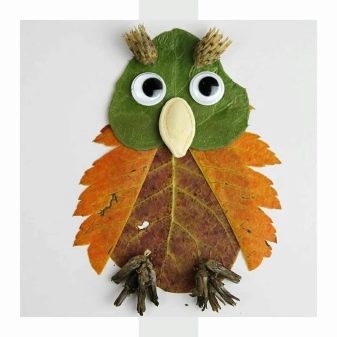
Thus, by the way, you can make not only an exotic parrot, but also other birds, for example: a formidable and gloomy owl, a peacock with a gorgeous and beautiful tail or little chicks sitting on a branch - you just need to turn on your imagination.


Portrait
Portraits made using natural materials look very unusual and beautiful. Such applications, for all their complexity, are quite simple to perform. Moreover, in the craft, you can embody anyone's image, for example: your beloved mother, grandmother, your own, a book princess, or just a beauty taken from the head. It all depends on your wishes.
For work, you need to prepare natural material, and you can use not only dried autumn leaves, but also flowers, spikelets and all kinds of twigs. You will also need a pencil, felt-tip pens, a cardboard base, and glue.

We will start with drawing a portrait. Here, unlike the rest of the aforementioned crafts, you need to pay attention to the drawing of details so that the image is more recognizable and vivid. To do this, you can add a freckle or a mole to the portrait, if any of the person you have conceived. Using felt-tip pens, paint individual elements of the composition, in particular: eyes, lips, parts of clothing. But the hair area should not be touched - it is enough just to outline them: we will make them using natural materials. When finished with drawing, lay out the autumn leaves and flowers in the sequence you need. Make sure that they are in harmony with each other.

Separately, we note that you should not use too much natural material, otherwise the craft may look too cumbersome as a result.
At this stage, the work can be considered completed. It is quite possible to present such an application as a gift, but for this you must not forget to add a small holiday congratulation to it.

Applique from improvised means
Autumn applications can be made from any available means - you just need to turn on your imagination and let your imagination run wild.
So, from the seeds of a watermelon or pumpkin, you can make a voluminous owl sitting on a branch, or a hedgehog carrying apples or fungi to his home on his thorns. Note that before using the seeds, they must first be thoroughly washed, dried and, if necessary, painted in the desired color, which can be done using ordinary gouache paint.
In a similar way, you can make a panel, which, as a result, will be able to decorate your apartment.


It will be a little more difficult to make a voluminous autumn application of salt dough. This lesson requires a lot of time, however, the process itself, as a rule, is very exciting for children, and the result, as a result, makes them happy. The dough for such crafts is prepared from a glass of salt, water and flour, after which it must be kneaded, adding additional flour or water if necessary. Next, you need to place it in the refrigerator for a couple of hours. After the required time has elapsed, you should mold details that will help to realize your idea. Next, they need to be placed in an oven preheated to 130 degrees for half an hour and painted with gouache or acrylic paint. Glue all parts to the cardboard backing with a hot glue gun.
If desired, the craft can be varnished and placed in a frame, which will add beauty to it. Ready!

For information on how to make panels from natural materials, see the video below.


