How to make a "marble" manicure with gel polish?
"Marble" manicure is a rather fashionable and at the same time simple design that even a beginner nail art master can do. In our article, we will tell you about the features of this technique, find out what tools you may need in your work and how to draw an imitation of a natural stone on your nails.


Peculiarities
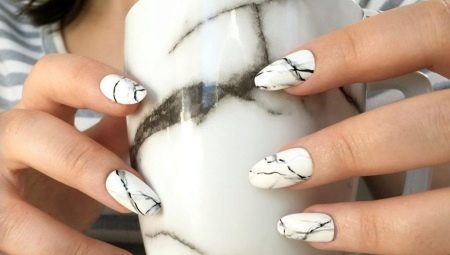
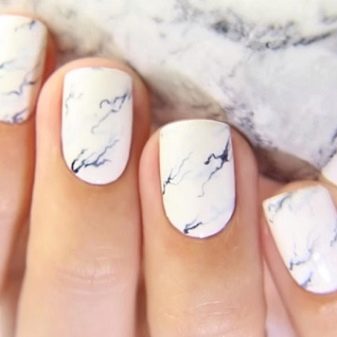
"Marble" manicure is represented by streaks of thin lines of several shades, smoothly replacing each other. The beauty of such a manicure is that it is almost impossible to get the same design, so your nails will always be individual. The classic version is a white background and gray-black veins.
But many masters do not limit themselves to these colors, but recreate on the nails an imitation of turquoise, quartz, malachite and other natural minerals with a similar pattern. All of these options are also referred to as "marble" design.

What do you need?
To create a "marble" manicure, you will need a standard set of materials and tools.
- Degreaser - This is a special liquid that allows you to remove excess sebum that has fallen on the nail plate. Many replace this tool with 90% alcohol to reduce the cost of manicure.
- Primer - the so-called primer, which prepares the nail for the application of gel polish.
- Base - this tool helps not only to align the nail plate before applying a colored coating, but also strengthens it, and prevents the transfer of pigment to the nail.


- A set of color-matched gel polishes - the choice of colors can be absolutely any, as well as their hiding power.It all depends on what effect you want to get. So, with the help of translucent jelly varnishes, you can get, for example, an imitation of quartz with visible veins in the thickness. Gold and silver stripes can be used to draw sparkling mica, etc.
- The finish - this tool will allow you to fix the manicure so that it delights you with its original appearance for a long time. Here you can choose the top with or without a sticky layer.


- Lint-free wipes - they will help to use a degreaser, while they will not leave unnecessary hairs and lint on the nails, as ordinary cotton pads do.
- A thin brush to reproduce the picture. Sometimes dots (metal sticks with a small ball at the end) or simple toothpicks are used for drawing.
- Orange stick - a tool that will help you remove excess gel polish from the cuticle.
You may also need a piece of plastic wrap, a bowl of water, regular nail polish, and Skin Defender (a rubber-based product that protects the skin around your nail from staining).

How to draw?
There are several types of techniques with which you can make a "marble" gel polish manicure. Let's take a step-by-step look at how you can depict marble on your nails.
Water way
This is a fairly simple option with several steps.
- First, do a manicure, carefully remove the cuticles and pterygium.
- Degrease the nail plate.
- Apply primer and base coat. Do not forget to cover the end of the nail, then your manicure will last for a long time and you will avoid detachments. Dry in the lamp.
- Apply the base color coat all over the nail. Dry again. If your color gel polish requires multiple coats, polish to perfection.
- Next, you need to remove the sticky layer from the colored coating and apply Skin Defender to the skin around the nail.

- Pour clean water into a bowl. Its temperature should be around 25 degrees. Place the colors of your regular nail polish in the liquid that you intend to apply the streaks. Use a toothpick or orange stick to create a marbled pattern in a bowl.
- Alternately lower your fingers into the water so that the nail plate lies horizontally on the drawing. In this case, with an orange stick, without removing your finger from the liquid, remove the excess varnish.
- Using tweezers or an orange stick, gently peel off the pattern on the nail and on the skin around it.
- Remove the Skin Defender layer. Remove excess nail polish from your fingers with nail polish remover.
- Leave the drawing to dry completely for 5-10 minutes.
- Decorate your nails with a top coat, not forgetting about the ends. Dry in the lamp.


With plastic wrap
This method will also not cause problems with the reproduction of veins.
- First, we repeat step by step from the first to the fifth points from the previous method.
- Then we take a colored gel polish and put the drops in a chaotic manner. For example, let's use white and black.
- We crush a piece of polyethylene and press the drops so that they spread over the entire nail plate.
- We remove the film, remove the protective coating from the skin. We dry the shellac.
- Apply the finishing layer.
Another way that polyethylene can be used is by drawing a pattern onto a film. For this, drops of gel polish are applied not to the nail, but to polyethylene. They are mixed with a sewing needle or a toothpick so that the pattern resembles the veins of marble. Then, using a brush dipped in a degreaser, the stains are transferred to the nail plate. Then the drawing is dried and fixed with a top.

Drawing veins with a brush
This is the most time consuming way but the manicure is more accurate and realistic.
- Initially, it is also necessary to repeat the first four points, which are described in the water method of applying "marble" manicure.
- At the next stage, we apply a layer of top to the nail, do not dry it. You can also use a spreading base.
- Next, you need to mix the so-called tone of nylon tights on the palette.To do this, add a drop of topcoat to the gel polish, which you will use to reproduce the veins. We also put a drop of the brightest shellac on the palette.
- Now, with the help of a brush, it is necessary to apply the "marble" pattern to the nails.


If you have a poor idea of the location of veins on a natural stone, it is recommended to use a photo of a natural mineral prepared in advance. This will make it easier to apply the design.
- First, using a translucent tone, apply an underpainting - light, thicker lines. We apply them with a thin brush, the so-called trembling hand. If you want to keep the nail art in the color of the backing, then you can get by with just a few lines. If you want the manicure to be closer to the color of the veins, then apply the pattern on most of the nail.
- Then we draw with undiluted gel polish. There shouldn't be too much of it. She only creates accents. At the same stage, you can add thin gold or silver lines that recreate veins of mica in the thickness of the stone. We dry everything well in the lamp.
- At the end of the work, we decorate the nails with a topcoat, sealing the butt, and dry again.
- If the top has a sticky layer, remove it with a degreaser.

Possible mistakes
Sometimes a "marble" manicure may not work. And each method has its own reasons.
- In water technology, this is most often associated with an unsuitable water temperature. If you took the liquid too hot, or, conversely, too cold, then you may not be able to mix varnishes into the desired pattern. The water temperature should be at room temperature. Another reason for the impossibility of drawing a pattern on the nails with a bowl of water is the too thick consistency of the varnishes. Such products do not spread well in the liquid; it is simply impossible to collect them in any pattern. Also varnishes from different companies can "conflict" with each other, so you should choose coatings from the same manufacturer and from the same series.
- When applying a "marble" pattern using a film, the ornament may not work due to too much pressure on the polyethylene. Or if the gel polish turns out to be too liquid.

- When applying the "marble" mesh to the nail with a brush, you can also face difficulties. Do not choose a top coat that is too thick. It will be quite difficult to draw lines along it. But a too liquid substrate is unlikely to work, since during operation it can leak under the cuticle and spoil the final result, as well as reduce the durability of the manicure.
Also, do not experiment with gel varnishes from different manufacturers, since the compositions of such products may not be combined, and the coating will “curl up” on the nails.
Beautiful examples
A manicure with a "marble" effect always looks stylish and suits both a business style and an evening dress. The main thing is to choose the right combination of shades. Here are some examples of how you can decorate your nails beautifully using this technique.
- White "marble" on all fingers. The classic version. Suitable for business women. This design works equally well on both short and long nails.
- Classic "marble" nails on a pair of fingers can soothe an overly flashy manicure with a lot of rhinestones, broths and glitter.

- On long nails, you can combine dark and light imitation of marble, dividing them with a rhinestone path. The result is a chic, highly sophisticated evening manicure.
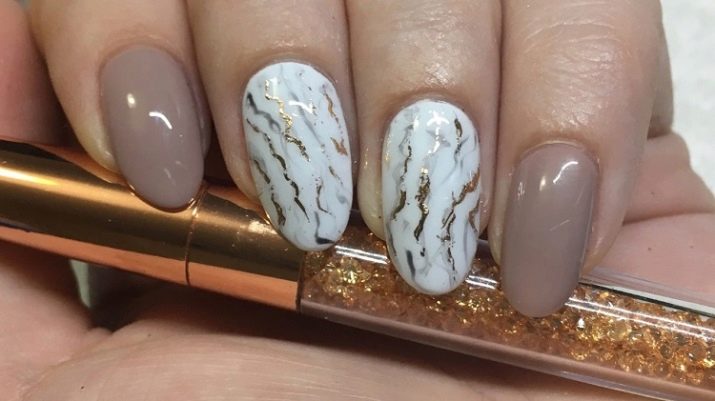
- Delicate manicure in nude shades can also be diluted with white "marble" nails, and small silvery veins will add grace to your fingers. This option is perfect for everyday wear.


- Gold streaks on black marble are already a manicure for relaxing in a nightclub or at a party.
- "Marble" manicure looks good with bright fuchsia nails. Only in the veins of the pattern on the imitation of the stone, you need to add a little bright pink tint.


- Turquoise on the nails also looks pretty sophisticated.For the evening version, you can add a little glitter with a transfer foil.
- Malachite manicure combined with gold designs will also be a great option for the evening.


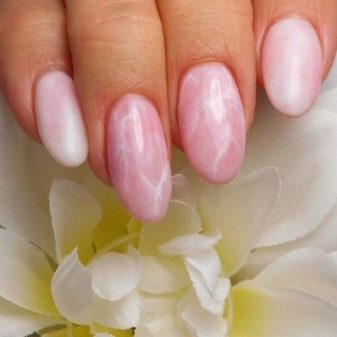
- For lovers of pink marigolds, you can choose light quartz. Delicate manicure for daily wear.
- Quartz can also be used in wedding manicure designs.

- Nails decorated using the "marble" technique can be quite bright, the main thing is to choose the right colors. For example, yellow nails with brown streaks are perfect for lovers of casual clothing.
- An excellent summer option for a seaside holiday can be a "marble" pattern on the nails in orange tones.
- White marble stains look quite interesting on nails with glitter. They ennoble manicure, removing excess shine, while maintaining tenderness.


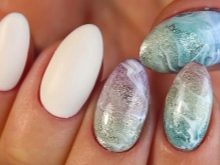
- The sky on the nails, made in the "marble" technique, also looks very feminine and cute. To some, such a manicure may resemble sea foam. A great option for the summer.
- Red and black are timeless classics. "Marble" manicure can be performed in this color scheme. Suitable for very confident ladies.


To learn how to create the effect of natural stones with gel polish, see the next video.


