How to seal the end of the nail with gel polish?
Coating nails with gel polish, performed without breaking technology, can delight you from 2 to 3 weeks, until the nails grow back and the time comes for their renewal. Failure to comply with the technology, accordingly, shortens the period of wearing a manicure to several days. Both a nail service specialist and someone who independently, at home, is engaged in staining nails at home, you need to know all the intricacies of the procedure, otherwise the result will bring a feeling of disappointment. Correctly sealing the end (arch) of the nail with gel polish is one of the moments leading to long-term wearing of the varnish coating.

What it is?
The end is a cut of the free edge of the nail plate. Due to the fact that more than one layer of manicure is applied, the unsealed arch simply makes all layers of gel polish available. Unclosed gel layers are much easier to chip off than protected ones. Arch sealing is the painting of the free end of the nail from 2 sides, first with a base, then with gel polish, and at the end with a finish. In other words, this is not one final process, but a set of operations at each stage.
When viewed from an aesthetic point of view, an unpainted cut looks extremely unsightly and strikes the eye. The advantage of sealing the arch of the nail plates is the disappearance of the yellowish tint, the plates are less exfoliated, and chips appear less often on them. Healthy nails allow for more frequent manicure, in contrast to those that have already undergone stages of exfoliation and become weak.


How to properly seal an arch?
Let's consider the sealing technique step by step, since the process itself consists of a number of important stages.
Preparing hands
No matter how trivial it may sound, but before starting the procedure, you need to prepare your hands: wash them thoroughly, make a bath, or apply a nourishing mask, soak in oil. If you intend to make changes to the geometry of the nail plate, then do this even before coating with gel polish.


Remember that under no circumstances should you apply varnish immediately after completing water activities. Nails soften, acquire porosity, and are unable to keep the gel tight to the surface. Wait at least thirty minutes. During this period of time, you can move and cut the cuticle or give the nails the desired configuration.
Nail plate processing
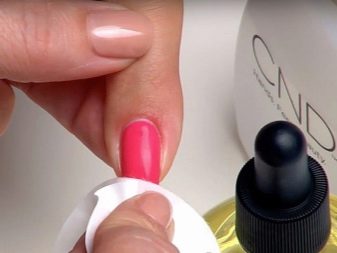
Before applying the gel polish, it is not necessary to file your nails with a buff. This must be done only if the marigolds are too stratified. In other situations, file with a soft file and cover with a degreaser. A lint-free cloth is preferred for sanding. Pay close attention to the edge of the nail, as it is where the gel begins to peel off. You can no longer touch the plates of nails treated with a buff with your hands. At the end of this stage, the nails are treated with a degreaser.


Using a primer
To prevent brittle and brittle nails, you can apply a primer (primer) to them. The product dries instantly, and guarantees the best adhesion of the following layers to the nail plate.
The primer allows you to degrease, dry and disinfect the nail plate. It is allowed to practice both acid-free and acidic substances based on the type of plate.


Apply the primer carefully so that it does not under any circumstances end up on the cuticle and skin around the nail.
Base for gel polish
Upon completion of all the above activities, it is necessary to start applying the base. This colorless, viscous substance not only makes the coating more durable, but also protects the nails from weakening and yellowing. Choose a base with biologically active substances included in the composition or with caring ingredients.
The base thickness should be as small as possible. It is necessary to dry the base in a specialized lamp. The sticky layer is certainly removed. The base counteracts the invasion of the colored enzyme into the nail plate. It is best to try to insert the base coat slightly under the protruding edge of the nail. When the nails are cut too short, and their size is not enough to seal, it means that you either need to grow nails or simply do not rely on the impeccable quality of the manicure.


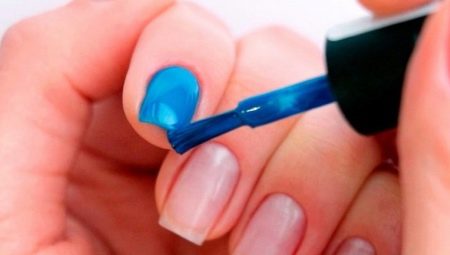
Sealing the end with gel varnish
This procedure includes the following steps.
- Apply a thin layer of base coat.
- Take a brush and dip it into a regular gel. Remove excess liquid and gently smear the edge of the nail plate, holding the brush in a perpendicular position, with a bun of hair to the tip of the finger. This will make it possible to prevent the manicure from peeling off the nail plate.
- Dry the base coat in an LED or UF lamp for 2 minutes.
- Apply a coat of gel polish. If the liquid is thick, then one layer is enough, if the thickness is not enough, more coatings will be needed. Dry each one in a lamp.
- Apply the top and pat dry.
- Remove the sticky layer with a lint-free cloth.


Finishing gel
After finishing applying and drying the gel polish, you should cover your nails with a finishing agent. The finish layer should be slightly higher than the base coat thickness. The gloss of the nails directly depends on the quality of drying the finish. Nail specialists say that it is better to have it overdried than underdried. When the coating is not completely dry, then, together with the removal of the remaining gel, the gloss will disappear.

Subtleties of care
After the nails have acquired an excellent shape and graceful appearance, it is very important to take care of them, so that delamination does not happen. For this, you need to adhere to several recommendations.
- You should limit the use of hot water during the first day after the completion of the procedure. You should also not visit the beach or solarium.
- It is forbidden to file the nail plates. If there are any unpredictable factors, it is necessary to completely remove the gel coating and perform all operations again.
- It is required to use gloves in case of interaction with detergents, soil, chemical fertilizers. This will eliminate the contamination of the nail plates, in addition, will protect the sensitive skin of the hands.
- It is recommended that you choose a time when you should walk without a varnish. It will be useful to rub in oils, paraffin baths. With the help of this, the nail plates will be made strong, and then nothing will remind them of their fragility and delamination.


Helpful hints
Let's dwell on some of the tips given by nail service professionals.
- Thoroughly wipe the brush and paint over the arch without pressing, so as not to rack your brains, causing the varnish to drip onto the inner side of the nail or float upward in an unsightly "roller".
- Hold the brush only perpendicular to the nail plate, and make the sealing movement from the left side to the right or from the right side to the left, but not from bottom to top or from top to bottom.
- Liquid tape should be applied to keep the nail polish from getting into the skin.


In conclusion, it can be noted that if you strictly adhere to the technology, understand how to seal the end of the nail plate with gel varnish, and prevent the coating from wearing out as a result of mechanical stress, then it will delight you for a long time.
For information on how to seal the end of the nail with gel polish, see the next video.


