How to make a guitar?
Making guitars is a whole branch of music. There is nothing for a beginner to do here, but those who have experience in assembling guitars can try their hand at making an instrument on their own at home.
What can be done
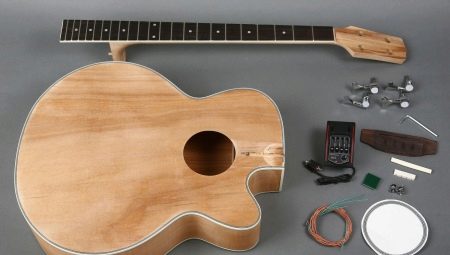
The simplest guitar with your own hands can be made from improvised means. The musical instrument has a simple device of two parts: a body and a neck. The first is made of various materials, it can be wood, metal or plastic.
Not every type of wood is suitable for a homemade guitar. Different types of wood are used to create the top and bottom soundboards. The upper part is preferably made of spruce or cedar. The body, made entirely of spruce, emits a resonant sound, and in combination with the cedar, the instrument begins to sound in a special way. This material is expensive. Simpler models are made from pine.

The lower part is made of maple, mahogany and rosewood. In order to learn how to assemble, you can try to make a tool from available tools, for example, from plywood. It should be considered as a preparatory stage for creating a guitar from more expensive materials.

Metal guitars can be considered exotic as they sound very strange.

The body made of carbon (or carbon fiber) is more durable and resistant to deformation. Such a tool is almost eternal. It has a cleaner sound.

An important part of the instrument is the neck. Hardwoods are suitable for its manufacture, for example, rosewood, ebony.

Advanced craftsmen may be advised to make carvings or inlays on the instrument. The neck is often engraved to preserve the rest of the body and tone. Inlay can be done on any part of the guitar: both on the neck and on the body.

Instruments
Before starting assembly, you need to prepare tools and consumables. Here's a rough list:
- wood of different species;
- glue for woodwork;
- sealant;
- sandpaper;
- drill;
- cutter;
- clamps;
- varnish for surface treatment.
Additionally, drawings are required to indicate the markup.


Dimensional Drawings
Do not complicate your work by developing a drawing yourself. On the internet, there are suitable schematics for a wide variety of types of guitars with different deck sizes (classic, mini, etc.). You just need to have an Internet connection and a printer to make printouts of the selected patterns. In addition, there are thematic books with a variety of diagrams and drawings.
As a last resort, you can simply take a suitable guitar and circle its body.

How to make a fretboard
The fretboard can be ordered ready-made, or you can make it yourself at home. This is a painstaking stage of work, so it is worth talking about it separately.
When making a neck, you need to take into account that the thinner it is, the lower the sound, and vice versa.
The thin neck will have to be additionally reinforced with carbon inserts.
To create the body of the neck, you should take a block of ash or maple with dimensions of 70x10x2 cm (respectively, length, width, thickness). For the overlay, you can take a rosewood blank with dimensions of 50x60x7 cm.

The workpiece must be smooth and perfectly flat.

Using self-tapping screws, the fingerboard and headstock samples are fixed.

Anchor creation
The most common anchor designs are compression anchor and double anchor. It is worth giving preference to the double version, because it is stronger than the classic one, it has the ability to bend from itself. A straight groove is milled under it. There are double acting anchors that can bend the bar in opposite directions.

Fixing the overlay
The first thing to do is to firmly fix the fretboard to the neck so that there are no gaps and crevices. Apply glue with a brush, make a screed with clamps, starting at the edges and moving gradually from the head to the heel of the bar.
It is very important to ensure that there are no gaps.
In this state, the structure is left overnight. And in the morning, you can already remove the clamps and milling the lining.
Aligns the bar to the edges at the heel.


The next important step is marking the fretboard. It is convenient to use steel templates with a thickness of 2 mm. The template is fixed on the fretboard and lines are drawn with a simple clerical knife through the slots. This is repeated at the same place several times. Next, shift the template to the side by half a centimeter and repeat the same steps.
After creating the cuts, inlay is made by gluing the "points" into the previously made holes of small depth.


An important step is the neck profile. First, remove the excess wood from the back, starting from the 1st fret and ending with 14 or 15. The thickness is 2 and 2.5 cm, respectively. And the rest of the section is cut off. At the end of the processing, grinding is carried out with a bar.


Manufacturing steps for other parts
Before assembling a guitar yourself, you need to carefully study the structure of this instrument.
To create a guitar at home, you need to draw up a step-by-step action plan. It looks something like this:
- choose the type of guitar;
- make a drawing;
- transfer the drawing to the selected material;
- choose technology;
- find a room, prepare tools.
In technology, it is especially important to think over how the parts will be bent. This is a serious moment. An electric heater will help with this.
Requirements for the premises:
- warm comfortable temperature;
- adequate lighting and ventilation;
- low humidity.

Choosing a board to create a body
Regardless of the type of wood chosen, there are general requirements for the board:
- lack of knots;
- strictly straight arrangement of fibers without sharp bends.


Instruments
A list of all the necessary tools is presented at the very beginning. It is worth adding here that it is preferable to have a manual and electric jigsaw. A mains-powered tool is useful for cutting out parts, and for more delicate work, you should use a manual one.


How to create a guitar step by step
Stage 1
The boards are ready, the drawings are printed, the type of guitar is selected. You can start creating patterns. First, they begin to assemble the body of the bottom deck by adjusting two boards. This can be done in one of two ways.
- The pieces are clamped into clamps. The surfaces are sanded and glued.
- The pieces are clamped in the form of a shield, processing the joint with a milling machine. After that, you just need to assemble.
After assembling the body, along the predetermined boundaries, the workpiece is cut out with an electric jigsaw.


Stage 2
The lower part of the guitar is assembled. Now you need to fix the springs and footer on it. The latter is placed strictly in accordance with the center line, without deviating either to the right or to the left.... Three springs are placed at a 90 degree angle to the footer.


It is preferable to use a solid board for making the top deck. Some professionals prefer the same creation method as the bottom of the tool.
The advantage of a one-piece web: when the strings are under tension at the top, the seam is likely to burst.
Next, outline the location of the outlet. The center should be located at the narrowest point of the instrument. This is where a special hole will be located. The spring is fastened from the inside of the deck.


Stage 3
The most difficult of all elements are the shells.
Problems with cutting and cutting should not arise, it is quite easy to do this, but difficulties arise with bending and shaping. For this reason, the workpiece is thoroughly moistened with warm water and placed in a warm place for a quarter of an hour. Next, the part is heated to a temperature slightly exceeding +100 degrees. The material is now more pliable and can be curved. The workpiece is allowed to cool to fix the shape.

Vulture
Glue the handle and heel of the bar together. The most important requirement for a connection is strength. At this stage, it is not necessary to make a groove in the body. This is done later in the general assembly of all parts of the tool.
The head should be decided in advance. Its location can be either strictly vertical or tilted. The second option is easier to manufacture. The oblique angle is no more than 17 degrees. The vertically positioned head is made together with a handle from the same wood species.
There are two options for tilting modification: make a neck from one piece as a solid piece or assemble it from a couple of elements.


Kernel
The rod is glued into the neck to give the instrument a bend, to strengthen the entire structure. You can glue the neck in one of two ways:
- at the top of the case under the cover;
- on the reverse side, covering with a plate as a decoration.

Stage 4
After cutting, grinding, completing all the necessary parts, they begin to assemble.
The best glue is casein or fish glue.


Sequence of work.
- The shells are glued together, thus forming one piece, and the element is placed on the bottom deck. Top deck is fixed with glue. The resulting guitar is thoroughly dried. Before that, it must be compressed properly.

- They outline and cut out a recess for the neck, glue it in.


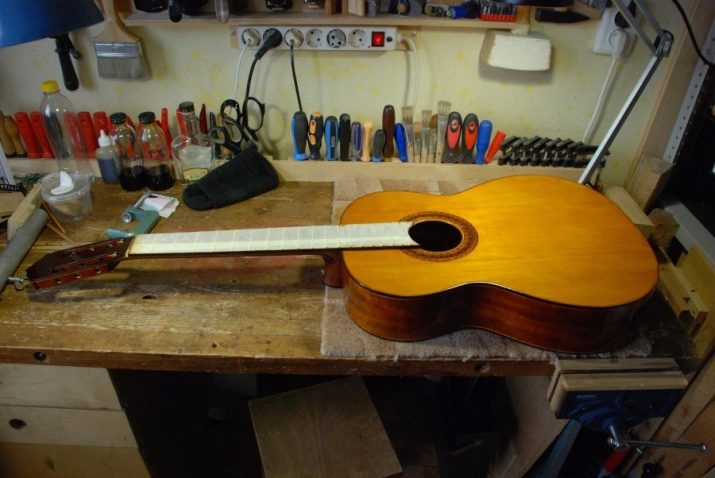
- Cover the surface of the case with the selected varnish, make inlay, pull the strings. The guitar stand can be glued in before or after assembling the instrument.


To assemble a guitar yourself, you need to stock up on time and patience. This is a difficult event that will take more than one day, especially for those who do not have sufficient experience in creating musical instruments. It is important to thoroughly approach the work: choose the right material, prepare all the necessary tools, find or make drawings.
At first, plywood can be used as a raw material instead of an expensive material.
The neck deserves special attention, since the resonant frequency of the guitar sound depends on it.


You can see how a guitar is made in production in the following video.


