How to play barre on guitar?

The guitar is a difficult musical instrument in terms of mastering the playing technique. One of the challenges for a large number of beginners is the barre technique. This question is very relevant: there are even examples when famous musicians in their performances avoided using this technique when playing individual chords (for example, the legend of "open guitar tuning" Joni Mitchell). Unfortunately, many people quit their studies without mastering some regular barre chord.
What it is?
Barre on guitar and other stringed musical instruments is the technique of simultaneously pressing with one finger of the left hand all or part of the strings on a fret in order to get a chord... For this, the index finger is mainly used. Often (especially on electric and semi-acoustic guitars), when playing power chords, the ring finger is used while simultaneously pressing two strings on the same fret.

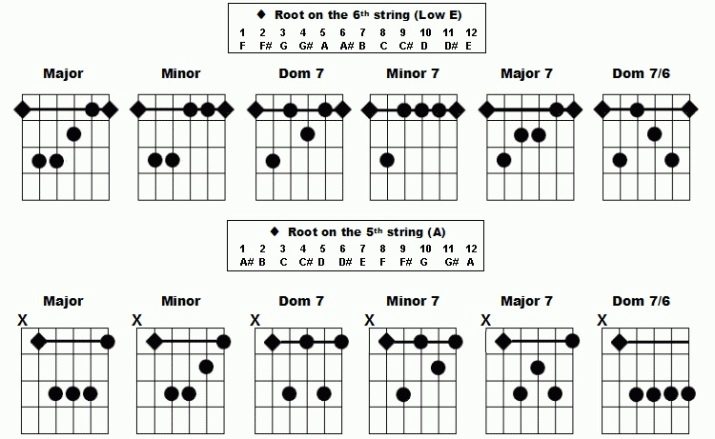
On a 6-string guitar in standard tuning, one index finger gripping all the strings does not thus form any normal chord (major or minor triad) on any fret. To build such chords, in addition to the index finger, different patterns of pressing the strings with the rest of the fingers of the left hand on the frets adjacent to the barre are used.
All schemes for constructing fingers on strings additional to the barre for obtaining consonances originate from the so-called open chords.
Open chords are typical triads and seventh chords in position I that are played without barre using open string sounds: C, D, Dm, D7, E, Em, E7, A, Am, A7. It is with them that beginners begin to learn the first chords.
If we take, for example, the minor triads Am, Dm and the major E chord in the open position, then their conditional layouts of the places where the strings are pressed are as follows.

Now you need to imagine that the guitar nut can be moved. By "rearranging" the nut 1 fret forward along the neck and using all the same schemes of two minor chords and one major consonance (in our example, these are Am, Dm and E), get completely different harmonic constructions:
- A minor chord (Am) becomes B flat minor (Bbm);
- E major chord (E) becomes a F major triad (F);
- D minor triad (Dm) is replaced by E flat minor (Ebm).
Instead of the nut, without "shifting" it in your imagination, you can actually place a capo on the 1st fret of the neck. Sometimes this very useful guitar accessory is called “movable nut”. It can be placed on any fret if needed.
However, there is another - simpler - option for changing chords in the given example - using the barre technique with the index finger of the left hand on the 1st fret.
You can also say this: the barre technique replaces the nut function, "shifting" its location to the right place to get all the same typical chords, but in a different key.

Likewise, you can think of the nut itself as the index finger of your left hand in an open chord (for example, in A minor).
Raising or lowering the sound of chords also changes in semitones, as well as individual sounds: one fret along the neck towards the body of the guitar changes the rise of all its sounds by a semitone in the chord. For example, an open Em chord when shifted one fret up the neck (towards the body) becomes Fm, two frets - F # m (or an anharmonic triad Gbm), and so on. When the barre moves sequentially along the frets towards the headstock, the notes in consonance change to lower the pitch by the same semitones.
They begin to master the barre technique at the initial stages of learning to play chords, since this technique is fundamental for a guitarist of any direction.... A full-fledged guitar playing without mastering the barre is almost impossible - most of the chords are taken with its help.
Views
Not every chord or barre accord requires you to clamp all the strings on your guitar. This technique is of two types - large and small.
Big
If the index finger is simultaneously clamping five or six strings per fret, then we are talking about a large barre. In some sources, it is the pressing of all six strings that is called big. But such a statement is not true, which is confirmed by the representative "Schools of playing the six-string guitar", for example, E. Puhol, P. Agafoshin and other famous guitarists, who left their educational heritage for posterity. In the textbook by E. Pujol, it is clear about the barre and its varieties.
Barre in notes is indicated by square vertical brackets (or just a bar), enclosing the notes of the chord on the side, with the obligatory indication of the fret number where it is used (for example, large barre - BII, small - 1 / 2BII). In some musical literature, there may be another letter in the designation of this technique: CIII (1/2 CIII).
Small
When a musician presses with his index finger from two to four strings (except for the 5th and 6th), then such a barre is called "small". It should be noted that the small barre can be taken with any other finger of the left hand, and up to three strings - even with the little finger. But this is rather the exception than the rule, since this happens very rarely.

Barre is a rather difficult technique, not only in terms of technical execution, but also in a purely physical sense for the hand as a whole, and for the hand in particular. If a beginner performs an exercise, for example, busting a chord with a barre, then the hand can simply go numb in almost a minute, right up to the shoulder. But such a phenomenon arises from the incorrect placement of not only the finger and hand in general, but also the thinking of an inexperienced guitarist. The fact is that do not think that the whole trick lies in the force of the pressing of the strings... Muscle strength, of course, is present, but not to the extent that a beginner musician thinks. In this regard, it is necessary to consider in more detail the question of how to properly perform the barre reception.
How to do it right?
First you need to understand how to properly place your index finger on the fret of the guitar when barre. The finger should be placed closer to the metal nut, to which he will press the strings. In this case, the finger itself is either strictly parallel to the sills, or slightly deviates with its last phalanx towards the other fingers, but within the fret.
Another important point: the index finger should not be bent at its joints, as in normal play, but fully straighten and lie flat in this position with the inner side so that the strings are pressed by the muscles of these joints.
None of the 6 strings should fall into the inter-articular bend of the finger, otherwise the sound from such a string cannot be extracted.
At the same time, the thumb completely adheres to the back of the neck across it, allowing all other fingers to conveniently press the desired strings next to the index, performing the barre. It is located approximately halfway between the index and middle fingers.

Technique Exercises
For beginners, there is a good recommendation from professionals: learning to play chords from a barre is best done on exercises in which you need to hold no more than half of the strings (first 3 thin strings).
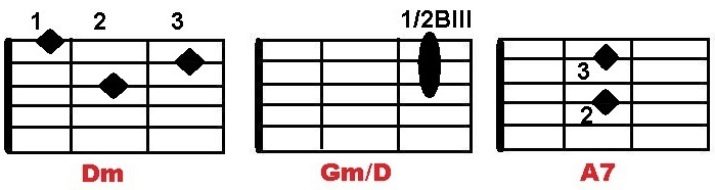
Example 1
Play the mixed arpeggio (brute force) in this harmonic order: Dm— (Gm / D) —A7 — Dm... The triad, denoted as Gm / D, is taken by the small barre: the index finger presses three strings at the 3rd fret. The other fingers do not participate in the construction of the chord - only the index finger. Below are the chord diagrams in the desired order. The two remaining chords in the presented harmony are open, played without a barre.
Left hand finger symbols on chord charts:
- 1 - index finger;
- 2 - medium;
- 3 - nameless;
- 4 - little finger.
The right hand fingering scheme in fingering is as follows: P-i-m-a-m-i:

The designation of the fingers is in accordance with the international standard:
- P - the thumb of the right hand, playing on the 4th, 5th, 6th strings;
- i - index, extracting sounds from the 3rd string;
- m - middle, playing on the 2nd string;
- a - unnamed, choosing the 1st string.
The bass in the chords will be like this:
- d minor (Dm) - 4th string;
- G minor (Gm / D) - 4th string;
- major seventh chord in a (A7) - 5th string.
All bass is extracted with the right thumb (P).
The Gm / D designation of a G minor chord means that the chord's bass is D (D), which is the open 4th string.
Example 2
You can complicate the previous exercise by playing the tonic G bass note in the Gm chord. To do this, in addition to holding the small barre at the 3rd fret, you will have to press the 4th string at the 5th fret with your left ring finger. But for convenience, you can take the barre not on three, but on all four strings participating in the arpeggio. In this case, the ring finger will easily grip the fourth string across the fret from the barre.
Example 3
You need to play the following harmony with the most different types of arpeggios and even a fight known to the student: Am-Dm-E7-Am... All chords are played in the V position, that is, within the V-VIII frets (in this case, the V-VII).
Illustration of chord schemes:

The Am and Dm chords are played with a barre, the seventh E7 is open - some of the strings are clamped in the V position, and two strings - the first and second - are free.
Tonic bass:
- for Am is on the 4th or 5th strings;
- for Dm - on the 4th string;
- for E7 - on the 5th or 6th.
By brute-force playing the sequence, you can vary between the Am and E7 bass options. On the Dm chord, bass from the 5th open string will sound good for variety.
The development of a large barre should be started without fanaticism. Full chords with a large barre are not easy to come up with, even after some experience with a small barre.
For each exercise - no more than 15 minutes of time with further rest of the left hand until complete recovery.
Exercise 1
Working with all strings pressed down with only the index finger... Start at the 5th fret. Play - mixed brute-force on strings No. 6, 3, 2, 1 with the fingers of the right hand P, i, m, a, respectively. Having played the brute-force scheme 2 times, you need to shift your finger from the V fret to the IV, then to the III, II and I. Make sure that all sounds are clearly audible and merge into a single chord in longitude. If something is wrong with the sound, you need to immediately correct mistakes: slightly change the position of your finger vertically or horizontally, increase the force of pressing the strings. You should try to find the cause of the lack of sound or its quality, and then eliminate it.
Barre training is best done with arpeggios rather than striking. When striking the strings, it is difficult to tell if all the sounds are coming from the chord or if some of the strings are not sounding. With arpeggios where each string is plucked sequentially, it is impossible to miss out on reception errors.
Exercise 2
Below is a tablature image of the beginning of the second exercise. This example is a sophisticated version of Exercise 1, in which only 4 out of 6 sounds were controlled. Here the thumb of the right hand plays not only the 6th string, but also plays all the bass strings - from the 6th to the 4th, and only then shifts to the next fret. In addition, the second finger (middle) of the left hand is added to the barre for development, pressing the third string at the VI fret.
Exercise # 3
Now on the V fret you can build different chords using a large barre (Am, A, A7, Dm, D7, F), "driving" each of them down and up the fretboard, shifting along the frets, first with playing any brute force, and then, when the sounds will be obtained everywhere, by striking "from top to bottom" on the count of "one, two, three, four" at each fret.
Barre patterns for exercises:

Schemes of the indicated chords for exercise # 2 (except for those already encountered earlier):

Recommendations
You should pay attention to tips for learning the reception of barre from professionals.
- You should not accumulate errors when setting the barre - they need to be identified and immediately eliminated. You can't let them take root into a bad habit.
- Beginners try to tighten their grip on the strings by turning the index finger with an edge. This is mistake. It is necessary for a good sound to press the strings with the wide inner part of the finger.
- In continuation of item 2: daily exercises should be used to strengthen the muscle mass of the phalanges of the index finger, and not to contribute to the appearance of lateral calluses on it.
- If you need to quickly take several different chords from the barre, then you first need to master them separately to automatism, and also save the movement of restructuring from one chord to another by means of general sounds, the same structure of chords, articulation technique (glissando, legato, precise movement of the barre).
- When performing a barre, you need to be able to relax your muscles. An experienced guitarist will never tire of a barre - for him any tension automatically means instant hand relaxation whenever possible.


