Guitar hand position

Almost all guitarists who have once taken lessons in playing the guitar of any direction begin by learning to sit or stand with the instrument correctly, as well as the rules for placing both hands when playing. This is exactly what is described in this article in great detail and professionally.
Right hand position
This article discusses hand placement rules for guitarists learning a classical six-stringed musical instrument. The same rules generally apply to all other types of acoustic guitars. They do not apply only to electric guitars, including a bass instrument, since they use mainly a picking technique, which is not studied and is unacceptable for nylon strings of a classical guitar.
According to the latest guitar playing techniques, the right hand should be positioned so that there are no significant kinks on the forearm and hand line, which would create the so-called “broken arm” effect.
For the same purpose, when placing this hand, assuming its placement on the most convex place of the guitar body, one should not transfer any significant force from the weight of the hand to the instrument body.


So, in order for the position of the right hand to be correct, it is necessary to perform the following algorithm of actions with the guitar.
- Sit in the standard position for a classical guitarist: on the edge of a chair, the body is straight, the left leg rests on a support 12-15 cm high, the right leg is set aside. Women sit in the same way, but the left leg is not set aside, but lowered with the knee down (for this, it is set aside with the toe a little back, under the chair).
- The guitar is placed with its side lower notch on the left raised thigh so that its body is perpendicular to the floor. There should be no leaning towards or away from the guitarist's chest. The guitarist should bend over the guitar himself, if necessary.
- For the first exercises, only the right hand is needed, so with your left hand you can hold the guitar body in the area of its lower generatrix under the neck. There is no need to hold on to the neck - the left hand does not participate in the additional support of the instrument when playing.
- The head of the guitar neck (where the tuning mechanism is located) must be raised to the level of the guitarist's left shoulder, taking the place where the body of the instrument rests on the thigh of the left leg by the upward rotation of the neck. The greater the angle of the bar in relation to the floor, the easier it will be to play later with the left hand on it.
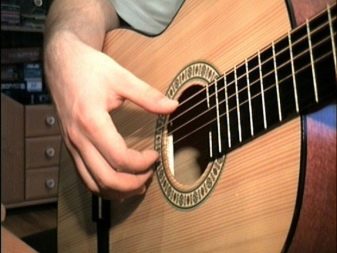
- Now it remains to place the right hand. Bending your arm at the elbow joint to a right angle between the shoulder and forearm, a point just below the elbow joint, you need to install it on the most convex part of the guitar body in the place of the rib between the top deck and the shell.

Then the elbow joint is slightly unbent so that the fingers can be placed near the outlet on the strings as follows: the thumb touches the top string, the index finger touches the third string from the bottom, the middle finger touches the second string from the bottom, and the ring finger touches the first string (the lowest and thinnest).
In any case, the thumb should be (when looking at it from the player's side) slightly in front (to the left) of the other fingers.

In conclusion, you should check the result and correct errors in the position of the right hand. What you need to pay attention to when monitoring:
- the hand on the line "elbow - forearm - wrist - direction of the fingers" should not have kinks - everything is on the same straight line from the side of the viewer, except for the thumb (it will slightly deviate upward, which is normal);

- from the side of the player, the right hand must have a rounded shape due to slight flexion of the wrist joint and its convexity to the outer side, but more often it is the other way around - the beginner's hand has a concave shape due to the bending of the wrist joint in the wrong direction (to the inner instead of the outer);

- the thumb is slightly extended in relation to the other fingers.
If something goes wrong, you need to correct the mistakes by practicing at the same time with the correct position of the hand, starting each time with the stage of landing the guitarist and placing the guitar on the hip. As a result of a few minutes of training, it will be possible to consider that the beginner musician has prepared for the first guitar exercise.
Left hand position
If novice guitarists usually have no problems with the location of their right hand, then the left hand is more capricious in this sense. This is understandable: the right hand is in a natural position when playing. - with the open palm down, when, like the left, you have to turn the inside of the palm up, which is not natural not only for a musician, but also for any person.

But it will not be possible to put the left hand in a different way, unless the person learns the fingerstyle style, using some unusual method (playing with the fingers of both hands in the neck area, a technique called "tapping"). But we are studying a classical instrument, so we will leave such tricks for later. In general, you will have to overcome the difficulties in setting and playing the left hand, placed in a position that is disadvantageous for the muscles and consciousness, through the centuries-old technical exercises, studies and advice from professional guitarists.
In the meantime, you should learn how to correctly place the fingers of your left hand on the neck of the guitar. And the following order of the student's actions will help in this.
- Starting position: correct seating with the guitar, fingers of the right hand - on the strings (look at the description of the location of the right hand on the guitar above in the text).
- The left arm, bent at the elbow at a right angle and pointing with the forearm forward, is under the bar.
- The palm is spread with the fingers forward, and its inner part turns downward - towards the floor.
- You need to imagine that a tennis ball or an apple of medium size is taken in the palm of your hand. They need to be held back. (All this for understanding can be done with a real apple or ball).
- Keeping the resulting shape of the fingers and hand, turn the hand, rotating the forearm together with the hand counterclockwise, with the inside of the palm up.
- Bring the brush to the instrument neck. The bar with its lower sidewall will need to be inserted into the gap formed between the thumb of the left hand and the rest of her fingers.

It should turn out that the shape of the hand and fingers with a virtual apple wraps around the neck.
In this case, the thumb is located behind the bar, opposite the line between the index and middle fingers. This is the correct position of the thumb, so in the future it should be adhered to in most cases.
When moving the fingers of the left hand along the bar, the thumb should always follow them, being across the bar from the back of it. Placing this finger along the bar is a gross mistake that should never be allowed. The hand should always be rounded, and the fingers should be above the strings, not under it (also a gross mistake).

Exercises for training
Here are a few exercises that should start a daily finger warm-up for novice guitarists.
For the right hand
The best exercises for the fingers of the right hand for beginners are arpeggios (brute force), when, one by one, starting with the bass, sounds are extracted from four strings (sixth, third, second and first) according to the following schemes:
- P - i - m - a - m - i (Mixed Direct Arpeggio);
- P - a - m - i - m - a (Mixed Reverse Arpeggio);

- P - i - m - a (ascending arpeggio);
- P - a - m - i (downward arpeggio).

Legend:
- P - thumb playing only on the 6th string;
- i - index finger playing on string 3;
- m - middle finger acting on string 2;
- a - ring finger playing 1 string.
For the left hand
To develop the independence, stretching and strength of the fingers of the left hand, it is necessary to play chromatic sequences of sounds on all strings daily. You need to start with the first string, then move on to the second, and so on - up to the sixth
At first, playing only in the first position (within the first 4 frets) is enough, later you should play up to 12 frets on each string.
The order is: 0 - 1 - 2 - 3 - 4.
Here:
0 - open (unpressed string);
1 - the index finger of the left hand, pressing the first string at the first fret;
2 - middle finger pressing the first string at the second fret;
3 - ring finger pressing the first string at the third fret;
4 - the little finger pressing the first string at the fourth fret.
In this case, the sounds from the string are extracted by the fingers "i" and "m" of the right hand alternately: i-m-i-m (and so on). Having learned to play this exercise freely on the first string, move on to playing it on all strings without stopping.


