Guitar Exercises
The guitar is a polyphonic musical instrument that is played with the fingers of both hands. The functions of the hands are, of course, different. The right hand sets the rhythm and is responsible for sound production, which should not only be timely and correspond to the required duration, but also beautiful. The fingers of the left hand should press the desired chord or individual sound on the string in time and with good quality to ensure the correct performance of the piece of music.

For aspiring guitarists, playing an instrument is a kind of vague and therefore difficult art that, as they believe, not everyone can master. But this is not quite the correct vision. Anyone can learn to play the guitar, who will not spare time and persistence in learning this art.... And it all starts with the simplest, at first glance, exercises, which are described in this article.
Preparation
It is necessary to prepare for lessons on the six-string guitar every time by performing simple warm-up exercises with or without an instrument.
This rule is not only for beginners - even musicians with concert experience follow it.
Let's take a look at these exercises.
First of all, a warm-up is necessary for the fingers and hands of both hands. This should be done before you even sit down with your guitar.
- Make a light massage of the palm and finger joints (the left hand does the massage with the right, and then vice versa).
- Spend a little time on various manipulations related to the development of elasticity of the muscles of the hands (their rotation, bending up and down, twisting, and so on).


- Stretching is very important for the fingers of the left hand., therefore, for 1-2 minutes, a forced stretching of adjacent fingers should be performed with the help of the right hand, placing the right hand between them in the area of its transition to the hand.The same can be done with two fingers of the right hand, folding them together and acting like a wedge.

- Do several independent stretches between the fingers of both hands without outside help.
- Try to straighten the left palm (fingers - together, straightened), and then alternately, starting with the index, bend them in the middle joint. It is necessary to hold the rest of the fingers in place when the next one bends. Bending everything, straighten them in turn. The second option is to start bending with the little finger. This exercise develops finger independence.
- Do the same with the right hand.

Warming up exercises will take no more than 10 minutes, but the benefits are great. The muscles will stretch in preparation for more serious challenges. In addition, fatigue in the hands will not be felt for a long time. After that, you can move on to exercises for the development of fingers with a guitar.
Examples of simple exercises
Each guitarist has a different set of exercises for developing the fingers of both hands. But among the great many, one can single out exactly those exercises that are needed primarily for beginners who comprehend the difficult basics of performing guitar skills.

For the right hand
The surest choice for a beginner guitarist is the decision to master the arpeggio (brute force) technique. Exercises for different types of busting can be started almost immediately, as soon as you have learned how to properly sit with the instrument and put the fingers of your right hand on the strings.
All these exercises are first practiced on open strings (without the participation of the left hand).
There are many types of arpeggios on the guitar, but for beginners, this list is limited to the following basic types.
- Mixed Arpeggio (it is recommended to start the development of the fingers of the right hand with it). All fingers are involved in the game: P (thumb), i (index), m (middle), a (ring). Each finger makes a sound from "its" string: the thumb - from the bass 6th, the index - from the 3rd, the middle - from the 2nd, the ring - from the 1st. The sequence of sound production (busting) is as follows: P-i-m-a-m-i. Count: "one, two, three, four, five, six."

- Ascending... The movement of the fingers is as follows: P-i-m-a. Count: "one, two, three, four." Like the previous type of brute force, it is performed with a sound production technique called "tyrando" (plucking from bottom to top without support on the adjacent string), except for the thumb. The thumb, sliding off the bass string, stops on the adjacent lower one (it remains there until the next pluck of the same string, serving as a support for the whole hand). But you cannot play from the 4th string with support on the 3rd in this arpeggio, since the 3rd is played immediately after the bass. Here you have to use a pinch without support.

- Descending... Busting scheme: P-a-m-i. The reverse of the previous arpeggio. Only the beginning remains the same - the bass should come first. The difficulty of busting is that it should have been played with a technique called "apoyando" (plucking from top to bottom towards the top deck with support on an adjacent string). It is recommended to first work out the exercise without support, and then with support.

After learning the chords, these types of arpeggios must be practiced already in harmony, for example, by playing several chord sequences:
- Am-Dm-E-Am;
- C-Am-G-C;
- Em-Am-B7-Em.
The bass should match the chord being played: Am - 5th string, Dm - 4th, E (Em) - 6th, C - 5th, G - 6th, B7 - 5th. At the same time, one should not forget about the purity of the sound, as well as about the acceleration of actions without loss of sound quality.
It is best for beginners to perform all guitar exercises with a metronome to develop a sense of even rhythm.
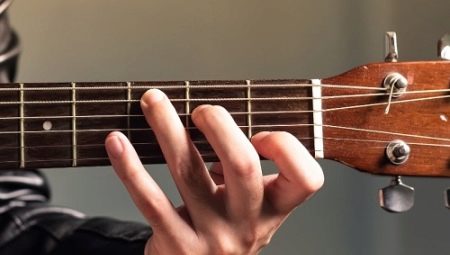
For the left hand
Guitar exercises for the left hand fingers of a novice guitarist are mainly aimed at correct placement, stretching and independence.
- Exercise number 1... Sequential pressing of string # 1 on the first four frets with all fingers, starting with its open sound. The scheme is as follows: 0-1-2-3-4.Here are indicated: 0 - free (unpressed) string, numbers 1, 2, 3, 4 - designation of fret numbers on the fretboard accepted on the tablature. The finger number corresponds to the fret number: index - 1, middle - 2, ring - 3, little finger - 4. It is important not to remove the previous sounds - you just need to loosen the pressure of the fingers (relax), transferring the force to the finger that is working at the moment. The fingers of the right hand make sounds with the apoyando technique one by one, for example, moving like this: i-m-i-m-i (index-middle and so on).

- Exercise number 2... The first half of it is performed in the same way as the previous exercise, and then you should go back to the first fret. This is more difficult to do - you need to lift each finger, starting with the little finger, so that all the rest stay on the frets. The movement pattern is as follows: 0-1-2-3-4-3-2-1. All sounds must be of equal duration. Having mastered this exercise, you can move with it to the next strings up, without stopping until the very end.

- Exercise number 3 ("Caterpillar"). A good workout for stretching and independence of all fingers. For the starting position, place the fingers of the left hand as follows: 1st finger - clamps the fourth string at the 9th fret, 2nd - the third at the X fret, 3rd - the second at the XI fret, 4th - the first at the XII fret. The right hand makes sounds with an ascending search: P - 4th string, i - 3rd, m - 2nd, a - 1st. Right hand finger movement pattern: P-i-m-a. When the arpeggio is played, the 1st finger of the left hand is moved from the 9th fret of the 4th string to the 8th fret, the arpeggio pattern repeats. Before the next arpeggio, the 2nd finger is already shifted from the X fret to the IX, for the third time the 3rd finger is shifted one fret after the previous ones, for the fourth time the 4th finger is moved from the XII to the XI fret.

Exercise # 3 continues by alternately moving a single finger of the left hand after each sound of the entire arpeggio circuit. And this lasts as long as a beginner musician will manage to place his fingers on the frets. The fact is that closer to the head of the neck the distance between the saddles increases, and therefore, out of habit, untrained fingers will not be able to move exactly along the frets. At first, the process can end within the VI or V fret of finding the 1st finger, later the muscles will acquire the necessary elasticity, allowing you to move further - to the 1st fret.
Recommendations for beginners
Initial learning to play the guitar is accompanied by a lot of difficulties that arise: the seeming inconvenience of landing with the instrument, the left hand is uncomfortably twisted, pain in the pads of the fingers, swelling of the limbs and shoulders, and so on. In this regard, we can recommend a few useful rules for beginners.
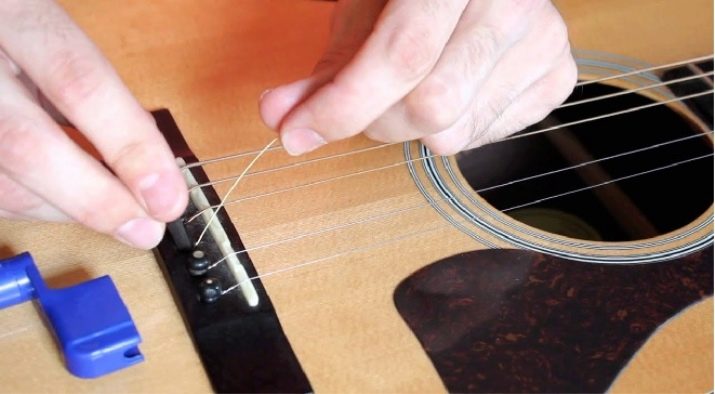
Replace for a while the metal strings on your "acoustics" with nylon ones. Of course, you cannot do this on an electric guitar, but there is an opportunity to change the strings to thinner ones - caliber "8" or "9". They are softer. And if you already have an "8", then look for strings that are not hard, but soft.
When performing exercises without a guitar, do not overdo it: you do not need to crunch your knuckles or bend or twist your hands to unbearable pain. All this is harmful for untrained muscles: it is so close to their sprains.
In class, use the metronome, setting it first at 45 beats per minute, and eventually increasing the tempo to 90 or more.
When doing exercises with your left hand, try to play not only with your i-m fingers - train other pairs as well: m-a, a-m, m-i, i-a, a-i.


