We make planes from foam

Children love to play with a wide variety of toys. Girls prefer dolls, boys prefer cars, but there are toys that everyone likes. Flying planes captivate both boys and girls, they allow making the rest not only fun, but also active.
Foam throwing airplanes have appeared on the modern market, which are simple to assemble, and it is clear how to play with them. In addition to the purchased options, it is possible to make a foam airplane with your own hands, and if you have the appropriate knowledge and skills, even equip it with a motor.

Simple option
One of the favorite activities of children is to launch airplanes. The paper varieties did not please with their durability, and therefore the manufacturers created a foam throwing plane.
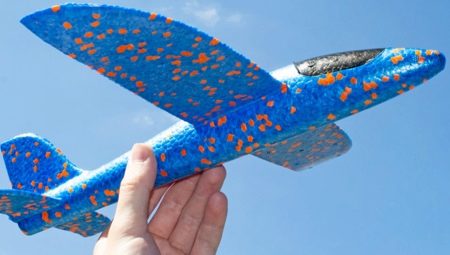
Modern products can be large - 35-45 cm in length, and small - 20-25 cm. The variety of colors of products allows boys and girls to choose their plane to their liking.... Due to the lightness of the design, the ability to put the tail in two different positions, you can provide a different flight of the product.
The popularity of throwing aircraft made it possible to create more original models in which there is an illuminated cockpit, which makes flight at night very beautiful and mesmerizing. Some products contain special metal balls that make the nose part heavier, which increases the range and duration of the device's flight.

Purchased throwing plastic planes consist of only three parts: body, wings, tail. There are holes in the body, into which the rest of the parts are threaded. A child can also assemble such a toy, most importantly, apply moderate force, since parts from great effort can break... The position of the tail can be changed depending on which hole to install the tail piece.
The strength of such toys is quite good, so parents, without unnecessary hesitation, buy such planes for their children.
From prolonged operation, parts can be less fixed and displaced, and the cockpit can fall out altogether. To prevent such consequences, you can simply glue the parts with super glue.

The cost of foam throwing aircraft is low, so almost everyone can afford them. Despite the popularity of such toys and their convenience, they also have one significant drawback - they are the same and are deprived of the possibility of making any significant changes.
For those who want to make their own aircraft, craft something of their own, according to their own sketches, using personally chosen decor, you can build such a product from foam, having the necessary tools and materials, using certain rules.

Preparation of elements
To make a throwing plane with your own hands, you need to have a number of tools and materials:
-
a thin sheet of foam - the sheets provided for the decoration of the ceiling are well suited;
-
specialized glue for foam;
-
stationery knife;
-
sandpaper;
-
clothespins for fixing;
-
needles for attaching the template to the foam in the process of redrawing parts;
-
paper and pencil.


When creating a foam plane, the first step is to make a drawing of the future structure. The template must be made in full size, the dimensions of the elements must correspond to the original, because the main details will be cut from them.
If you are not sure that the finished product will fly well, you can make a paper model and check it.
If you are satisfied with the paper version, you can proceed to creating the main flying vehicle.

It is better to take thin sheets of polystyrene, it is easier to work with them, it is easier to cut and more convenient to glue. In addition to decorative ceiling squares, you can use foam plates, in which food is sold in supermarkets, foam sheets, which protect the elements of equipment during transportation.
It is convenient to make straight lines with a clerical knife, it is better to create rounded shapes with scissors.
Before handing sharp objects to your child, it is worth practicing on unnecessary pieces of styrofoam in order to achieve the desired accuracy and accuracy of the process.
Foam glue can be bought at any hardware store, it is sold in plastic tubes, you can find smaller and larger packaging options.

With the help of sandpaper, all sections will be leveled, all parts will be sanded, which is especially important for gluing parts and painting them. It is better to have two versions of such paper at once, with large and fine grain.... The first processing is done with coarse sandpaper, which quickly removes all unnecessary from the product. The main work is done with fine grain paper - it helps to bring the product to the desired appearance.

In the process of transferring the template drawn on the sheet it is better to use needles with which paper parts are fixed to the foam base... If this is not done, there is a risk that the element will turn out to be asymmetrical, and the plane will fly unevenly. If you use thin foam, you need to glue several parts together to achieve a stronger and more reliable structure, which is especially important for the base of the aircraft. You can fix the details using a press from books, but ordinary clothespins will be more convenient., with which the glued parts are clamped and left on them until completely dry.
If you want to make the plane beautiful and unusual, you can paint it with paints, after pasting it with white paper, or use colored paper for decoration. Glitter paper and self-adhesive will look stylish and beautiful, which is easily attached to the product and does not deteriorate.


If you have all the necessary parts and know how to properly assemble an airplane, you can make a beautiful and comfortable toy for your child.
Assembly
To make an airplane from foam with your own hands, you must not only have everything you need, but also be able to put all the parts together. Having a template of the future aircraft drawn on a sheet of paper, it is necessary to cut out all the details and transfer them to the foam.
In order for the foam glider to turn out correctly, such a sequence of actions is necessary.
-
Draw a template for the future aircraft.

- Transfer all parts to foam.


- Cut out the parts with a utility knife and scissors.

- On the tail, mark the place where the stabilizer will be installed, cut a hole for it.

- The glue is applied to the stabilizer part and it is inserted into the slot.

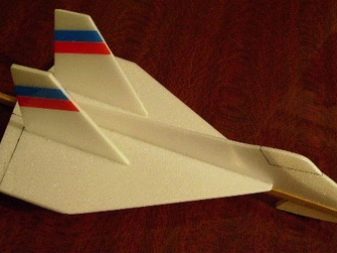
- The same parts must be glued to the base of the aircraft in order to make the body more durable and voluminous. It is best to make two layers, the first will have a ledge that imitates the cockpit, the second will go without it.


- Once the model is dry, it is necessary to outline the places for the slot under the fenders. All holes must be made on the paper template so that when the template is placed on the plane, all areas for cutting can be accurately marked.

- The part of the wings is one-piece, it is inserted into the hole in the body and positioned so that the right and left are the same distance. It is also best to glue the wings so that they do not move during flight and falls.

- When the structure was assembled, it is necessary to bring the children's plane to the desired appearance, for which sandpaper is used. Strongly protruding areas need to be cut off with a clerical knife, and the rest of the irregularities are removed with sanding paper.


To prevent the nose of the aircraft from breaking from frequent falls, it is necessary to cover it with glue, which will make the material more rigid and the front of the structure heavier. This will improve the aerodynamic performance of the product.

With the help of such manipulations, you can make a simple throwing plane, which is launched with a simple throw with your hand. It is possible to build a catapult-type launcher, or to equip the plane with a motor.


Creation of an airplane with a motor
The foam plane is a fun and safe toy, but you can transform it into a more interesting flying object if you want. If you equip the product with a propeller and a motor, you can get a radio-controlled airplane. Having in-depth knowledge in this matter, you can do it yourself, otherwise you need to order a set of parts that will transform the throwing aircraft into a transport on the control panel.
To implement your plan, you must have:
-
receiver;
-
servomechanisms;
-
on-board battery;
-
travel regulator;
-
electric motor;
-
3-4 propellers;
-
Remote Control.

The propeller must be installed on a foam plane and securely fastened, connected to the power supply, and the receiver and all necessary parts must be fastened. If the alteration is carried out for the first time, then it is worth reading the instructions for the set of parts, there is a scheme for working with the equipment, as well as watching videos that show master classes in this area.
How to paint?
To make a beautiful styrofoam plane for kids, you need to take care of its visual appeal. The easiest way is to decorate with paints. Not all paints are suitable for application to polystyrene., there are aggressive compounds that corrode the material, spoil its structure and appearance.

To ensure reliable protection of the aircraft surface, it should be primed, thereby closing the pores of the material and providing better adhesion to the future paint layer.
For work, you can use water-based paints, but they will not withstand exposure to water and sunlight. Acrylic paints, which can be applied with a brush or from a special spray can, are optimal.


The color of the plane can be of any color. When painting by hand, you can make drawings, camouflage, create your own symbols or apply already known ones. After painting, a self-made foam aircraft significantly changes its appearance, and becomes similar to a miniature copy of a real aircraft.


How to set up and run?
When buying or creating a simple throwing aircraft, the launching process does not cause any particular difficulties, you just need to take the product in your hand and throw it forward and slightly up. If the equipment has a motor, the starting process will be slightly different. On sale there are foam models with a motor that can be charged using a USB cable, in addition, you can make similar products with your own hands.
Before starting, builds to check whether the motor is running, whether the blades are spinning. For RC models, it is important to check if the equipment turns on so that flying vehicles do not lose control... When everything is checked, you need to turn on the engine and start the plane manually. For models without control, the flight lasts 10-15 seconds, after which the motor turns off and the product glides to the ground, the flight of the radio-controlled vehicle can be adjusted and controlled, ending when required.
You can learn more about the launch process in the video below.


