How to mold pineapple from plasticine?

Pineapple does not grow in our country, but it is well known to children, even to those who have not tried it. An unusual fruit with scales and a green forelock, seen once in pictures or on TV, is hard to forget. An interesting appearance encourages kids to be creative, they are happy to sculpt pineapple from plasticine.


Tools and materials
We will conduct master classes for different age groups. Older children can easily cope with ordinary plasticine, it should only be held in hot water so that it becomes softer, and you can do modeling. It is better for babies from three years old to purchase a set based on beeswax, it is molded without effort, does not leave greasy marks.
In addition to plasticine, you will need a plastic board or oilcloth so as not to stain the table, a stack for cutting colored briquettes and a napkin for hands. We will tell you about the additional material that will be needed in each specific case later.


Step-by-step instruction
Pineapple scales can be made in different ways - squeeze, cut, glue... Each of them is interesting in its own way, so we will consider all the methods for our creativity.
Pattern extrusion method
The easiest option, recommended for children 3-6 years old, is to draw a pattern on the pineapple skin.
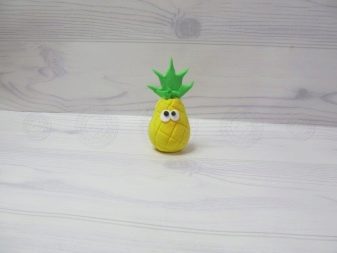
- Take a piece of yellow plasticine roll a ball out of it.
- Pull out the top of the pineapple slowly, forming a pear-like workpiece.
- With the help of the stack, start extruding the crossed lines diagonally... Older children can make a more complex pattern, like pineapple scales.
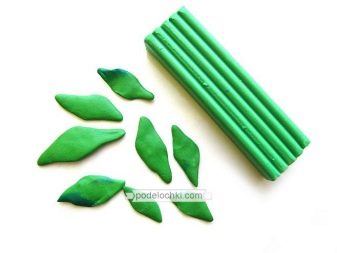
- To make foliage, we need green plasticine.... Roll a ball out of it, flatten it into a cake and cut out sharp leaves in a stack.To simplify the work of babies, they will be presented with a single branch.
- Glue the piece to the top of the pineapple.


To "revive" the fetus, give it a muzzle.
- Start with the eyes. To do this, take a piece of white plasticine and very little black for the pupils. Roll two small balls out of white material, make round cakes out of them.
- Gently glue the eyes to the top of the pineapple, one side connect them to each other.
- Designate pupils black plasticine, placing them at the top of the eyes.
- Make two more white cakes, no larger than the previous ones... Stick on both sides of the fruit, in the places where the cheeks should be.
- Make nose pineapple. To do this, roll a tiny pea out of the green material and secure it under the eyes.
- Under the nose, between the cheeks with a stack, draw mouth.


The result is a very cute pineapple that looks like a cartoon character.
Method of carving a pattern on the peel
To cut out the scales, we need regular scissors. Older children, from 5-6 years old, who can already work with scissors, will cope with the task, because cutting plasticine, even soft, is more difficult than paper.
- Prepare two blocks of plasticine: for green leaves, for fruit - at your discretion (brown, red, yellow or orange).
- Roll two balls of different shades: green - smaller, brown - larger.
- Work with the brown material first, roll it in your palms to create a slightly oblong barrel-like shape.... Turn the green ball into a conical blank.
- On the brown surface, start cutting the scales in the form of triangular notches with scissors... The work is done from the bottom up. The rows must be offset during cutting.


When all the fruit is full, start working with the leaves. We will not make them separately, but we will form a whole bundle from a green cone:
- take scissors and make cuts from the wide side of the workpiece, going into the corner of the cone;
- then carefully unfold the cut elements outward and form leaves from them;
- Combine the green panicle with the top of the pineapple.


The result is a realistic fruit, not at all like the previous cartoon character.
Bulky flakes option
It is better to do this work with children from 6 years of age and older. Making each scale will require perseverance and painstaking work from the child. Modeling helps to form these qualities that may be useful in the future.
Take two blocks of plasticine - yellow and green. Roll a ball out of the yellow material and, pulling out the top slightly, give it the shape of a pear.


We will shape the body of the pineapple using small yellow diamonds (scales). Sculpt them individually, pinching off pieces from the common bar. There should be a lot of details. To speed up the process, you can roll out the plasticine with a thick tourniquet, flatten it and cut the rhombuses.

From the bottom up, glue the prepared rhombuses onto the surface of the pineapple. If they are done neatly, even rows will be visible, extending upward at an angle.

Pinch off small pieces from green plasticine, roll them into balls and, stretching, form long pointed leaves. When the products are ready, they can be bunched together at the bottom, then placed on top of the pineapple. Another way is to glue each piece of paper separately.


Useful Tips
Plasticine sculpting is a fun and useful activity. We hope our tips will help those who have just started to master this creativity:
- to keep the table surface clean, use for working with plasticine board or oilcloth;
- soften plasticine by long kneading in hands, and to speed up the process, it is enough to lower the bar in warm water for a few minutes;
- to save plasticine while sculpting a large figure, a frame is placed inside the product, for example, from a plastic bottle or cardboard;
- the finished work can be decorate with natural material, ribbons, beads;
- save plasticine applications longer will help colorless varnish, who need to cover the made postcard or panel;
At the end of the work, it is difficult to wash your hands with water, so you should first wipe them with a napkin.
.

For information on how to mold pineapple from plasticine, see the video.


