How to mold a plasticine pumpkin?

Among the crafts for children, the plasticine pumpkin looks like a rather simple option in execution. The basic version of this vegetable is, indeed, easily blinds even to a preschooler. It will be much more difficult to figure out how to make a beautiful and unusual pumpkin for Halloween. A master class will help children and adults with this, explaining in detail, step by step all the subtleties of making such a decorative product.


Materials and tools
The work of making crafts from plasticine can captivate both children and adults. But so that the process does not have to be interrupted due to the lack of necessary items or materials at hand, it is worth paying as much attention to the preparation as possible. To create bright crafts in the form of pumpkins, regardless of the technique of execution and the complexity of the product, you will need:
-
stack;
-
a special board with a coating to which plasticine does not stick;
-
a toothpick to create a relief;
-
wet wipes for hands;
-
plasticine - black, green, orange.

When making crafts as holiday souvenirs, the usual modeling mass can be replaced with a polymer mass that hardens during firing. It can be difficult for babies to knead thick plasticine well. For them, a special soft, wax-based is produced. It is safe for hands, but has a lower heating temperature.


How to make a simple pumpkin?
Among autumn vegetables, pumpkin always looks like a queen due to its bright orange color, good storage adaptability. It is not surprising that, giving children the first knowledge about the world around them, parents and teachers most often try to mold the gifts of nature with them. Making a pumpkin with your own hands does not require special skills.At the same time, modeling always has a positive effect on the child's fine motor skills, contributes to its development.

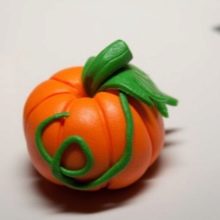
A simple pumpkin doesn't require a lot of preparation. The base is made from bars of orange and green plasticine, you also need a small amount of gray. For crafts, a tubular body from a felt-tip pen or ballpoint pen is also required.

Let's consider in stages the process of making a pumpkin from plasticine.
-
Blind a ball out of orange material. The sphere should be quite large.
-
Leave a dent in the top center with the handle body. From it, draw lines downward, reducing them to one point. Pin a small gray circle here. Cover it with relief with a toothpick or a stack.
-
To mold a stalk from green plasticine. Place it in the groove.
-
Blind 3 long, thin "sausages" and 3 flat ball-shaped cakes, process them with a stack to get a jagged leaf edge. Fix the decorative elements on the handle. The antennae and leaves need to be arranged randomly, freely.


It is better to sculpt a pumpkin with a child on a board or oilcloth, paying special attention to thorough kneading of plasticine.

Cheerful pumpkin on maple leaves
A bright seasonal craft with characteristic autumn features is exactly what you can captivate children. A cheerful pumpkin, laid on maple leaves as a stand, will be a wonderful exhibit of a thematic exhibition, a gift for loved ones. Kids can get creative when decorating the vegetable, personalizing their pumpkin with facial expressions or other details.


A master class on making crafts involves a number of steps.
-
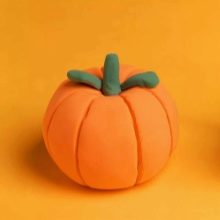
Form a ball from orange plasticine or sculpting mass. Once the sphere is ready, it needs to be flattened slightly at the top and bottom, giving the vegetable figurine more realistic shapes.
-
Stack lines on the sides of the pumpkin, dividing its surface into separate segments.
-
Take a small piece from brown plasticine. Form a stalk of the product by rolling a sausage about 5 mm in diameter. The excess length can simply be removed with a stack.
-
Roll a flat cake from light green or bright green plasticine. Cut pumpkin leaves of a characteristic shape, apply a relief in a stack. Roll 2-3 flagella - antennae.
-
Collect the craft by placing additional decorative elements on the handle. The leaves should bend, point upwards. The antennae curl up at random, like a real pumpkin.
-
Make a small cake from yellow plasticine. Stack to give it a relief along the edges to look like a flower. Fasten the workpiece to the handle. Place a small brown oval in the center of the flower - the core.
-
Make 2 small discs from white plasticine. This will be the foundation for the eyes. Stick on the front of the pumpkin parallel to each other. Make pupils from black plasticine, place in the upper part of the eye.
-
Stack a smile on the "face" of the pumpkin.
-
To mold a button nose from light green plasticine. Fasten between the eyes just below their base.


The craft can be placed on autumn leaves, or you can make another stand for them. In any case, such a cute vegetable will definitely create a joyful mood in children, help them realize their hidden creative potential.

How to dazzle on Halloween?
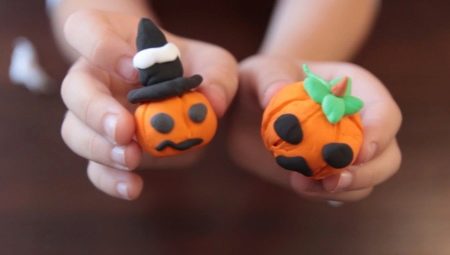
A foreign holiday with its age-old adage: "sweetness or nasty" is inextricably linked with its main symbol - a pumpkin lantern. Sinister grinning faces are carved on its surface, a candle is placed inside. Of course, such a lamp cannot be dazzled from plasticine. But this material is great for making thematic crafts with all the attributes of Halloween.

Here is how the pumpkin sculpting process looks like step by step in this case.
-
Orange plasticine - about half of the bar - knead well in your palms. Roll into a ball.
-
Continue kneading the sphere on the board.It is necessary to give it a slightly flat outline at the "poles", you can make small dents with your fingers.
-
Using a stack, make notches on the surface. They run from top to bottom of the craft, slightly pushing the material apart. This will make the relief more realistic.
-
With the corner of the stack, make 3 indentations on the front side of the future pumpkin in the places where the nose and eyes will be located. The spatula is applied with the flat side, slightly pressed into the material at an angle.
-
Blind 2 drop-shaped blanks from black plasticine. They should match the size of the pumpkin's eye sockets. For the nose, a triangle is molded from the same material, simulating a failure.
-
For the mouth, you need to roll a thin black plasticine sausage. It is positioned in a zigzag manner, helping itself with a toothpick or a stack.
-
For a witch's hat - an accessory for a pumpkin figurine - black plasticine is taken. You will need to mold 2 parts: a simple cone and a base in the form of an irregular-shaped cake with slightly ragged edges. Plasticine is pre-kneaded, softening it.
-
Connect the details of the hat. Pull out the top of the cone, bend it. Cut the brim of the hat with a stack, giving it a torn look. Using a match, connect the pumpkin and the headdress intended for it.


The awful scary pumpkin is ready. You can add originality to it with the help of yellow, red highlights (dots) in the eyes.

In addition, nothing prevents you from making an interesting and unusual base for the craft - a witch's cauldron or a stump from the same plasticine.
For information on how else you can mold a pumpkin from plasticine, see the video below.


