How to mold a bear from plasticine?

The shaggy big and clumsy bear is liked by both adults and children. It is very often molded from plasticine. This process is very exciting, because it allows you to feel like a real sculptor. In this case, only plasticine and hands are needed for work.


How to make a brown bear?
You can sculpt a brown bear both from ordinary plasticine and from air. Of course, if you wish, you can add some bright elements to the animal. With your own hands, an ordinary piece of brown plasticine can be quickly and easily turned into a funny sweet tooth. In advance, you will need to prepare some tools and materials for work:
- brown plasticine - one or two bars (depending on the size of the toy);
- plastic stack - one or more;
- toothpick;
- a small ball of white and black plasticine for the nose and eyes.


When everything you need is ready, you can take a closer look at all the stages of modeling.
- For beginners, it should be clarified that before work, plasticine must be prepared by carefully kneading it in your hands. When the mass becomes softened, it is necessary to roll a ball from a single piece.
- The next stage is the preparation of the main parts for the clubfoot. The body should turn out to be massive, and it is advisable to make the stomach as plump as possible. The workpiece should be conditionally divided into two parts: wide and narrow.
- The hind feet should be large and made from large pieces of plasticine. They need to be pulled out and pressed down at the bottom. To make the paws look more natural, they need to be bent.
- The upper part of the paws should be made wider and more flattened. The front ones are made like a horseshoe.To do this, you can roll a couple of tubes, close them at the top, and squeeze at the bottom so that they become more like the legs of an animal.
- The resulting three parts (torso, hind and front legs) will need to be assembled all together, like parts of the designer... From them, the main part of the bear will turn out. The upper legs should be attached to the narrower part of the body. In this case, it is worth pulling out the tubercle at the top, as if it were the collarbone. In the process of collecting the back of the sculpture, it is important to smooth out the clay well.
- For the clumsy and clumsy body of the bear, you will need to blind the head. It is best to do it from a separate piece. It is advisable to give the details a characteristic elongated shape and sharpen the nose. In this case, the neck should be wide. Ears are easiest to make flat from small balls.
- The head is glued to the front of the torso, and the ears are set on top of it.... After that, the plasticine is smoothed out so that the fake seems to be a single whole, there were no noticeable joints.
- Next, eyes are made: black small dots must be glued onto white flat ovals. The nose is one of the easiest, since it only needs to roll a ball of black plasticine.
- The brown bear should be shaggy, and this is easy to do with a toothpick. To do this, it is necessary to create notches with a sharp end, gradually moving from the head to the hind legs. Soft plasticine lends itself very easily to such drawing.
To make the clubfoot look more impressive, it is better to make shallow furrows.


This step-by-step scheme is fairly easy. By sticking to it, you can get the figure of a large bear. If you wish, you can make a smaller toy to make a small bear as well.


Teddy bear modeling
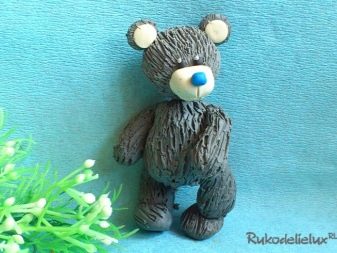
Another teddy bear that is attractive to many is the Teddy Teddy. This furry is interesting for kids with its cute look. There are many options for how to make such a teddy bear out of plasticine so that it turns out as believable as possible. Of course, such a figure can only be admired by placing it on the shelf. For sculpting you need to prepare:
- a bar or two gray plasticines;
- small balls of plasticine in white, blue and black;
- toothpicks.


The process of making a sculpture will be easier if you do it in stages.
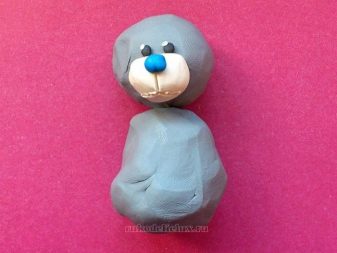
- At the first stage, the preparation of plasticine is carried out. - kneading it with your hands until soft. Next, you need to make a truncated cone from part of the bar. In this case, it is not necessary to level or smooth the walls of the workpiece - crush a rather soft piece of plasticine from all sides so that the desired shape is obtained. A half of a toothpick should be inserted into the resulting part.
- Now you can go to the head of the toy. It is made from the same amount of plasticine as the previous part. It is enough to make a large ball. Moreover, its surface also does not need to be smoothed.
- In the next step, the head is pushed onto a toothpick and both parts are held together. In front of the head, a bump of white plasticine is molded, which will indicate the nose of the bear. The tip of the nose can be turned blue to make the bear look more like a teddy bear.
- Above the nose, two points of black plasticine should be glued, and on top of them white ones of an even smaller size. The mouth can be obtained by simply cutting the surface under the nose.
- The front legs are molded in the form of cones. As for the rear ones, they consist of two fragments: cones and balls. It is important that the shape of the paws is obtained, and their surface will be further processed in the future.
- All four legs are attached to the torso.... In this case, the rear ones must be wrapped inward so that the bear turns out to be clubfoot. It turns out that the figure seems to be shifting from one paw to another.
- The next stage is considered the longest, and before it it is important to replenish the stock of patience.... On it, with the help of a toothpick, or rather its tip, it is necessary to apply small notches to the entire bear figurine.It is best to start with the head, moving from the eyes and nose to the sides. It is important to carefully treat the entire surface of the head and torso.
- Now you can make ears in the form of gray round plates, and on top of them stick more white plates of a smaller diameter. Now they need to be attached to the body.


When the bear is ready, if you wish, you can complement it with a cute pink bow on the neck or make it with a heart.
Children really like that the Teddy bear, made according to this scheme, turns out with a movable head due to a toothpick. This plasticine sculpture will be a great gift for any holiday.


Other options
For children, such an activity as modeling from plasticine is very exciting. They are ready to spend a lot of time behind it. It is not surprising that, first of all, they like to make figures of those characters with whom they are familiar from books and cartoons. For example, many people like the white bear Umka, which can be seen in cartoons about the New Year or on New Year's cards. Also one of the favorites of children is the bright and kind Winnie the Pooh.


New Year
Most often, white bears are molded in the winter. Probably because polar bears live in cold regions, where there is always a lot of ice and snow. Snow-white animals seem very harsh, but this makes them no less attractive to children and adults. It is very easy to make a Christmas bear step by step, but it is advisable to add a few bright elements to it to make it more festive. To sculpt a serious polar bear, you need very little:
- several bars of white plasticine;
- a block of red plasticine;
- a small ball of black plasticine;
- stack of plastic.
Of course, ideally, you should take a lot of white plasticine. However, if there is a lack of this material, you can use a trick. Take plasticine of a different color and make the main parts from it. After that, apply a thin layer of white plasticine to them. So you can save money, but for reliability it is still advisable to stock up on a large amount of snow-white plasticine mass.
When working with light plasticine, it is worth considering that it becomes dirty very quickly. Therefore, it is advisable to stock up on a damp cloth and periodically wipe your hands before picking up the white material. This should be done especially if before that you had to contact with plasticine of other colors.

When all the nuances have been taken into account, you can proceed directly to sculpting a white bear.
- First you have to knead a bar of white plasticine well in your hands and roll a ball out of it.
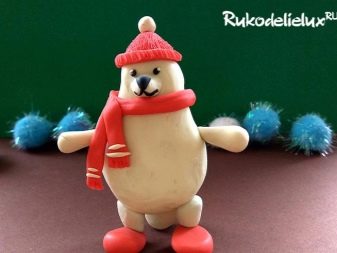
- After that, it is necessary to form a figure from the ball with the help of your fingers. It is important that the detail resembles a pear in its appearance. In this case, the oval should be extended, and then squeezed from the back and front. You also need to highlight the neck.
- The upper, narrower part of the torso will be the head. You need to stick your mouth and nose on it. Under the latter, a ledge is made of white plasticine - the muzzle. A black triangle (nose) is attached to it and from it there are two black stripes diverging to the sides (mouth).
- The eyes are made in the form of two small black balls. After they are attached to the head, you can add a drop of white plasticine on top of them. So the eyes of the bear will become more expressive.
- At the next stage, a hat in the shape of a head is made from a bar of red plasticine.... It is advisable to make a thin edging along the edge of the accessory. To make the hat look furry, it is worth adding texture to it using a stack.
- Now we need to make two small white balls. One of them is attached to the top of the cap in the form of a pompom. As for the second, it is used as a tail. And the smaller the last one turns out, the more funny the bear will be.
- The legs are relatively small relative to the body. They resemble cones in shape. The hind legs should be flattened from below and red balls-bast shoes should be attached to them. The smaller the legs are, the funnier and more original the polar bear looks.
- A scarf in the form of a long sausage is made of red plasticine. It will need to be wrapped around the neck. At the ends of the scarf, you need to make a fringe with a toothpick and add a couple of white stripes.


During the winter holidays, such a polar bear will look great in the company of a Santa Claus figurine, because they both came to us from a harsh land.


Winnie the Pooh
Sweet tooth Winnie the Pooh is just made for honey and funny pranks with friends. Children know two images of this funny fat man at once: colorful (from the American cartoon) and more natural brown (from the Soviet). Both of these characters are fun and interesting. Of course, you can make two at once, but for now it is worth considering the version of the brighter bear.


Such a character will be especially interesting for younger children. A guide with detailed steps will allow you to quickly and easily mold a figurine of a bear that has eaten well and is basking in the sun. To do this, you need to prepare:
- a block of red plasticine;
- a bar of yellow plasticine;
- a small piece of black plasticine;
- matches or toothpicks.

Winnie the Pooh, which is created after Disney's image, will turn out to be bright yellow in a red T-shirt. It looks very funny and original. Depending on the size of the sculpture, the number of bars in the primary colors can be large.
- Torso It is obtained from a puffy belly in the shape of a ball (yellow) and the upper part of red plasticine. It is best to make these parts from small pieces. So it will be easier to knead the plasticine mass to a soft pliable state.
- At this stage, tummy ball. For a T-shirt, you need to roll the blanks in the shape of cones from red. Two of them are created smaller, and the third is larger and truncated.
- To do paws, you need to take four small pieces of plasticine and stretch them along the length. The ends of the paws are bent outward.
- When all the main parts are ready, you can combine into a single whole. To do this, they should be arranged in advance in the required order to make it easier. First, you need to connect the largest parts (belly, upper body), and then smaller ones (paws, sleeves of a T-shirt). The bear's upper legs should be tilted back so that the figure rests on them. It should look like Winnie the Pooh lay down to sunbathe.
- Head it is necessary to narrow it up a little. Also, it should be squeezed and smoothed on one side so that the frontal part becomes more expressive.
- Ears are made in the form of two yellow cakes of small diameter.
- To highlight nose, you should press a match over it. The tip of the nose is made in the form of a tiny black ball.
- Eyes look like very small black dots.
- Mouth the best way is to just cut in a stack.
- The finished head should be attached to the torso. with a match or toothpick.


To make the image of Winnie the Pooh more real, you can complement it with a plasticine barrel with honey or jam.
It will take only 30 minutes and very little effort to create such a fun sculpture.

Next, see a master class on modeling a bear from plasticine.


