Methods for sculpting a panda from plasticine

One of the cutest animals is the panda. Children find him adorable, and so do adults. The child can be offered to mold a small panda: this is a game, and the development of creative skills, and organized leisure. There are a lot of modeling options. The younger the child, the less experience he has in working with plasticine, the simpler the scheme should be.


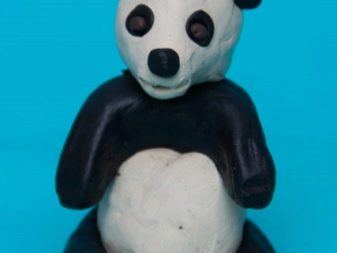
Simple figurine
For work, you only need plasticine (in this case, white and black), as well as stacks and a modeling mat. Ideally, you need to be creative during the day, in good natural light.

MK for sculpting a panda for children.
- Any plasticine must be kneaded in hands before work. Sometimes this warms it up additionally, because the material can be cold and not quite pliable. And to stretch your fingers in this way also makes sense.
- A not very large ball needs to be rolled out of white plasticine, flattened a little so that an oval is obtained. This will be the panda head.
- Make two small flat circles out of black. They must be literally pressed into the panda's head. It's easier to do this in stacks, those with rounded ends. It is the depressed circles that make not just a teddy bear, but a recognizable image of a panda.
- Then you need to roll up little white eyes and squeeze them into the black recesses formed. The pupil is made of black plasticine.
- Now you can sculpt the muzzle and nose. The oval muzzle is made of white plasticine, attached to the head in proportion. A small triangle (inverted) with rounded edges is made of black material, glued to the face.
- The panda's ears are also black.With the help of two small balls, slightly flattened by the stack, they can be formed.
- It's time to get down to the torso. Its base is made from a white fragment. The size of the body is slightly smaller than the head.
- The upper legs are molded from black plasticine. The lower ones will also be black, they are round, attached separately. The "handles" are made in one long sausage, fixed over the body, slightly rounded and tapering downward.
- It remains only to connect the body to the head - the panda is ready!

Despite the rather simple algorithm, the figurine is excellent. It's nice to play with this and put it on the shelf.
How to mold with natural materials?
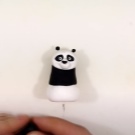
You can make a cute panda with his favorite bamboo - it seems that the bear does not want to part with this natural delicacy.
How to mold a panda with a bamboo branch in stages.
- The most important and largest element is a white ball, it should be molded in an ideal shape (as far as possible).
- Next, you need to attach small black ears, semicircles to this ball.
- The next element is black circular spots around the eyes. After them, a little black pipette-nose is molded. It must be very small.
- Two white, very thin strips are glued in the middle of the eyes. Our panda will be just like that, this is its feature.
- Then we make a gap - a black cake connecting the neck and head.
- We make legs, lower and upper, from black plasticine. They should be small. The tail will be exactly the same.
- The panda is ready, now you need to make a twig for it. For this, green plasticine is taken, a thin sausage is molded from it. A very thin flagellum is made from a piece of green plasticine, three leaves are formed on it. This twig goes to the first green thick sausage.
- It remains only to give this delicacy to the panda's paws.


A similar version of the figurine is made on the basis of a cone: if there is a task to combine natural material with plasticine, then this is possible.

To make it more animal-like, the bump that will become the panda's body can be painted in the appropriate colors.


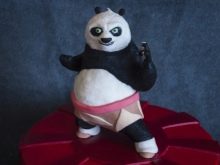
How to make Kung Fu Panda?
The task becomes more complicated, because you will have to sculpt not just a cute bear, but the hero of a legendary cartoon, that is, in sculpting you need to convey the features of a particular character. However, the task is feasible even for children.


Making Kung Fu Panda step by step.
- Modeling begins with the formation of the head of the figure. You need to roll a medium-sized ball, plasticine will need white or ivory, milky (if there is a large set of plasticine in front of your eyes from different shades). The bottom of the ball is cut off with a stack. Carefully push through the recesses for the peephole.
- Let's start shaping the face: you need to take a piece of plasticine three times less than what was taken to make the head. A cone-shaped element is formed from it, it is attached in the center of the head, under the eye recesses. The stack forms a depression for the mouth.
- You can dwell on the small details of the face. First, small, equal-sized pieces of black plasticine are glued to the places where the eye sockets are defined. All this is gently pressed with your fingers. Then a triangular fragment in the form of a nose is glued.
- The ears will be small and oval, exactly like the character from the cartoon. If you make them a little larger, the recognition of the figure will no longer be the same.
- The eyes are made of very small white and blue plasticine balls.
- You can move on to the formation of the neck and paws. We need black plasticine for this. A cylindrical element is made from it, which is attached to the head.
- Then two identical elements are performed, from which the front legs are formed. They are molded on the sides, all joints are smoothed.
- Another cylinder is formed from the white plastic mass. It also joins the body and becomes the panda's tummy.
- Now brown plasticine is taken - from it you need to mold the hero's shorts. All elements are connected together.
- Next - the legs.They are made from a black piece, they will be cylindrical elements. They are joined by shorts, or rather, vice versa. Plasticine is darker, but still brown; shoes are molded for the hero.
- Well, how to do without a yellow belt with a brown pattern that adorns the hero's belly - he is molded too.


Everything is ready, such a character will inevitably cause a smile, because it is like a animated cartoon in front of your eyes, moreover, created with your own hands - the child will be delighted!

Light plasticine modeling
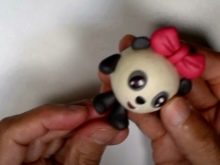
From the airy, especially attractive plasticine, together with the children, you can mold Panda - the very heroine of the cartoon "Malyshariki".
How to make a Panda - complete instructions.
- A ball is molded from white plasticine. This is the basis of the craft, it should be perfectly round and smooth.
- The next element is gray cakes-circles, from which the eyes of the figure will form. Of the black cakes, the formation of the eyes continues. Next are very small white circles, of which there will be two in each pupil.
- Next, an inverted triangular nose is formed from black plasticine. A stack will help make it flat and even.
- Very delicately, Pandochka's mouth is cut with a cutting stack. Excess plasticine is removed from the formed recess. You can use metal blades - a special tool that allows you to work as thin as possible. A small black piece of plasticine is inserted into the place of the formed notch, which will be the mouth. It should just stick in, and not just stick on top.
- A bow is formed from pink plasticine, just like Panda's. The folds on it are indicated by the stack. It must be placed on the top of the figurine.
- Small ears are formed from black plasticine, attached to the sides of the bow.
- It remains only to mold the legs and fix them in their places. The final touch is a small ponytail.


All these figures are good in that they are made quickly, that there are no complicated technological techniques here, and much material with tools will not be required.
These plasticine heroes can be made into cartoon characters: transfer animation, which uses the principle of multiple photo frames, can also be filmed with the child. There will be several times more delight, and the production of the cartoon will be shown in all its glory.


How to mold a panda from plasticine, see the video.


