How can you mold a tiger from plasticine?

Almost all children know and love domestic cats. They love to play with these affectionate and playful animals, especially kittens. Wild cats are quite another matter. These beasts are fierce, cautious and mysterious. It is difficult to meet them in nature, it is much easier to get to know them in a zoo or circus. However, you can also get a tiger at home, for example, by making it out of plasticine. How to mold a tiger from plasticine mass will be discussed in this article.


Classic version
Such materials will be needed to sculpt it.
- Picture of a tiger. The image of this animal can be found in books for children, coloring pages, on the Internet, and often place a photograph of it even on a plasticine box.
- Plasticine... From a set of colored plasticine, you will need pieces of orange, black, brown, yellow, white.
- Plasticine board... It is needed in order to keep the workplace clean.
- Stack... It is used to treat the surface of plasticine. Often this tool is sold together with a set of plasticine.
- Matches or toothpicks... With their help, you can strengthen the plasticine structure, creating a toy frame from matches.
In addition to the named materials, adults need to prepare instructions for work for the child, writing it out step by step and step by step.
A picture of the animal prepared in advance will allow the kid to carry out work, taking into account the shape of the animal, its color.
In the classic version, the tiger is orange in color with black stripes. It is these shades that will be used in this case.


Further work is performed according to the following algorithm.
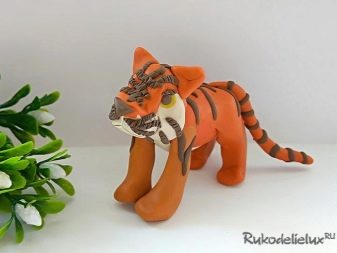
- Making the torso. The body of the animal is spindle-shaped.To mold the body, they take mashed orange plasticine and roll up a thick, oblong sausage. The belly of the animal is white, so a thin white strip of plasticine is applied and smoothed onto one side of the orange blank of the body.

- Modeling paws... Four rollers are rolled from pieces of orange plasticine, giving them the appearance of front and hind legs. The front legs of the predator are short and even, the hind legs are long and bent. Creation of the tail. The tiger's tail is long, and its tip is slightly bent upward. A long thick cord, rolled from orange plasticine, will later become the tail of a tiger.

- Head making... The head color of the predator is orange with white spots. The head is sculpted using these shades. Two balls are rolled from white plasticine. The larger ball will become the head, and the smaller ball stuck to it will be the muzzle. An orange strip of plasticine is glued on top of the head, round ears are made on the sides. A black nose made of a plasticine piece is placed on the muzzle. Eye sculpting. The basis for the eyes of the predator will be a disc made of black plasticine, then yellow discs are molded onto it and, in the end, black balls in the form of pupils are glued.

- Tiger coloring... There are black transverse stripes on the body of the tiger; they make the predator invisible in the colorful jungle. To make the plasticine tiger look like a real one, black stripes are glued to all parts of its body. They are made from strings of black plasticine.

- Assembling the figure... Having made all the parts, they are put in place, fixing them with toothpicks. This will allow the structure to become stronger. During installation, it is necessary to carefully connect the white neck with the white belly, to smooth this place. The red back is connected to the red part of the head and is also smoothed.


- The toy is compared with the drawing, small details are corrected, and finishing is carried out. The muzzle of the animal is decorated with a lush mustache, using a stack, they draw the mouth of a tiger.


What other tiger can you make?
A toy created with your own hands from plasticine gives the child great joy. If you want to consolidate the learned skills, you can continue your creativity.... So, to an adult tiger, you can add a small tiger, dazzle a white or saber-toothed tiger.


Tiger cub
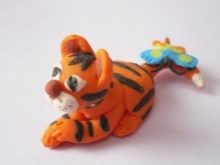
Although the same materials and tools are used to create a funny little tiger cub, the look of the craft will be very different.

Making such a toy is easy if you follow the steps below.
- The first step is to blind head and torso. To do this, a ball is rolled out of orange plasticine in the form of a future head, and the body is made pear-shaped.
- The tiger has a fat funny paws... Considering this, the limbs of a small predator are made. The front legs are sculpted even, slightly widened at the bottom. The hind legs are given the shape of a drop, slightly flattening them, pressing them against the board.
- Next, from small pieces of orange plasticine they make round ears and a long tail.
- In the next step the molded parts are put together. To do this, the body is placed vertically, and, using a toothpick, the head is fixed. Then the front legs are fixed by placing them side by side. The hind legs are horizontally attached to the lower torso. A tail is attached to the back of the body.
- When the main work is done, they begin to sculpt small parts. The muzzle of the animal deserves special attention. It is necessary to glue the tiger's ears to it, make white cheeks, insert a pink nose. Eyes made of yellow discs with a black outline are placed above the cheeks, black pupils and small white dots in the form of sun glare are added to them. The tiger cub's neck is wrapped in a white shirt front, making it fluffy with the help of a stack.
- Then follows stick balls on the feet of the limbs from white plasticine in the form of fingers and pads, fix the black claws.
- It remains only to give the craft a striped color. To do this, short thin threads are made from black plasticine and glued to the head and other parts of the animal's body.


Another DIY toy is ready. But you can not stop there and create a whole plasticine zoo.
White
The next beast can be a white tiger. It will not be difficult to sculpt it, because the basic skills of working with plasticine have already been obtained.
The only difference will be in the use of other colors.
- The main color will be white plasticine. The head, body, paws and tail are sculpted from it.
- The eyes will remain the same as those of an orange adult tiger. They are made from black discs, on which yellow pancakes with a black pupil and white highlights are molded.
- The stripes on the tiger's body remain black.


A blinded white tiger will become a real decoration of the plasticine zoo. But once upon a time more formidable saber-toothed tigers lived on Earth. If you find a drawing of such a tiger, it can also be molded from plasticine.


Saber-toothed
Looking at the picture, it is easy to see that the saber-toothed tiger is different from modern species.
It is worth dwelling on these differences separately.
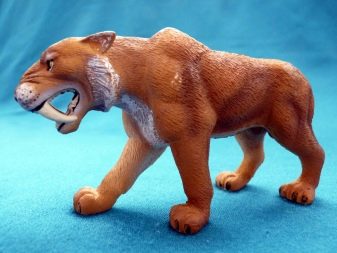
- Coloration... Unlike the modern tiger, which has a bright orange color with black stripes, saber-toothed tigers had a sandy gray color, and instead of stripes, the body was covered with dark small spots. In this regard, the sand color obtained by mixing brown and white plasticine is used to sculpt the body, head and legs.
- Huge fangs... In order to show the main difference between the saber-toothed tiger - huge fangs - two thin cones are molded from white plasticine, which are slightly flattened and glued to the upper jaw of the animal.
- Features of the physique. The saber-toothed tiger had a more massive build, thicker legs, the forelimbs were much longer and raised the chest above the sacrum. All these differences are taken into account when sculpting a saber-toothed tiger, giving it a similarity in body structure.
- Tail the saber-toothed tiger was much shorter, not even reaching the ground. It is such a tail, with a small brush at the end, that must be glued to a plasticine toy.


Having named the features of the appearance of the saber-toothed tiger and sculpted it from plasticine, the child will well remember the appearance of this extinct animal.
To learn how to make a saber-toothed tiger from plasticine, see the video.
Useful Tips
Working with plasticine is a very useful activity for preschoolers and younger students. Modeling develops accuracy, patience, perseverance and hard work in children.
To make the work more diversified, it is worth inviting the child to complete such tasks.
- Before you start modeling, you need to open a box of plasticine with your child and examine the contents. Ask the kid to choose the colors that are most suitable for modeling a tiger.
- Invite the child to mix small pieces of plasticine of different colors and see what happens.
- Ask to name the geometric shapes that resemble parts of the body of a tiger.
- Looking at the pictures, it is recommended to ask the child to name the differences between ordinary tigers and white and saber-toothed ones.
After finishing work, children need to be reminded to clean up the workplace and remove the clay and tools where they should be stored.


