Methods for sculpting a snail from plasticine

Plasticine is a material from which you can make a variety of figures. They can be very complex or extremely simple. In today's article, we will learn how you can mold funny snails from plasticine.

Classic version?
Modeling a snail is interesting, but not too difficult. A child of any age can figure out how to make such a funny character from plasticine.
For babies aged 3-4 years, it is best to master the sculpting technique from classical patterns.
Let us consider in detail what components will be needed for the simplest plasticine snail.


The shell and body of the mollusk must have different colors. Bright contrasts look especially attractive and expressive, but you can also resort to small differences in shades.
To make a simple snail according to the classical scheme, you need will prepare the following materials and fixtures:
- plasticine mass of black, white and two other any colors;
- wire base;
- glasses filled with cold and warm water.

We find out detailed instructions for making a simple snail for beginners.
- First you need to take 2 bars of plastic material of various colors... A couple of balls must be carefully rolled out of them. After that, each of them is immersed in a glass of warm water for literally 1 minute. This is necessary for them to soften. One of the balls should be slightly larger than the other.

- A more voluminous ball is rolled into a bundle of sufficient length. This can be done in the hands by weight, or you can roll out the part with your palm on a board.

- After that, the flagellum must be carefully rolled up in a spiral manner. Thus, the shell of the future plasticine snail will be made.

- The ball, which has a more modest size, must be rolled into a thick and short sausage. Then this element is carefully bent at right angles.

- The base of the body of the future plasticine snail should be pressed with your fingers to the board... This is necessary for the part to become flattened, to acquire uneven edges.

- The finished shell should be carefully placed on a flat plasticine piece. This element must be slightly pressed down. It is important not to overdo it in this process.

- Take a couple of pieces from a white plasticine block, and then roll them into balls. Their size should be close to beads. After that, a piece of black plasticine is rolled out to obtain a plate. With this element, it is necessary to wrap a wire piece, which will then be inserted into the prepared white beads, as well as the snail's body.

- A couple of small balls should also be prepared from black plasticine mass. They need to be slightly crushed, and then fixed on white beads. These will be the pupils of the clam.

When all the components are assembled into a single composition, it will be possible to appreciate the amusing charm of the plasticine snail.
How to sculpt with chestnut?
An interesting craft will turn out from a combination of plasticine and chestnut. Using such materials, you can make a very original snail. This requires the following components:
- chestnut;
- wet wipes for hands;
- plastic stack;
- black and hot pink plastic material.


Consider a detailed master class on making a cute snail from plastic mass with chestnut.
- First you need to take a piece of hot pink plasticine. It will need to be divided into 3 parts.
- From the workpiece, which has the largest dimensions, the base for the snail's body should be formed... The head of the mollusk will be located in front. Next, you will need to prepare the necessary layer for the chestnut.
- The chestnut must be attached to the central part of the plasticine craft. Horns should be made from the workpiece, which has the smallest dimensions. At the top of them, you need to fix the eyes of the snail. Additionally, you will need to attach tiny black plasticine balls. These will be the pupils.
- The made and collected eyes should be fixed on the top of the plasticine mollusk. Next, you need to take the stack. With its help, you need to carefully draw the nostrils and mouth in the form of the simplest lines.
- From a medium hot pink ball, you need roll out a long and thin strip.
- The side of the chestnut will be needed glue over with a thin blank made of bright pink plasticine mass... This is how a spiral should form.
- If all actions were correct, the result will be a very attractive and positive craft that will surely delight the child.


How to make with a seashell?
This workshop is especially attractive for children aged 3-4 years.
To make a charming snail with a shell yourself, you will need to walk a little in the park or inspect the summer cottage. It is in such places that empty shells are most often found.


In addition, you will need other equally important components:
- long seashells;
- plasticine mass of various colors;
- stack of plastic.
If all the components have been found and prepared, you can start making a cute plasticine snail.
- First, the shell is prepared. The shells must be washed very well and thoroughly and all dust and dirt must be removed from them. The workpieces will need to be dried. If you want, the sinks are allowed to be varnished.

- Colored plasticine block must be well wrinkled in your hands, and then form a dense sausage out of it. One of its ends must be made a little narrower, and the other must be bent.A pre-prepared and clean shell is placed on top of the plasticine sausage.

- Oblong shells must be thoroughly washed, cleaned of all dirt and mucus... The prepared components are stuck into the head of the mollusc. All joint areas are carefully smoothed.

- Next, take a plastic material of white color... A couple of balls are made of it, the sizes of which resemble beads. In the interior of these components, grooves are formed by means of a stack.

- It is necessary to make balls from green plasticine... Then these details are slightly flattened and placed in the area of the eye iris. The pupils are done in the same way. Prepared mollusk eyes are fixed on top of long shells.

- A short tourniquet is rolled up from a colored plasticine mass. It is recorded as the cute smile of a snail.

Such a craft will turn out to be very original and effective. The child must be interested in it.
Modeling on cardboard
Plasticine snail on a cardboard is a very beautiful composition. To create it, you only need to prepare a wire, a marker, a plastic stack and plasticine.
Consider detailed instructions for creating such a craft.
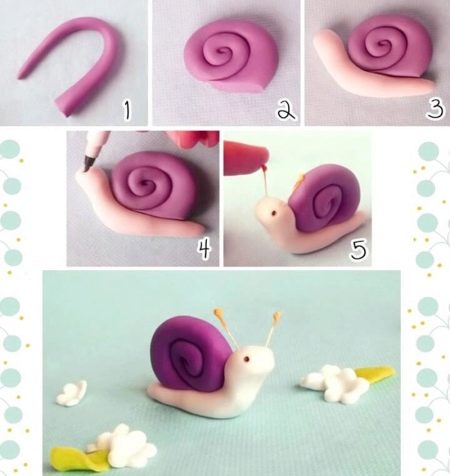
- First you need to take a bar of purple plasticine. It is thoroughly kneaded, after which a long sausage is formed.
- The finished sausage is carefully folded in a spiral... All excess should be cut off using a stack.
- A piece of pink plasticine mass will also need to be rolled into a sausage. This component should be slightly thicker and shorter.
- A pre-made shell must be attached to the back half of the workpiece. The front half is bent at a right angle.
- Using a marker, you shouldpaint eyes with a plasticine mollusk.
- Next, the wire part will need to be trimmed to get 2 short sections... On one of the ends of each of the segments, a ball is strung, molded from a colored plasticine mass.
- Next, the ball will need to be carefully pulled to the very bottom. With the second tip, the wire is driven into the snail's head. Thus, it will turn out to make the antennae.
- At the final stage form the simplest flowers and leaves, which are placed surrounded by a plasticine snail.

The considered homemade product turns out to be very simple to perform.
Of course, at the end of all stages, the finished snail can be supplemented not only with plasticine flowers and leaves, but also with any other decorations. Here, the imagination of the young master is not limited to anything.


More ideas
There are many more different techniques for sculpting a snail from plasticine. Different materials are used in different workshops. For example, crafts with maple leaves, cones, pasta, acorns and so on are cool and positive.

Let's consider in stages how you can make cute snails from plasticine and pasta with your own hands.
- Necessary take some pasta, the shape of which resembles the shape of seashells.
- Should take a pink piece of plasticine, roll a sausage out of it and bend it at a right angle. The eyes of the snail should be attached to the top. They can be made from plasticine, or you can use ready-made options purchased at the store.
- Costs make antennae using a pair of toothpicks and pink plasticine circles fixed on them.
- On top of the pasta is attach small flattened circles of colored plasticine... With such components, the craft will turn out to be more interesting.
- The snail body can be combined with a pasta shell. In a single combination, a ready-made homemade product will look cool!


A child whose age is 4 or 5 years old can handle such a craft.

It is extremely simple to make a snail from plasticine and cones.... The principle of action here will be about the same as in the case of empty shells, only in this case, for example, a fir cone of suitable sizes will take over the role of the shell.
Such crafts look especially interesting and unusual. Even the smallest craftsmen can make them without any problems.

A plasticine snail, in the manufacture of which maple leaves are used, will turn out to be very original and elegant. To create such a craft you will need:
- red plasticine;
- stack;
- maple leaves;
- scissors;
- Double-sided tape;
- plastic eyes.

Let's analyze the step-by-step workflow.
- A red plasticine mass is taken. A small sausage is formed from it.
- One end of the sausage should be tighter. Here you need to make an incision to form 2 halves. It is worth making the antennae of a mollusk from them. The body will need to be bent.
- Now you need to start preparing the snail's "house". For these purposes, you must use maple leaves. In advance, they will need to cut off all the cuttings.
- The maple leaf is folded neatly. The result is a strip. It will need to be twisted. You should start from the narrower side of the part. To make the snail's house more voluminous, you will need to wind some more similar strips of leaves. At the final stage, the clam shell should be fixed with tape. Thanks to him, the part will not unwind.
- Next, the finished house of leaves is attached to the body of a plasticine snail... Then plastic eyes are added. The stacks represent the mouth. The craft is ready.


Detailed instructions for making a plasticine snail can be found in the following video.


