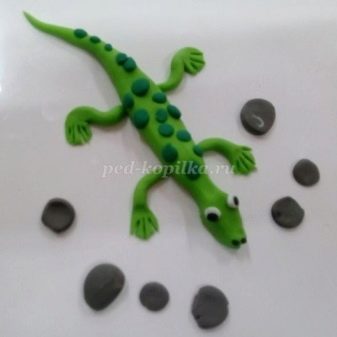
How to mold a lizard from plasticine?

A child's acquaintance with the environment takes place in different ways. One of them is plasticine modeling. This lesson develops the fine motor skills of babies, promotes the development of creative thinking, and lays down artistic skills. The main thing is that the process of creating crafts is very interesting for children, moreover, it teaches the child to order and perseverance.
For crafts, you should choose representatives of the animal world already familiar to the child, asking him about the appearance, habits, and habitat of the animal. Or to acquaint with the inhabitants of the planet new to him, by briefly talking about the animal and showing it in pictures in books or on the Internet.


Classic version
For children, modeling from plasticine is an opportunity to bring their creative ideas to life, be it a favorite cartoon character or a cute forest animal. An interesting choice of image is the lizard. This small agile animal is hardly noticeable in the tall grass, when it sees people it quickly hides between stones, and in case of danger it drops its tail, which grows back after a while. Every child can mold a lizard from plasticine. To do this, we have prepared a diagram in which the steps to create this animal are described in stages.
To create a craft, you need the following materials:
- a set of plasticine;
- stacks;
- modeling board;
- a sheet of colored cardboard;
- pebbles of different sizes (for decoration).


Progress. Choosing the color of our future lizard. We took light green. We tear off a small piece from the bar, from which we will form the legs of the animal. The main piece will serve as the torso, head and tail. We make the head of the lizard by squeezing and slightly scrolling part of the large bar.To form the tail, roll out a large block, as shown in the picture. From a small piece we make 4 balls of the same size, which we then roll out into elongated sausages.
Slightly flattens the tips of the feet. Also, the body of our lizard also needs to be flattened a little. We stick the made paws to the sides of the body, the front ones should be slightly smaller than the rear ones.
Smooth bend of the feet should guide them forward, as shown in the figure.


Draw the toes on each foot using a stack. We also make the open mouth of our figure with a stack. We take dark green plasticine and form many small balls of different sizes from it, which will decorate the back of the lizard. We stick the made balls on the back in any shape - from the neck to the tail.
To make the eyes, we make two white and black balls: the first is a little more, the second is less. And we stick them on the lizard's face. We make two small holes on the nose - nostrils. We place our figurine on a piece of cardboard, decorating it with pebbles. Our green prankster is ready.


How to make a gecko?
One of the lizard species is the gecko. Quite often they are bred as pets. Depending on the subspecies, geckos differ in color and appearance.
We offer to make a multi-colored figurine of a gecko from plasticine step by step together with your child. To do this, you need the following tools:
- a set of colored plasticine;
- stacks;
- modeling board;
- toothpick.


Work algorithm. We do not take one plasticine color as a basis. Our lizard will have a marble color, for this you need to prepare three colors - yellow, light green and green, and combine them into one mass to get beautiful multi-colored veins. Roll out the resulting piece so that a sausage is formed. On one side, we form the head and neck, as shown in the picture. We pull the other end so that we get an elongated tail, tapering to the tip. Give the body an S-shape.
The paws can be made either from the same mixed color, or monochromatic. For them, we form 4 equal parts, which we then roll into sausages. We press down the end of each one a little and cut through the fingers of the lizard.


We attach the resulting legs to the body. For the eyes, we form two small balls of green plasticine. And we sculpt them on the sides of the head. We make small indentations in them, in which we place black balls. We draw the mouth and nostrils of our reptile. We decorate the back of the lizard with thin stripes of green and yellow colors - from the head to the tip of the tail.
We put dots along the entire length of the green stripes using a toothpick. Our colorful beauty is ready. To decorate the lizard, you can use various decorative elements - for example, beads, rhinestones.


Sculpting tips
- be sure to work on the sculpting board - thanks to it you will not have to wash the table from the remnants of plasticine after class;
- when shaping the head of a lizard, do not forget about the neck, which should be clearly defined;
- after the body of the lizard has been sculpted, it should be slightly pressed down from above so that the surface becomes slightly flat;
- when shaping the legs of the lizard, make sure that the folds are soft and invisible;
- do not forget to draw the toes on the paws;
- lizards have bulging eyes, so there is no need to make additional pits on the head.
Use different decor for jewelry - this way the craft will become original and even more beautiful.


For information on how to mold a lizard from plasticine, see the next video.


