Selection of the diameter of the ring lamp
The ring lamp is designed for effective video photography. Thanks to such a lamp, when shooting an object or person, the shadow recedes into the background, hidden from the observer. In the worst case, the shadow halo is observed against the background of the silhouette of a person or the outlines of the subject.


Small lamps
Loop luminaires with diameters of 26, 36, 45, 30, 33, 32, 16, 46, 31, 20 cm - or similar diameters - usually do not exceed 20 watts. That, in turn, depends on the nominal power value of the LEDs multiplied by their total number. Depending on the dimensions of the lamp and the power of the final LED, there can be about 10 to 100 pieces for each such ring.
To limit the current, so that the LEDs do not burn out after a few seconds or minutes, there is a limiting resistor in the circuit - one or more.


The white LED crystal - it doesn't matter whether it gives off a warm or cold glow - is designed for a supply voltage of 3 volts, at which it almost does not heat up. However, manufacturers, trying not to miss the constant excess profit, deliberately overestimate the current in such a way that the voltage on one LED under load equals 3.3 ... 4.2 V, depending on the desire to save money on light elements. It is recommended to choose not the Chinese “one-day” manufacturers that appeared on the market only yesterday or a year ago, but much more famous ones.
Knowledge of at least the basics of circuitry and the ability to solder radioelements is considered a good option - this may be required, for example, to extend the life of the lamp by eliminating the cause of overheating (LEDs heat up to 65 degrees, which is abnormal, they should not be warmer than a human finger when glowing) ...

A typical lamp with a diameter of 16 cm consumes power, say, 5 ... 10 W, contains 15 ... 30 planar LEDs. Ideally, they should be connected in parallel and connected through a sufficiently powerful chip resistor. For lamps with a dimmer, in the simplest case, a compact variable resistor is connected in series in the circuit, however, the operating current can be adjusted stepwise - it is implemented using a simple microcontroller with push-button mode switching. More expensive ring lamps have multistage (in percentage of luminosity) brightness switching - in this case, the "+" and "-" keys are used, and power is supplied from finger batteries (from 1 to 3 pcs.) Or with a rechargeable lithium-ion battery that receives recharge from (micro) USB port.


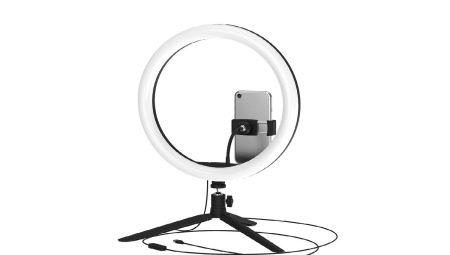
Large diameters
Among the variety of sizes - 54, 55, 56, 48 cm in diameter. These lamps are supplied with a tripod.
Such a set is designed for professional photographers who, although they shoot great frames and video clips without unnecessary shaking and jitter, which can spoil the detail of each shot, but nevertheless want to play it safe.

Lamps of this "caliber" are the preferred choice of studio photographers and videographers, but a tripod is often used in outdoor photo shoots. The lamp is powered by connecting an external power supply or battery.
Thanks to the series connection of groups of LEDs (3-4 each), and the same groups are connected in parallel with each other, it is possible to turn on such a lamp even in a car "cigarette lighter".


They are also compatible with laptop power supplies, which, in turn, require a 12V power supply. They can even be connected to a battery from the alarm - it also gives out 12.6 V. At the same time, without turning off the security and fire system of the building. The power of studio lamps is 25 ... 40 W, and a combination of several will give at least 100 W.

Which model should you choose?
For individual bloggers whose shooting locations are limited to only a small area of the premises (for example, their own bedroom, which has a computer or laptop with an action or webcam), a lamp with a power of more than 20 W will seem inappropriate. Excessive light, which is harmful to look at for a long time (even with peripheral vision), is unlikely to benefit the eyesespecially when it is "cold" lighting in which a small amount of ultraviolet light may be present.
Try to choose a "warmer" color - the ideal is the spectrum that the sun gives out, when under direct rays the white surface appears slightly yellowish.


The travel blogger will opt for a small lamp that is recharged from an external battery. The presence of USB ports will turn out to be not only desirable, but necessary measure.
Additional convenience for shooting can be provided by one of the following accessories:
- clips or clips, suction cups for suspension;
- mirror;
- solar panel that recharges the built-in battery during the day;
- an additional holder, on which a smartphone is installed in the middle of the circle bounded by the lamp.
This is not the whole list of additional accessories. Sometimes it is not worth saving on such conveniences either, because they allow you to take pictures or photographs faster and with better quality. You also hardly need a lamp with an extreme brightness - except when you ride a bike at night and take pictures of the surroundings, in this case a large ring-shaped lamp can be fixed to the bicycle handlebar using all kinds of fixing structures and elements.


Practical tasks will require a slightly different approach. For example, if you are a master make-up artist, beautician, then it is recommended to use lamps with a power of 30-35 W, but this is only a recommendation.


If you are familiar with the basics of electronics, know how to solder radio components and are afraid of running into a fake, even after giving a lot of money, then the instructions for making such a lamp boil down to the following.
- Order LEDs on the Internet - for example, planar type SMD or simple superbright classic forms, as well as ordinary semiconductor diodes to reduce the voltage.You will also need the simplest solid base - as a breadboard, as well as flux and solder for working with a soldering iron.
- Connect the LEDs in parallel.
- Install high voltage damping diodes rated for the load with twice the power reserve. Here it is required to lower the voltage under load to 3.3 V (this is the operating maximum for white LEDs, above which it is not recommended to increase the voltage due to significant heating and failure of the light elements).
- Install an additional switch on the power cable.
- Make a detachable connection - use single-pin terminal blocks (male and female), marking the polarity on the battery and lamp wires.
- From the side of the power source, if you are using, for example, an external battery for smartphones and tablets, solder the USB plug on the additional cord to the contacts.
- Insulate all live parts with electrical tape or masking tape.


Place the LED panel in the matte case. You can also fill it in the mold with clear hot melt glue or optical epoxy.
If the assembly is done neatly, then a homemade lamp will not give way in appearance to an industrial one. It will serve the declared 25 ... 100 thousand hours, as advertisements promise, and will not burn out, barely breaking the bar of 1000 ... 2500 hours, as is the case with industrial LED products.


