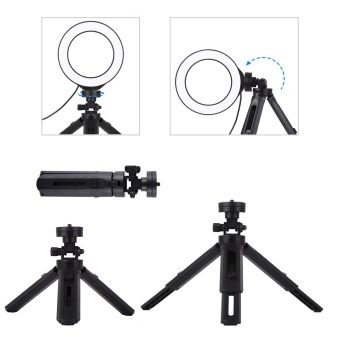
How to assemble a ring lamp?

When shopping for photography accessories, the question of how to assemble a ring lamp with a selfie tripod comes up more often than others. At first glance, this device is rather complicated, but even a teenager can easily mount it. Detailed instructions will help you figure out how to properly assemble small and large ring lamps.

Checking details
The first thing a new owner of a lighting fixture has to do for shooting is to make sure that the package is complete, all the details are present in it. The standard complete set necessarily includes:
-
fastening accessories;
-
lamp;
-
diffusers;
-
tripod;
-
flexible tube;
-
latch for devices;
-
power unit.


Depending on the model, the manufacturer can supplement the complete set with a screwdriver for installation work, a bag for carrying equipment. And also in most models there are already installed filters and mirrors. A Bluetooth remote control for remote shooting is also almost always present in the kits, with rare exceptions.
When checking accessories, it is important to make sure that they include mounts for different shooting devices. Photographers come in handy with a screw holder for the camera. Selfie lovers - a holder for a smartphone, tablet PC.


Assembly instructions
Assembling the ring lamp correctly is not too difficult if you follow the detailed instructions. The small selfie model and the full-size model with a tripod are mounted according to the general scheme. Some differences will only be in the dimensions and functionality of the lighting fixture.


Assembly sequence.
-
Preparing the rack. You need to take it, loosen the screw on the side, then straighten the tripod.The bottom cross of this element must be 100 mm above the support surface. This will keep the fixture stable.
-
Tripod height adjustment. It is selected based on the location of the subject, the height of the photographer. The sections are telescopic, they are pushed out from each other to the desired height. Depending on the model, you can get an increase in the length of the rod 3-4 times.
-
Preparing the lamp. Diffusers made of plastic are attached to it - white cold spectrum or warm yellow. Assembly is done from below. The parts are fixed until they click, indicating that the element is attached.
-
Installation on a tripod. For fixing on the base of the lamp, you need to find the screw, then loosen it to create a gap. The lamp holder is compatible with a tripod. All that remains is to tighten the screw to securely fix it on the tripod in the desired position.
-
Power connection. The block wires are connected with plugs to each other until it stops. Then the cord is connected to the lamp. Plugs into an outlet to test the device. It is important to make sure that the device has a plug that complies with the Russian standard, otherwise you will have to purchase an adapter.
-
Adjustment. On the assembled LED ring lamp, the brightness level can be adjusted. The controls are located on the back of the instrument panel. By twisting the knob, it is easy to increase or decrease the brightness of the glow.
-
Lamp tilt. It can move forward or backward. It is enough to briefly loosen the special screw on the hinge base, select a suitable position, and then fix the result. The tilt range is 180 degrees.


These are the main steps in the build process. They will be the same for most tripod lamps. But the stationary position of the luminaire is not always suitable for shooting. If a deviation from the standard position is desired, a flexible tubular extension is used. It is fixed directly on the tripod itself with screws.
The lamp itself is attached to the flexible holder. After that, it can be deflected at the desired angle to the right and left, forward and backward.
This is convenient when you need to provide lighting for studio shooting or when working with special boxes.
Recommendations
There are some important things to consider when assembling a ring lamp. Here are some helpful guidelines.
-
The standard ring lamps are equipped with a phone holder. But some models have additional clips. They can be used to mount the camera by screwing it onto a tripod. When choosing a model, it is worth making sure that it is equipped with everything you need.
-
Armed with a miniature screwdriver, you can complement the LED ring with the included mirror. This option is suitable for those who shoot makeup, hairstyles, eyebrows and eyelashes.
-
It is important not to apply too much force when turning the screw fasteners. Such elements break threads quite easily. It is important to act carefully, but not to forget about the reliability of the connection.
-
Some tripods may additionally be equipped with casters. They can be easily attached to a tripod by removing the protective caps.
-
When deviating from the vertical axis, it is important not to exceed the permissible load. It is better to deflect the light ring on the flexible hose above one of the legs of the stand.


With all these tips in mind, you can easily figure out how to assemble and test run a dedicated backlight for photographers and selfie lovers.
For information on how to assemble a ring lamp, see the video below.


