How to make a piggy bank out of paper or cardboard?

Paper and cardboard are readily available materials from which you can craft a wide variety of different crafts. These can be not only applications, but also interesting volumetric products. For example, piggy banks modeled from paper and cardboard are very original. In the article we will tell you how you can make them yourself.


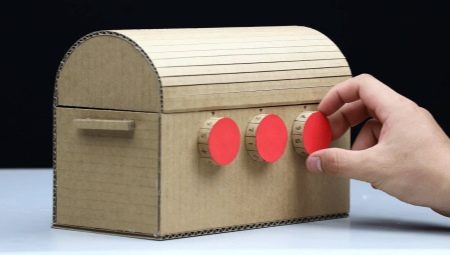
A product in the form of a safe
If you want to make a creative drive from ordinary thick cardboard, then you should consider the option of making a craft in the form of an original safe. For a child, he will become the first reliable storehouse for paper money and coins in his life.


To simulate a beautiful and reliable piggy bank-safe, you will need the following items:
- thick cardboard (cardboard from which the boxes are made is suitable, if there is none, it is enough to glue ordinary thin cardboard in a couple of layers);
- sharp stationery knife;
- adhesive composition;
- paints (it is advisable to immediately prepare a set of different colors);
- felt-tip pens;
- various stickers for decorating a finished cardboard safe.


The size of the future cash vault can be absolutely any. It all depends on the wishes of the child. If a young user has planned to keep a lot of coins in a homemade safe, it is advisable to make it more spacious.
If you do not need to store impressive savings here, you can get by with a compact drive.


Let's figure out the step-by-step assembly of a cardboard safe box.
- If the craft is made from a thin cardboard sheet, then absolutely all the necessary parts must be glued strictly in pairs, otherwise the product will turn out to be unreliable. Dense material can be used in a single copy - many layers will not be needed.
- It is necessary to carefully cut out 8 identical rectangular pieces. These will be the walls, roof and base of the future impromptu safe.
- On the inside of the walls of the structure, draw the height level of the coin acceptor. It is necessary to maintain an indent from the edge point equal to the thickness of the cardboard, multiplied by 3.
- In the next step, you will need to securely glue the guide parts of the future coin acceptor. They should be made shorter than the width of the side walls of the structure. This is necessary so that there is enough free space for the jumpers.
- Further, by means of an adhesive solution, it will be necessary to connect the base and the walls of the original piggy bank to be made. Do not use too much glue, as it will take a long time to dry and leave unsightly stains. Portions of the adhesive should be moderate.
- Between the fixed side walls, you will need to glue the jumper part so that it does not protrude beyond the edge frames. This will be the front component of the finished homemade product.
- You can then proceed to simulate the coin acceptor. For these purposes, you will need to carefully cut 2 rectangular pieces. Their width parameter should correspond to the distance between the walls of the cardboard craft.
- In one rectangular part, you will need to cut through 3 sides, and in the fourth, only half of the thickness, so that the workpiece can then be easily opened like a door. The bend of the "door" of the coin acceptor should be fixed by means of an adhesive tape fixed on the wrong side.
- In the center of the other part, you will need to very carefully cut a hole that has a square shape.
- Next, the coin acceptor is carefully assembled, after which it is fixed on the pre-installed cardboard guides.
- Then they assemble the cardboard box itself. First, the back wall, the cover, and then the front part are glued.
- A prepared strip of thick cardboard is glued to the coin acceptor.
- The craft is almost ready. It remains only to decorate it in any chosen way. On the top of the structure, you can draw a funny face so that the coin acceptor in a single combination looks like an open or closed mouth.
Thus, you will get an original "chewing" craft.


Piggy bank
The piggy bank is a real classic. The most popular and common are porcelain or ceramic varieties of such drives, but a model made of paper or cardboard sheets will also be a good solution.

Piggy banks, made of paper using a popular technique called papercraft, are very original. Making such crafts turns out to be very curious and exciting for children. Let's figure out how to correctly model a cool paper piggy bank using the papercraft technique.
- The course of modeling such a creative homemade product consists of just a few stages. It will not be difficult to make a beautiful piggy bank; it will take very little time. First, you need to print the appropriate template on thick paper. We recommend using A4 paper.
- Further, using scissors or a special clerical knife, you will need to cut the template as accurately as possible along the contour. Going beyond it is not recommended, as this will negatively affect the appearance of the future craft.
- In the next step, you will need to carefully but confidently push the existing fold lines along the ruler.
- By connecting the valve elements with paired numbers with glue to each other, it will be possible to quickly and easily assemble an unusual craft.


Making such an unusual piggy bank in accordance with the existing clear scheme, you should act as carefully and without unnecessary haste.It is advisable to start manufacturing with the smallest details. There are many different templates, based on which it is possible to make a cool piggy bank. Each master can choose the best option for himself.


More ideas
There are many more interesting ideas for modeling original piggy banks from paper and cardboard sheets. Kids can make cool crafts using a wide variety of techniques.
For example, you get very nice piggy banks if you model them using the origami technique with and without scissors.


Let's take a closer look at how it will be possible to model the simplest, but neat and aesthetic piggy bank using the origami technique.
- First, you will need to print a diagram of the future product. It is recommended that you use heavier, higher quality paper for all prints, as it will be easier to work with.
- Next, you need to cut out all the available parts strictly along the contour. You should act carefully, without going beyond the lines and dashes, as this will have a bad effect on the quality of the finished paper product.
- At the next stage, you need to carefully push the intended fold lines along the ruler. You will need to bend the existing valves.
- At the last stage, all the details will need to be glued together. It is recommended to use a simple glue stick for this. The liquid composition of PVA is poorly suited for such operations, since it quickly permeates the paper and can leave behind clearly visible traces. With it, the craft will come out less neat and tidy.

A finished simple craft can be decorated in a variety of ways. This business should be entrusted to the child. The drive, made using origami technique, can be decorated with a variety of drawings, stickers, multi-colored inserts and other decorations.


And also a child can make a first-class cardboard piggy bank "House" from cardboard at home. This interesting children's craft can be small or large, the choice of its color design is also not limited by anything. We will learn how you can make such an original piggy bank on your own, taking as a basis the cardboard box left over from the sweets.
- At the first stage, you will need to strengthen the bottom of the cardboard structure. To do this, take a sheet of corrugated cardboard. It is necessary to cut out a square piece from it, which will completely repeat the dimensions and outlines of the bottom of the colored box.
- A dense cardboard part is coated with glue, placed on the bottom of the box, and then pressed tightly for reliable gluing.
- To make a roof ridge, you should cut out a couple of triangular pieces from bright colored cardboard. Their base must necessarily exactly correspond to the width parameter of the top of the base box.
- The upper wings of the box must be lifted up, and then cut off at an angle, after which the prepared triangular elements can be glued.
- In the next step, the cardboard sheet must be doubled. Cut a round hole on one side. In accordance with its size, a tube is twisted, which will act as a chimney, as well as holes for coins sent inside the piggy bank.
- Next, the pipe is glued into the hole. For these purposes, its end is cut into a fringe, folded and coated with a small amount of glue. It is better to use a glue stick at this stage, rather than PVA.
- If there is an open "window" made of film or plastic material in the box of chocolates, then it must be cleaned. If such a hole is not provided in the structure, then it will need to be carefully cut out from the other side, and then a piece of plasticine is glued to replace the "glass".
- The walls of the piggy bank house will need to be pasted over with colored paper. It is advisable to choose for this brighter and more attractive shades that the child likes the most. The window should not be touched during these works.
- After that, it will be possible to glue the roof with a pipe, as well as add other decorative components and decorations to the finished house.


Of course, it is possible to make a piggy bank out of cardboard and paper not only in the form of a house. Cool designs are obtained if you give them a solid shape of a ship or a car - there are a lot of options.


For information on how else you can make a piggy bank out of cardboard, see the next video.


