Quilling for beginners
Quilling - a kind of art that anyone can master, regardless of age. Paper crafts made in the described technique are worthy of special attention.
What it is?
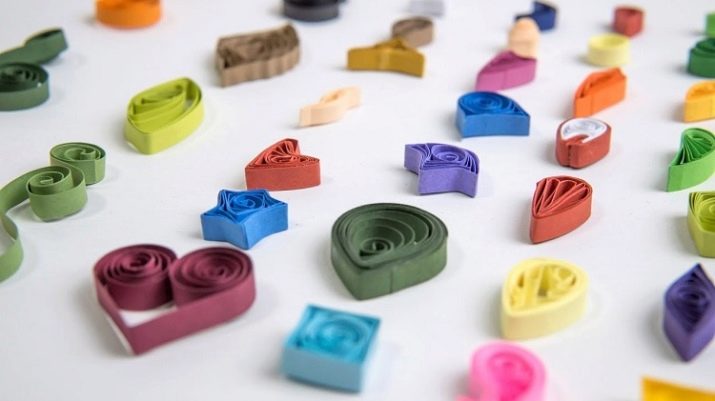
Quilling for beginners, or filigree work - is the rolling of thin strips of paper, resulting in complex designs. It is believed that this ancient art formfirst practiced by monks and used to decorate religious objects. The art itself is so named because paper was originally folded on goose feathers. Before the invention of paper, technology was used thin metal wire.
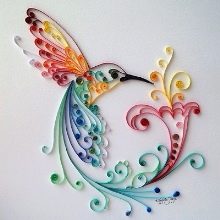
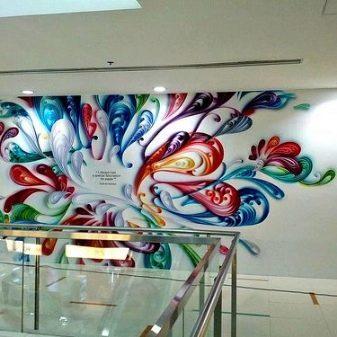
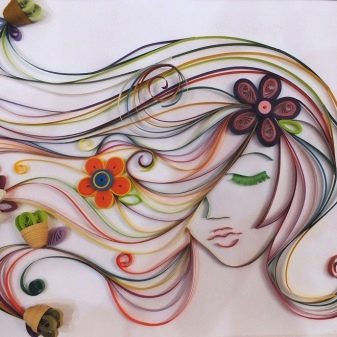
Now that there is no need to use feathers, other items are applied, such as toothpicks, needles and specially designed slotted instruments. Paper strips no longer chop by hand, a chopper was created for this. The circles you create are great for creating not only flowers, but other elements as well. Professionals can easily create paper masterpieces, forming floral paintings and landscapes with animals. It is not uncommon to see three-dimensional shapes.
Stationery, postcards, and gift boxes are often decorated with filigree paper.
The art of quilling is popular for several reasons. You can create small masterpieces without spending a lot of money on consumables that are always available in craft stores. Quilling can also be combined with other crafts. Quilling was very popular along with handicrafts in England in the 18th century. Items adorned with filigree paper included urns, wine coasters, tea cans, and more.
In American history, paper has been combined with twisted wire, shells, or wax flowers.... Only a few items dating from 1700-1800 have survived. They are mainly kept in museums in New England. Today quilling is at the peak of its popularity. It is sometimes used to decorate wedding invitations, Christmas cards, gift boxes.
Quilling can be found in art galleries in Europe and the United States and is an art that is practiced all over the world.
Required tools
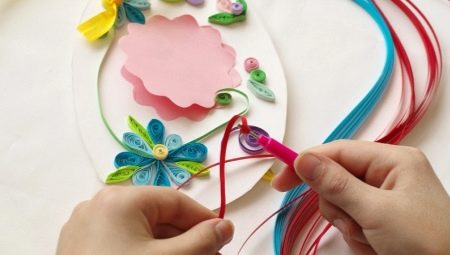
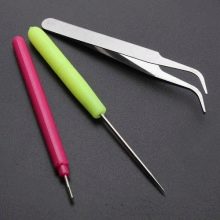
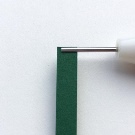
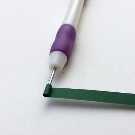
Quilling is relatively easy to learn when compared to most other crafts available today. This is a great pastime for children as technique teaches fine motor skills and is a great solution for training hand-eye coordination. The wizard will need a lot of tools in his work. One of the most important is considered bifurcated device... It is he who helps to curl paper strips. When it is not possible to purchase such a ready-made inventory, it can be used as a replacement an awl, a large needle, or an empty refill from a regular ballpoint pen.
Some have adapted to work with a toothpick. But before using the device, you will need to split its tip. Ideally suited for this stationery knife. If used gypsy needlethen break her ear. Any of these tools rotate clockwise during operation.
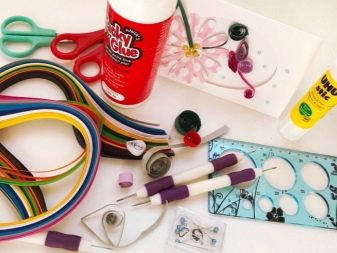
In addition to the "fork" you need to prepare:
- tweezers;
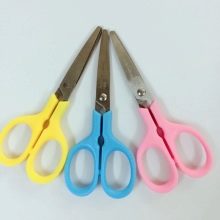
- scissors;
- glue;
- pencil.
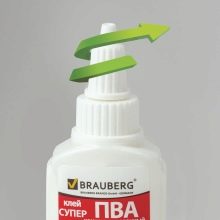
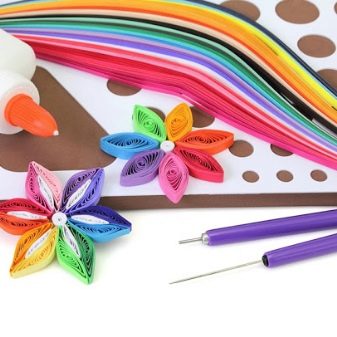
Special requirements regarding adhesive mass. It must be quick-drying and thick. It's good when there is a small dispenser on the tube. The ideal solution is PVA, you can get it at any stationery store. Sometimes they use Moment glue. The ruler, in the design of which there are holes of various diameters, greatly simplifies the work of the master. With their help, you can maintain a uniform size, as a result, the final product will look neat.
In addition to all of the above, craftsmen are advised to have on hand a rug made of foam or cork material, a set of pins and a comb, always with wide teeth.
Materials (edit)
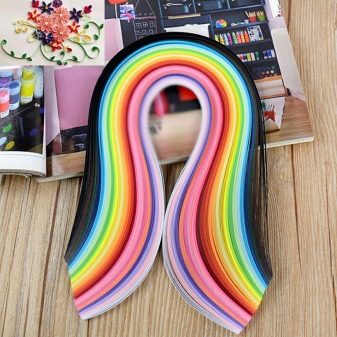
To work, the master requires not only tools, but also materials. Most of the paintings are created from paper and thread. Not everywhere, but you can find a ready-made set to create a masterpiece. Craftsmen harvest paper strips on their own. For this, double-sided colored paper is used. You need to understand that density material plays an important role, since the elasticity of the strips depends on it.
You can cut the sheet with scissors after drawing, or using a special technique. A small shredder is perfect for this.
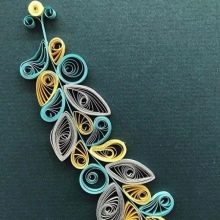
Basic elements
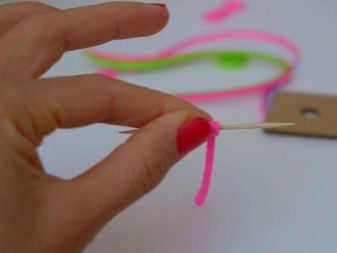
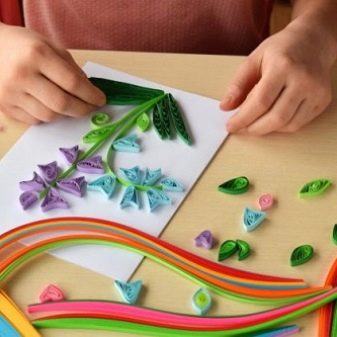
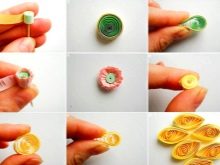
Novice masters should master the basic forms first. We are talking about a circle, a drop, a spiral, a cone and other shapes. You can make a spiral very quickly if you know how the process looks in stages.
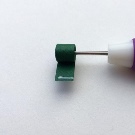
- Better to take several strips of colored paper and stack them on top of each other. Professionals recommend using ragged material as this will hold the center better and result in a smoother result.
- A small amount of glue is applied along the edge of the strips. They are then straightened with your fingers to make sure they are flat.
- Now you can pick up the tool and twist the prepared workpiece around it. You should have time to finish curling before the glue dries.
- Now that we have a coil of the required size and shape, we must apply glue to the end.
- Where it ends, the strips will need to be disconnected. The result is a subtle curl.
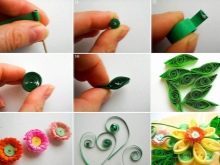
You can fantasize and change the shape of the workpiece, give it new bends. Any product starts with creating a picture or diagram. You will need A4 paper, scissors, a simple pencil for work. The sheet is folded in such a way that you end up with a triangle.The excess part is cut off, the resulting workpiece is folded again three times. Now you can start applying the pattern, it is subsequently cut out. This is the initial and simplest technique, showing how you can make paper crafts using the described technique. In addition, the main element in the work is rolls, that's why it's so important to learn how to do them right.
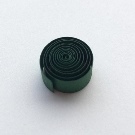
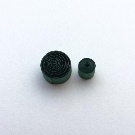
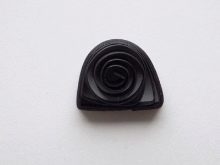
Almost any quilling job will use tight spiral. To make such a blank, you just need to wind a narrow strip of paper around the rod, and fix the tip with glue.
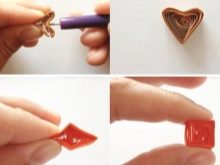
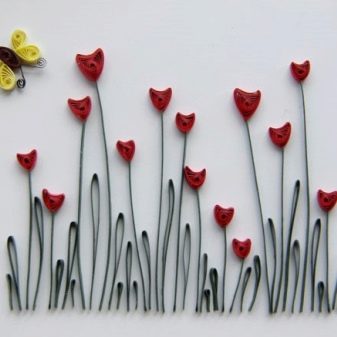
Just as easy to make small heart. Right-handers are advised to hold the material with the left hand and the instrument with the right. When using a double strip of paper, make sure that the back of the strip is facing towards the core. Rotate the tool clockwise. Another simple element is a free spiral. The principle of creation is the same, only before fixing the end, you need to remove the roll from the rod and let it unwind a little.
The curl is created using the same technology, only the end is not fixed. This technique allows you to write any name. It turns out beautifully and unusual.
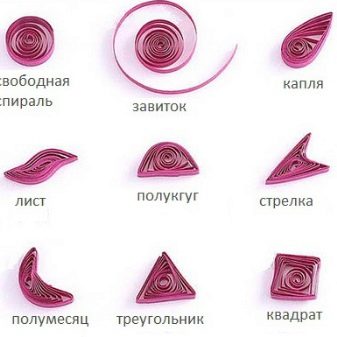
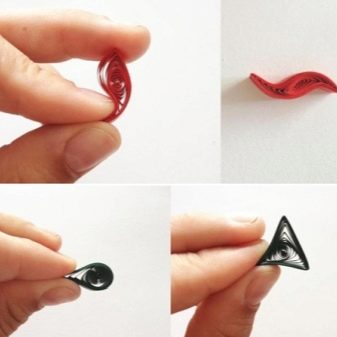
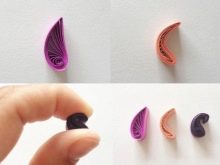
Popular among simple elements a drop. One part is made according to the principle of a free spiral, and the second part is compressed with your fingers. The figure will take on shape if you hold it for a few minutes. If a person is just mastering the quilling technique, he has nowhere to rush. It turns out neatly only when there is no rush. For beginners, there are many detailed videos on the Web today on how to make certain compositions and work with different materials.
When the simple forms are mastered well enough, you can proceed to the implementation of more complex elements. If you work from the basics, you can quickly learn how to create real masterpieces.
Simple schemes for adults
The technique of performing any figure is clear when it is described step by step. Provides a detailed description always Master Class. Even adults who are just getting acquainted with quilling should start by working with simple schemes.
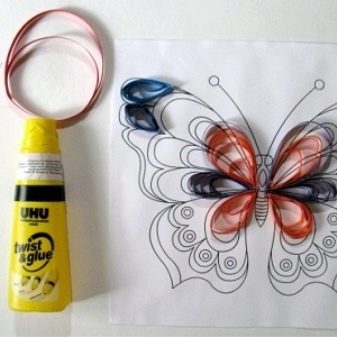
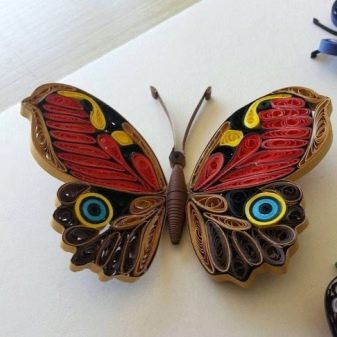
"Butterfly"
In the process of painstaking work, you can create a butterfly or a tree. In the future, their shape and size can be changed depending on the imagination of the author. A butterfly, although simple, is quite an interesting craft. The strips of paper can be of any color. The step-by-step process is as follows.
- First, you need to glue two stripes of the same color and make free rolls out of them. Then you need to make a second part of the same craft. A template is used to align the diameter.
- A free spiral is also created from paper of a different color. It must be squeezed to form a drop, the tip of which is slightly bent to the side.
- Now you can start working with the third color. Again we glue two strips together, first makes a free spiral, then a peephole. Separately, you will need to twist a loose roll, for which it is better to take paper of the same color.
- The antennae are made last. For them, a strip of paper is folded in half and only the ends are wound.
The butterfly is assembled on a dense basis from the created elements. You can use thick paper as it, but cardboard is better.
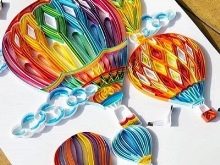
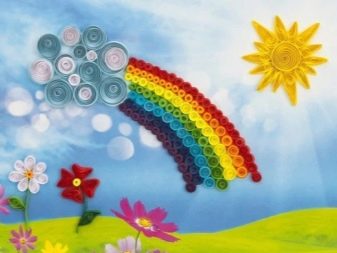
"Rainbow"
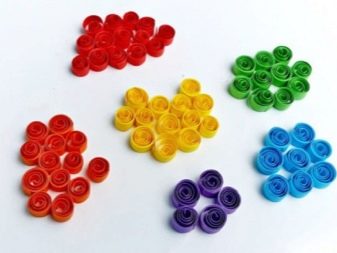
It is the perfect solution for a lesson in kindergarten or elementary school. In order to collect a rainbow, you only need to make a certain number of free rolls and spirals. The description of the process is simple. All work begins with the preparation of blanks. You need to make 5 purple spirals, 7 blue, 9 green, 12 yellow, 17 orange and 20 red.
All rolls must be of the same diameter. Use a template for alignment. It is desirable that the workpieces be up to 9 mm. Separately, from white paper, you will need to make 10 free spirals. Now you can lay out the drawing on the base, but it is too early to fix the blanks.Only when you are convinced that the final product will look great can the glue be applied.
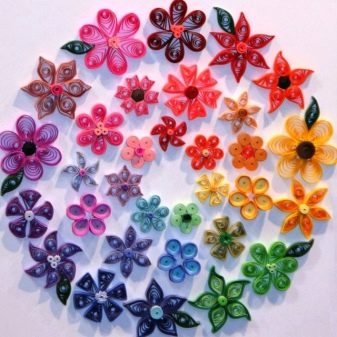
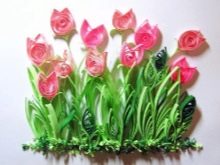
"Flowers"
Quilling colors may vary. Better to start with the simplest ones. To create such an element, you first need to make one free roll, it will act as the middle. For the petals, four spirals are made, which are slightly dispersed. The diameter depends on the wishes of the master, however, as well as the number of petals.
Before gluing to the base, the parts are preliminarily placed on it. If everything worked out according to the idea, then you can collect the application. When creating flower arrangements, paper of various colors is used.... Combine them at will. Sometimes supplemented with leaves, stems and other elements. A butterfly would look good here. The leaves are made in the form of a free drop.
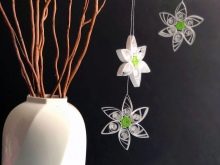
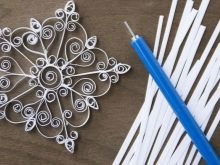
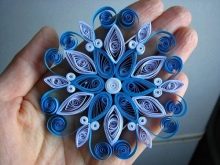
"Snowflakes"
Snowflakes are one of the richest options for fantasy. They can be simple or complex, of different shapes and colors. Looks good white and with blue inclusions. For manufacturing, you will need a stencil, paper, glue and a rod with pins. At the first stage, a template is made. Then the paper strips are halved. There should be three of them in total. Three spirals are twisted, necessarily the same in size. Usually equal to the first blank when the resulting diameter is measured. The spiral can be gently removed with a simple toothpick, and then allowed to unwind a little. Only after that the tip is glued together. All blanks are arranged according to the layout. You can use pins first, then glue.
There is another option for how you could make a snowflake using the described technique. An element such as an "eye" is used in the design of such a product. Several eyes are laid around one spiral, glued together. In the second step, a tight spiral is made and glued to the vertices. At first, it is difficult to create a non-twisting spiral, so it is advised to shift its center and press it a little.
The finished snowflake will look great on a Christmas tree or as another New Year's decoration.

Women's earrings
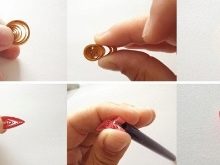
No matter how strange it may sound, modern costume jewelry is made from various materials. Paper was no exception. Quilling is ideal for making earrings that are unique in shape and design. For work, you will need colored paper, a quilling tool, glue, a pencil, a board and scissors. The color of the material can be selected individually. The hardest part is make the decoration symmetrical, so the work should start with drawing up a diagram on paper. This is the very template that must be used.
Now you can proceed directly to making the earrings themselves. To do this, you need to cut 6 strips of the same color. Each should be 1 cm wide, they all stick together. Cut 3 strips from paper of the second shade. They are glued to the end of the previously made tape, additionally gluing 3 more strips of paper of the first color. There should be two such blanks.
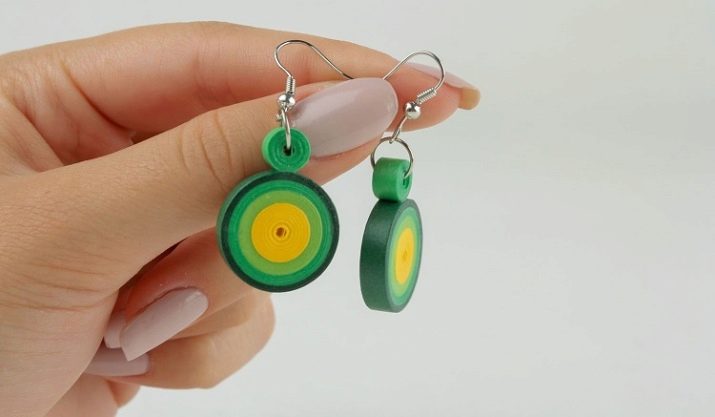
Now they make from ribbons tight spiral. The tapes are glued again according to the same principle. Only the number of stripes is reduced by two. Thus, instead of 6 stripes, there should be 4 first shades and 3 second ones. The rest of the principle remains unchanged. The second tight spiral should be smaller than the first. At the third stage, everything is repeated, and the number of ribbons is again reduced by two, that is, there should be two strips of the first color. We now have paired shapes for two earrings. Now they need to be laid out on the template and glued together.
In the last turn, several paper strips are cut out and glued, then twisted, but not into a tight, but a free spiral. Then the resulting blank is slightly stretched, and an element in the shape of an eye is obtained. There should be four such figures. Two are attached to the previously created template for each earring.
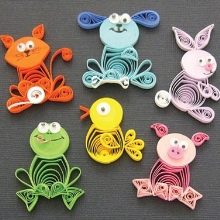
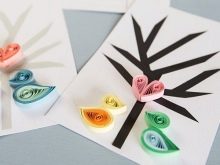
Quilling crafts for children
Quilling is ideal for making crafts for kids. It can be not only different animals, but also birds, flowers, cartoon characters and much more. By February 23, the figures can be associated with a military theme. A snowman is great for the New Year, since it is the easiest for a child to create. You can think about the theme of "Winter patterns" or try to invite your child to make a simple snowflake.

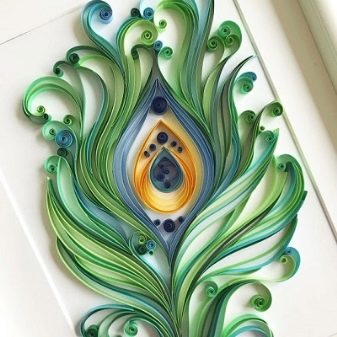
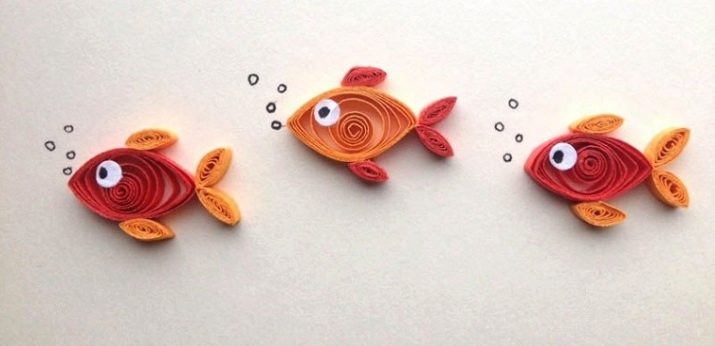
Recently, it has been very popular marine theme. Fish is the easiest to make, but in fact, ideas can be born along the way. It is not difficult to make an owl, a rat, a peacock, since they have a light pattern. With high-quality and detailed instructions, the assembly takes place without any difficulties.
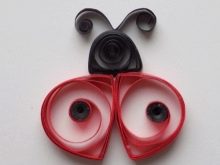
A good master class for a child is creating a ladybug. For work, you will need to prepare colored paper, scissors, cardboard, glue and tools.
- At the first stage, you will need to embed the body of the future ladybug from cardboard. Then a blank is cut out of a sheet of red paper of the same shape.
- The bottom will be light yellow. After it has been cut out, you can glue it onto the cardboard. When everything is ready, you should start rolling the strips.
- Black dots on the carapace will be made from loose spirals. They are also glued to the cardboard base.
This is an example of the simplest application that can be offered to a child. There is another option - a cat. It can also be used as an addition to the applique. For example, place it under a tree. When composing the character, more complex elements are used than in the previous version. Among them are a drop, an eye, a triangle and a free roll. As in any other case, you must first draw a sketch on a sheet of paper. Various elements are made using quilling, then the silhouette is filled with suitable blanks.
It is best to start with large components and then fill the remaining voids with small ones.
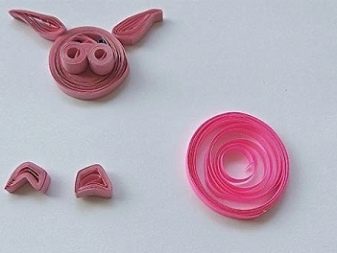
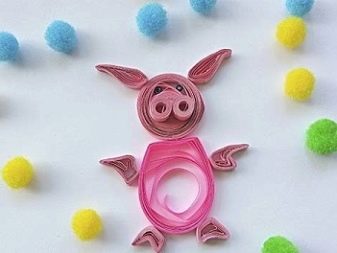
You can advise beginners to make an attractive pig. This is a small toy with a volumetric shape. For production, you will need 36 strips of pink corrugated cardboard with dimensions of 3681 mm and three strips of 3080.5 mm. You also need to prepare strips of red cardboard in the amount of 1 piece 481 mm and the same amount 3081 mm.
4 rectangles are made from burgundy cardboard. Buttons can be used as eyes. The assembly instructions are as follows.
- At the first stage, two tapes of 15 strips measuring 30 cm by 1 cm are glued together.
- One is rolled into a tight roll.
- Previously made blanks of two colors (pink and burgundy) will need to be cut into equal parts, and then glue the two tapes. Each one is rolled tightly. The resulting parts are glued together to form the pig's nostrils.
- Now a long pink paper strip is attached to the nose with glue and rolled tightly.
- When six turns are done, the mouth is glued under the nose. Its role is played by a workpiece 4 cm by 1 cm. Then the part is twisted further, but as a result it should turn out so that both circles have the same diameter.
- Now the workpieces need to be bent in the form of a dome, the nose rises up. Inside, the parts are well lubricated with glue.
- At the next stage, cones are formed from tight rolls, twisted from 4 strips measuring 30 cm by 1 cm.
- Ears are made from free spirals twisted from 2 ribbons 30 cm by 0.5 cm.
- The tail is also formed from a strip of paper 30 cm and 5 cm. The workpiece is greased abundantly with glue, then wound on a simple pencil. Thus, the desired spiral is obtained.
- Parts of the body will need to be glued together. The joint can be hidden with a paper strip. The legs are attached to the body. The hooves are made from previously cut rectangles and are also glued.
In the next video, you can visually familiarize yourself with the basic elements of quilling.


