How to make snowflakes using the quilling technique?
Quilling is a type of handicraft when various decorative compositions are made from rolled paper strips.... Snowflakes are especially beautiful in this technique, and it is not difficult to learn how to make them - you just need to repeat step by step all the actions of experienced craftswomen. It is best to use the schemes already invented, but with quite a bit of imagination, you can create the perfect New Year's decor. Let's get acquainted with the description of the method of making snowflakes.
Peculiarities
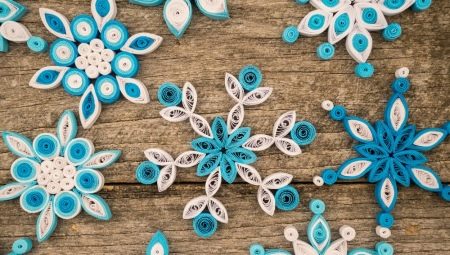
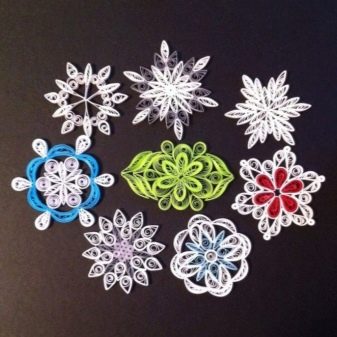
The snowflake is perhaps one of the most recognizable, delicate and beautiful symbols of the New Year and winter in general. Unfortunately, you won't be able to bring real snow home, so needlewomen all over the world knit, weave, cut and glue snowflakes. The most beautiful products are obtained using the quilling technique. This kind of applied art appeared a very long time ago - about 500 years ago, for the first time the technique was used by European masters. The technique involves twisting strips of paper and gluing them further - various ornate patterns are made from these swirling strips.
Rolled up strips can be formed as closed or open forms, novice craftsmen and children create simple and uncomplicated crafts from them, and experienced needlewomen are able to create real masterpieces.
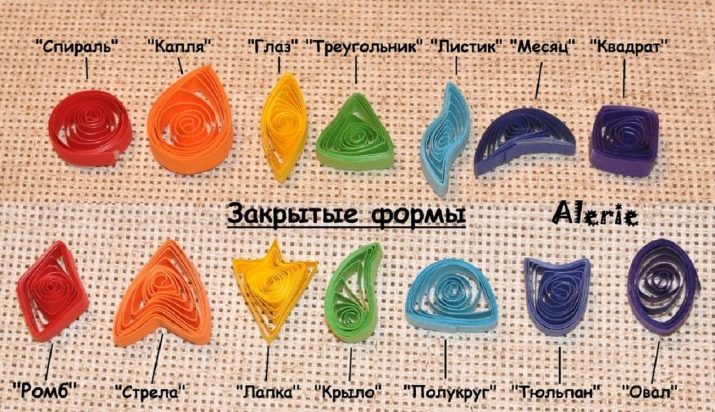
A distinctive feature of quilling is that patterns in this technique are airy and lacy. You can always hang New Year's snowflakes made in this style on a New Year tree or decorate the area near the desktop, so that the craft reminds every day of the approach of the main holiday and fills the expectation with a feeling of winter magic.Any production of snowflakes using the quilling technique should begin with composing working scheme - drawing of the decoration that you want to get at the end. Each composition consists of several basic elements, the most common are these.
- Tight spiral - a strip of paper is wound on a toothpick / match, then removed and the end is glued so that the roll does not unwind.
- Free spiral - in this case, the edge of the paper is not glued, but unwound, creating an air space between the parallel layers.
- Oval - the end of the untwisted spiral is fixed with glue and the workpiece is given an oval shape.
- A drop - in this case, the free spiral is gently squeezed from one edge with the thumb and forefinger.
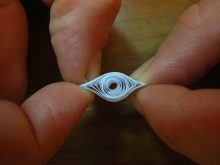
- Eye - such a shape is created by analogy with a drop, but not one, but two opposite ends are squeezed.
- Triangle - the twisted roller is given a triangular shape with your fingers, clamping on one side and fluffing the base from the opposite side.
- Square - in this case, the spiral is unclenched so that it takes a square shape, a rhombus is made in a similar technique.
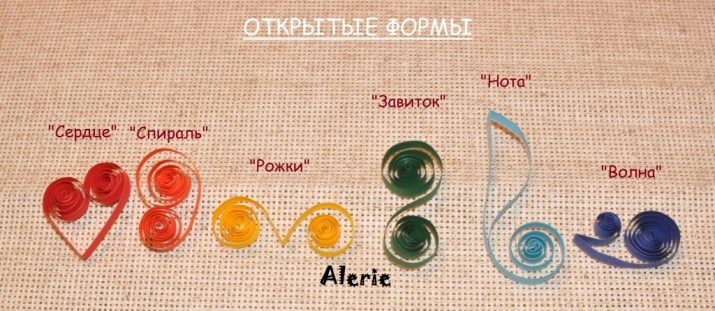
Open forms are very popular.
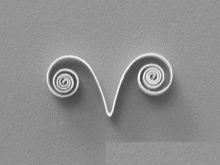
- Horns - in this case, the strip is folded exactly in half, and both free edges are folded outward.
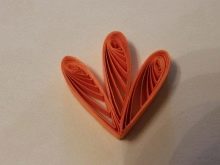
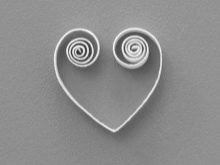
- Heart - performed using the same technique as the horns, only the free edges are twisted inward.
- Curl - here, fingers slightly indicate the middle of the strip, and the ends are wrapped in different directions.
- Twig - a strip of paper is divided in a ratio of approximately 1: 2, both edges are twisted in the same direction.
Using these shapes, you can create snowflakes of all shapes and sizes - you just need to find an interesting pattern and glue all the elements in a given sequence.
Tools and materials
The quilling technique is also popular because for this creativity you do not need to make any expensive acquisitions. Making crafts requires the simplest materials and tools that can be purchased at any store at affordable prices.
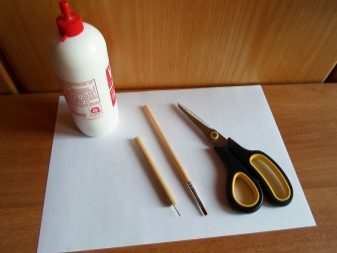
To work, you need the following.
- Paper - ideally, it should have a density ranging from 116 to 160 g / m2. For white snowflakes, plain office paper will work. And if you plan to make colored snowflakes, then it is better to purchase special quilling paper - it is sold in any craft store. It is not worth using the usual colored one, since when cut at the cut point, it gives a white color.
- Scissors - It is best to use an instrument with fine pointed tips.
- Glue - PVA or a glue stick would be the best option, but if neither one nor the other is at hand, a regular stationery will do.
- Any tool for curling paper strips - it can be a toothpick, a wooden skewer or an awl.
- Tweezers - it is necessary for fixing elements of a small size in the event that it is impossible to take them with your hands.
- Ruler with round holes of different diameters - thanks to this tool, spirals of various degrees of density can be formed.
- Regular ruler.
- Simple pencil.
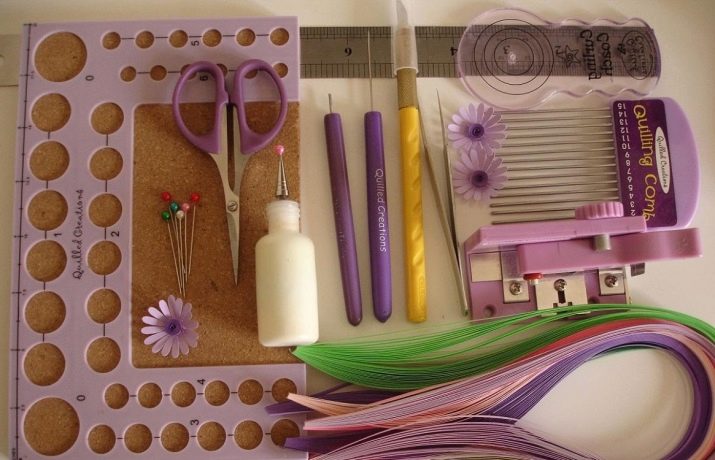
In stores you can find special sets for quilling, the paper in them is already pre-cut into thin strips, which can have a wide variety of shades, length and width parameters. In addition, the set includes a special split-tip tool for gripping and holding the strip, as well as templates for creating spirals of various sizes.

Step-by-step master classes
When creating a New Year's decor using the quilling technique you can make both small light and large volumetric snowflakes. They can be both simple - for beginner craftsmen and children of the preparatory group of a kindergarten, and complex - for craftswomen who already have experience in this direction.
It is best to start with the simplest twisted models.Having mastered them, you can easily show your imagination and create figures of varying degrees of difficulty. Let's consider step by step one of the most popular techniques for rolling paper snowflakes. This is a fairly simple scheme that uses standard base modules. You will need a blank in the form:
- tight spiral;
- eyes;
- petal;
- hearts;
- horn.
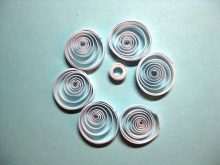
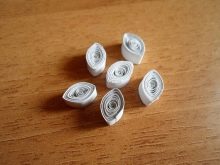
Each form must be completed in 6 copies.
The guide to action includes the following stages of work.
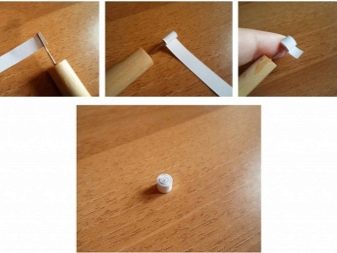
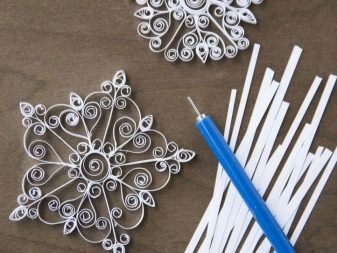
- To get started, take a sheet of paper and draw strips about 5 mm thick on it, focusing on the long side of the sheet. After that, cut with scissors - you should get about 40-42 strips.
- Each strip must be screwed onto a match or toothpick, after cutting its tip with a sharp knife and inserting the edge of the strip into this crevice.
- After the entire strip is twisted, the rod must be removed, and the edges of the tape must be fixed in such a way that the part does not unwind. You will end up with a tight tight spiral.
- Next, you need to screw the paper base back onto the working tool - a toothpick and put the twisted roll in the round hole of the ruler, it should unwind a little. The edges are fixed with glue, and the resulting part is lightly squeezed with your fingers at one end. This will create a petal shape.
- It is worth repeating all the same steps as for making a petal, but crush the roll from both sides. This module is called the eye.
- Next, take the prepared strip of paper and bend it in half, twist the edges towards the outside so as to form horns.
- Next, you need to do everything the same as in the previous paragraph, only you need to wrap it in a spiral not to the outside, but to the inside. Such a figure is called the heart.
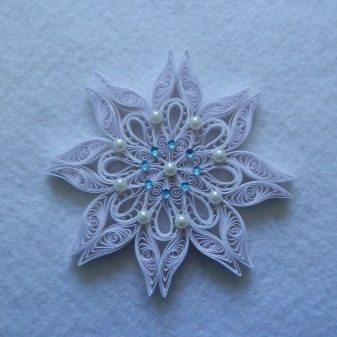
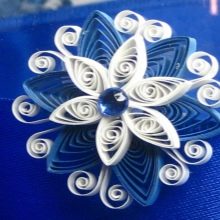
As a result of all the manipulations, you got 5 elements, 6 pieces of each shape. They need to be fixed in one figure, that is, to assemble the craft. To do this, you must first fold what you plan to get without gluing the paper together. When you understand that you like the result, you can already start gluing. As a rule, they collect a snowflake starting from the middle, that is, first they fix the petals between themselves, then the droplets, then the horns, then the hearts and finally tight spirals.
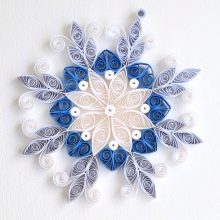
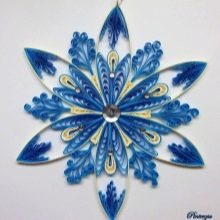
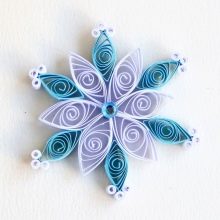
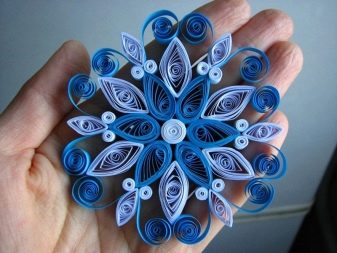
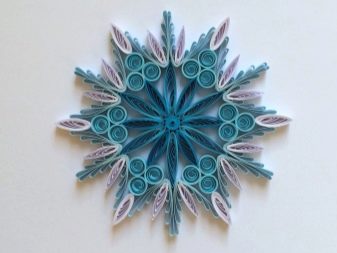
It is not at all necessary to make a snowflake in white, you can combine shades of blue, blue and silver colors with each other. Just as in nature you cannot find two identical snowflakes, so in creativity it is absolutely not necessary to do all crafts according to the same template. Having shown your imagination, you can diversify the details, size, density of the modules, shade and make many other changes.
If desired, snowflakes can always be additionally decorated with beads, rhinestones and sprinkled with glitter.
In order to create a truly magical New Year's interior in the house and decorate it with quilling snowflakes, you need to make a lot of effort and spend a lot of time. To make the work stand out, it is worth take advantage of the recommendations of experienced craftswomen. Here are some of them.
- It is best to start learning by creating the simplest elements and only after that move on to more voluminous and complex ones.
- All identical parts must be created from paper strips equal in width and length.
- In order to create petals, spirals and eyes of the same size, use the same hole on the ruler when unwinding them.
- If you are working with a double-sided strip, then the wrong side of it must necessarily face the rod.
- To facilitate winding, the tool, that is, a toothpick or an awl, should be rotated clockwise.
- When making snowflakes, you never need to rush, especially if you are just taking your first steps in quilling. Lack of craftsmanship may make the work look sloppy.This type of arts and crafts requires imagination, perseverance and patience.

Idea: snow curtains made of individual elements using the quilling technique look very impressive; they can be used to decorate a window or doorway... To draw up such a decor, you will need a silver rain and ready-made snowflakes, keep in mind that at their ends you need to place round elements with a through hole - through them you will thread rain and fix it with a knot. After that, at the lower end of the snowflake, tie a rain tape about 20 cm long and connect it to the second snowflake, repeating the steps until the desired length is reached. After making a few of these ropes, you can fix them on the cornice and enjoy the beautiful view.
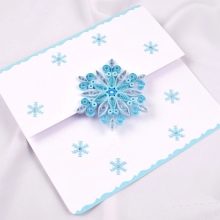
Simple schemes for quilling snowflakes can be used not only by novice craftswomen — they are widely used in children's creativity. Such an openwork craft can always be hung on a Christmas tree, under the ceiling or on a door. A snowflake using the quilling technique can be used to decorate a holiday card with congratulations or include it in a large New Year's composition.
In any performance, it will certainly delight the eye and create a magical mood.

Next, see a master class on how to make snowflakes using the quilling technique.


