White gradient on nails: design ideas and decor features
Currently, a relatively new direction in "nail art" has appeared - ombre. This style has its origins in France. The technique of its execution is based on fuzzy smooth transitions of several colors from one to another. In the usual gradient manicure, there are pronounced borders, and in the ombre they are blurred, shaded.

This technique is quite simple and you can do it yourself at home. These nails look great in a work setting, party or club. Ombre transitions can be vertical, horizontal, diagonal and even point - it all depends on imagination and skills. With the help of such a manicure, you can emphasize any outfit and individualize your image.


Peculiarities
There are several ways to apply varnish to your work surface. When staining with one tone, only the color intensity changes. You can use two or three different colors on one nail. In this case, the lightest tone will transition to a darker one. Also interesting is the option of applying a darker tone of the same color to each subsequent finger of the hand.


Application technique
The most universal is considered to be a white gradient, which will perfectly fit into any image. To create it, you need varnish, as well as a basic set of common tools for manicure, because the surface must first be carefully prepared for coating.


This is usually done like this:
- remove the old coating;
- remove the cuticle;
- file the nail plate to the desired shape.


Before starting a decorative manicure, you should prepare everything you need. To complete you will need: base varnish, several decorative varnishes of different colors or tones, fixer, sponge or brush, palette, cotton swabs and nail polish remover.


There are several ways to make ombre at home: smooth transitions of tones are obtained by shading with a decorative brush or a sponge.
Sponge
First you need to apply a base varnish. For this, both transparent and the lightest of the selected tones are used. They cover the surface completely. It is better to smear the areas around the nail with a greasy cuticle cream or just for hands. So on the skin there will be no lacquer marks from the sponge.


Next, using a palette and a brush for feathering, you need to recreate all the transitions of the varnish coating from tone to tone. In this case, the darkest shades should be used on the tips of the nails. This technique visually lengthens the nail plate.
The sponge is slightly moistened with water. This is done so that she does not have time to absorb all the varnish at once. Having dipped the sponge into the finished varnish composition several times, it is gently applied to the nail. In this case, it is worth avoiding strong pressing, as deep imprints from the sponge may remain. For a brighter manicure, you can apply the composition to the surface several more times.

Since the varnish is absorbed into the sponge quickly, mixing must be repeated for each subsequent nail. After completing the staining on both hands, the varnish should dry. If severe irregularities occur, they are corrected by shading with a brush.

At the end, a fixative is applied, which removes small irregularities from the sponge, - the surface will turn out to be smooth and shiny.
The rest of the varnish around the nail plate can be removed with a cotton swab. In the event that a little coating gets on the area without cream, you can use a special liquid to remove it.


Using a brush
All preparatory work is performed in the same way as in the previous method. But after applying the base, the lightest tone of the selected palette is applied to the root of the nail to the middle or one third of the working surface. It depends on the number of colors or tones of the varnish. Next, using a decoration brush, the contour of the varnish is gently shaded without pressure. Then a darker tone is also applied and shaded. With light brush strokes, you need to smooth out the transition between different colors as much as possible. The contour of the nail at the end can be outlined with the darkest varnish.
Next, the varnish must dry. After that, a fixer is applied to it, and the ombre manicure is ready.

More ways to make a gradient on your nails are presented in the video below.
Varieties
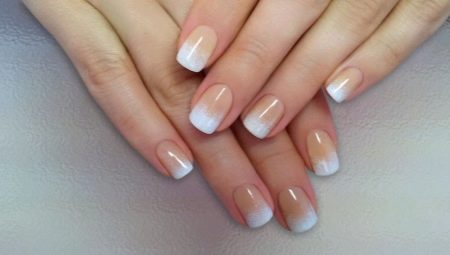
White ombre is very similar in tonality to the usual French manicure, and the colors of the varnishes used to create it are the same.


The simplest, but no less beautiful option is a white manicure. The number of varnish coats depends on the desired color intensity. You can paint the surface in two layers, which will look light and fresh. If you apply a multi-layer application, the nails will look like pearls and play, which is also very stylish.


However, if you wish, you can dilute the white with pastel shades of pink, blue and beige. As a rule, colored varnish is applied to the lower part of the nail, and the tip is painted white.


Such a manicure can maintain the tone of clothes, shoes, makeup. A small combination in the color scheme of the bow is not only beautiful, but also stylish.


In addition, the white gradient on the nails looks good with glitters and rhinestones, which in small quantities will be appropriate in the daytime.


