How to make a Shrovetide doll with your own hands?
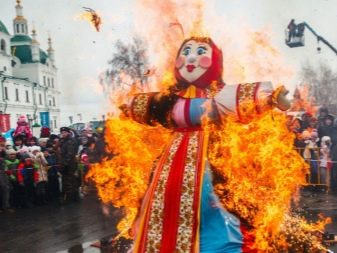
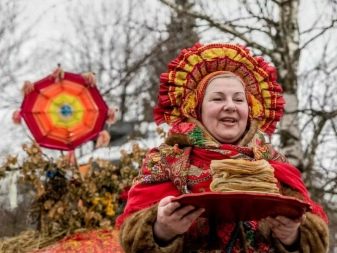
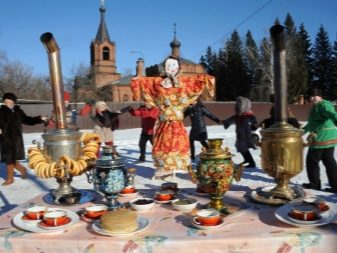
Maslenitsa is a festive week, during which people remember the traditions of the ancestors of the Slavs and carry out various rituals: visiting each other, baking pancakes, walking on the street. But the main ritual of Pancake Week is the burning of a ritual doll, which is held on the last day of the holiday.
Peculiarities
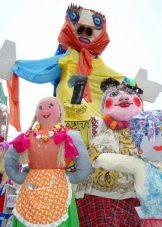
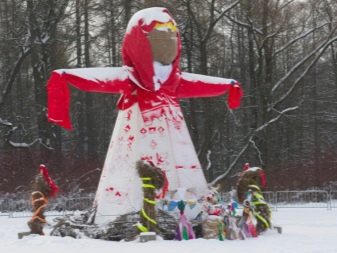
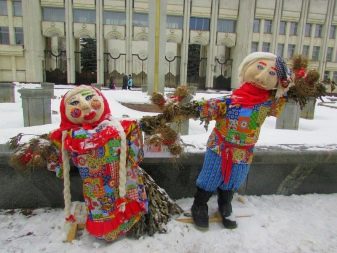
In modern society, the burning of a ritual doll is only a spectacular performance, although the holiday is considered Christian. The ancestors attached significant importance to the ritual - they dressed the Shrovetide doll in clothes and burned it on the solemn square, where all the people gathered. It was believed that she represents nature, asleep and frozen in winter, and the fire helps her wake up. The scarecrow has many names, the most popular are Shrovetide and Oiler.

In different regions of Russia there were other names, for example, in the Nizhny Novgorod region she was called Baba, and in Kostroma she was Garanka. During the Maslenitsa week, it was necessary to make peace with whom in a quarrel - that is, to prepare body and soul for the upcoming Easter and fasting. The Maslenitsa doll was made by hand at the beginning of the Maslenitsa week. This process was considered very responsible, the creation of a stuffed animal took place according to several rules.
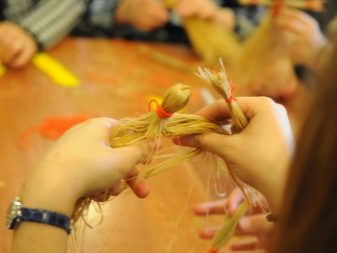
- Straw and old rags were wound on a wooden base. This is the so-called motanka.
- For the outfit, they took only old, worn and torn things. Ideally, it was a sheepskin coat turned to the wrong side.
- The creation of the doll could only be done by a married woman who already has children.
- The doll could be made by both a man and a woman. In the old days, an effigy of Maslenitsa and her husband Maslenka were burned.
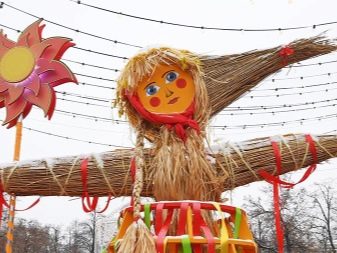
- The scarecrow was fixed on a long pole so that the ritual could be seen from all over the village.
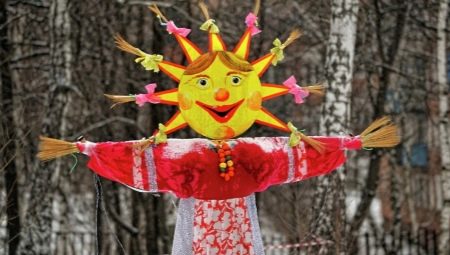
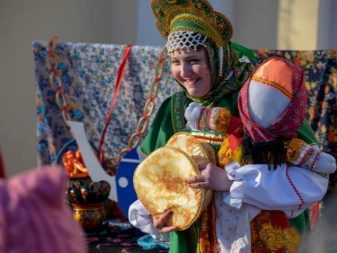
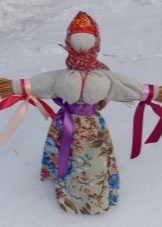
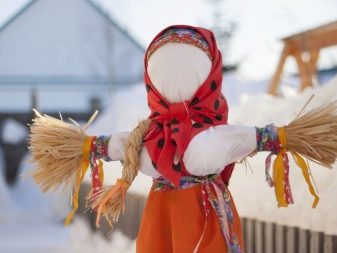
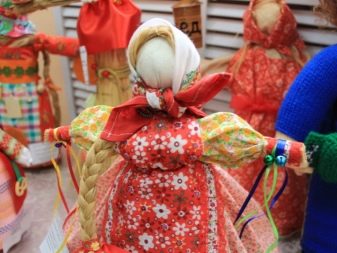
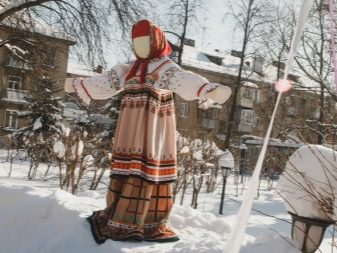
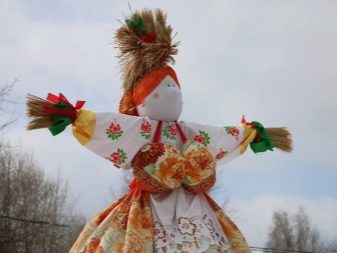
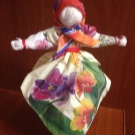
- For the costume, they tried to take clothes with an ornament in the form of plants. A scarf was tied on the head, and a pancake or frying pan was given in the hand. The size of the doll is from an adult or even higher.
- The scarecrow had to be stout or fat. They definitely emphasized her feminine charms - they made very large breasts. At first, Maslenitsa did not have a face, later they began to paint it with charcoal and beets. Carrots were sometimes used as a nose. Today the stuffed carnival is associated with a funny and smiling face.
Not in all corners of Russia Maslenitsa is a fat aunt. A stuffed horse made of straw was created in the Volga region. In Belarus, in general, the ceremony was a funeral of the grandfather, who choked on a bone. The grandfather was made a very large male reproductive organ, to which a rope was tied. And during the funeral ceremony, they pulled her.
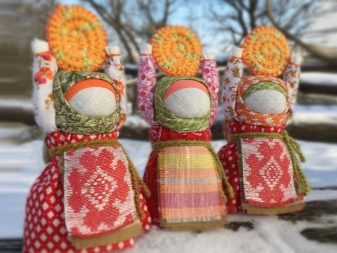
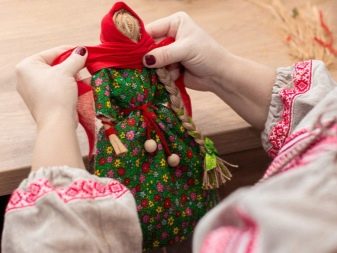
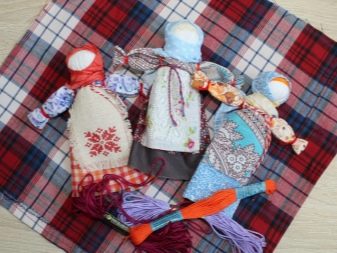
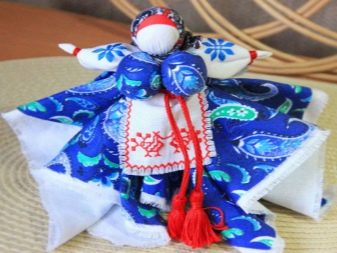
The Slavs also made a talisman doll at Shrovetide week - for the well-being, prosperity and protection of the family. She always had her hands up, as if she were turning to the sun. The skirt was twisted in a special way and symbolized the solstice.
During the year, the amulet was kept in the red corner of the house, and on Maslenitsa the doll was burned or allowed to float along the river. A new doll was made in its place.
A domestic doll is somewhat different from a stuffed carnival.
- It has a different meaning - it is a talisman and protector of the family. And the scarecrow being burnt personified cold and sleeping nature.
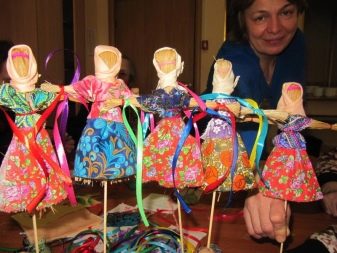
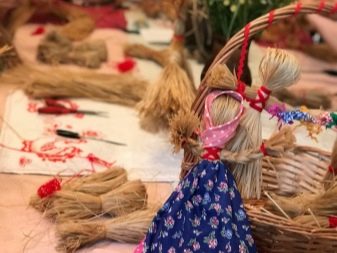
- Small size - about 20-25 centimeters. The Slavs sometimes called the doll - the daughter of Maslenitsa.
- The doll had no face. Ancestors believed that some evil spirits could enter the house through the eyes.
- Such a doll was made for all family members - for children and adults. And also one "common" one - for the house.


What is required?
A doll was considered a home amulet only if it was made correctly. The Slavic ancestors approached this matter with great responsibility. To create, they never used piercing and cutting tools, they were allowed only at the stage of preparation. Materials and threads were used only natural. All parts of the doll were not sewn on, but only tied, and the thread was wound strictly clockwise. Mostly red - as a symbol of life.
In no case was it possible to play with dolls-amulets.
The doll's frame is made as for a scarecrow, from two bars. One should be long and wide, the second a little narrower and small. The workpiece was hammered into a cross with nails. For the frame, birch bars were previously taken, as they symbolized growth and development. The body is formed from straw or hay.
The frame is covered with material, and the straw is fluffed from below. The hands are formed with twine. The head of a scarecrow is made from a bag that is stuffed with straw. Then it is tied and attached to the body. Two types of fabric are selected for clothes - white and colored. White for the shirt and colored for the skirt. The color should be vibrant and patterned.
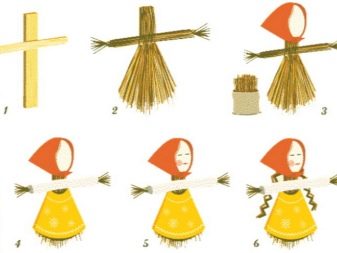
It is not necessary to draw the face of Shrovetide.
For the hair of the scarecrow, a yellow or brown fabric is selected. It is cut into strips and braids are braided, which are then attached to the head. Since it is quite problematic for city residents to find hay for a scarecrow, you can make it out of a broom. It burns just as well as straw. There are no specific rules for burning Shrovetide.
To do this, you can use a candle, matches, a lighter, you can douse it with gasoline or make a fire and burn the doll at the stake.
Step-by-step manufacturing workshops
If, when creating a homemade Maslenitsa doll, you follow all the recommendations and rules, then it will bring prosperity to your home and family, goodness and save you from misfortune. The manufacturing process is simple and interesting, even children can be involved in it. The main and basic rule is that Maslenitsa should be done only in a good mood, otherwise the amulet can only harm.Earlier, when something bad happened in the family or some of the household members began to be haunted by failures, the women talked and shared their problems with the doll.

It was also possible to tie a ribbon or knot on it, on which all the troubles remained, and at the end of the Maslenitsa week they were burned along with the amulet.
From fabric
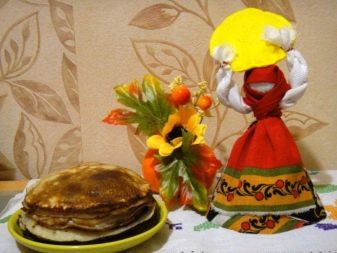
The rag Shrovetide was made for children. During the year, the child could have fun with a reeled doll, and then on Forgiveness Sunday he threw it into the fire. It was believed that in this way all diseases went away from the baby.
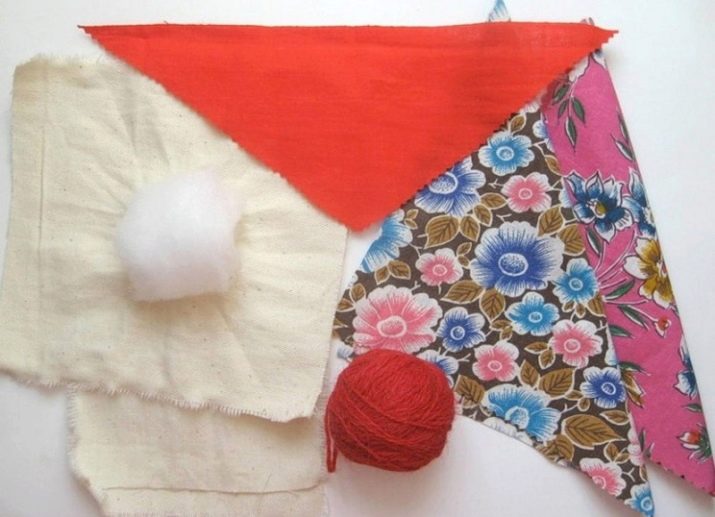
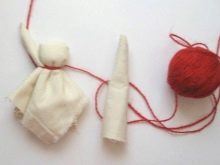
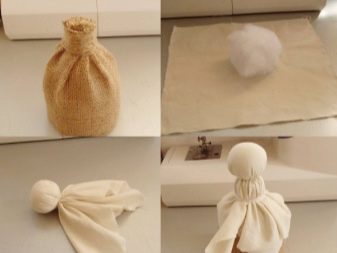
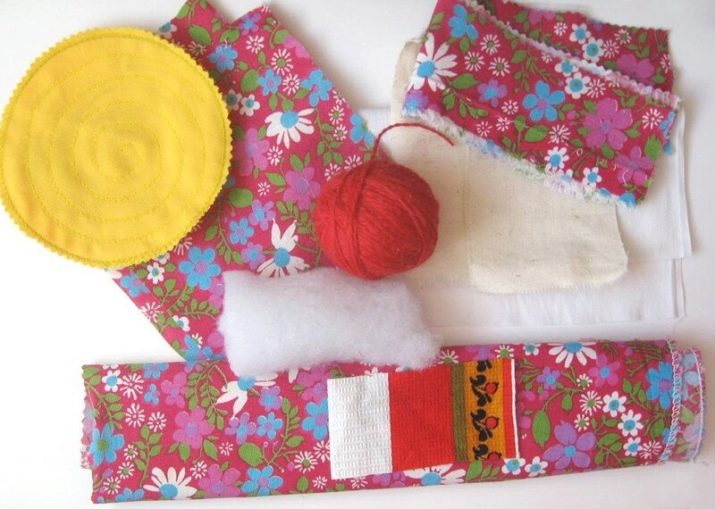
Materials for work are as follows.
- White fabric 20x20 centimeters - for the head.
- Two pieces of white fabric 10x12 centimeters - for hands.
- Two pieces of fabric with a pattern (preferably vegetable) 20x20 centimeters - for a skirt.
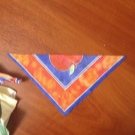
- Fabric for a scarf in the shape of a triangle, the long side of which is 22 centimeters.
- Cotton wool, rags or synthetic winterizer.
- Red threads.
Description of the work process.
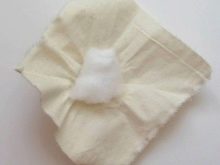
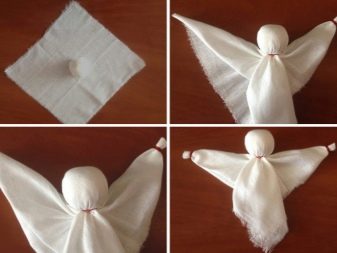
- The edges of the fabric do not need any processing or hemming, just pull out a few threads and fray the fabric.
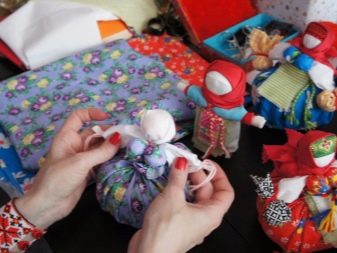
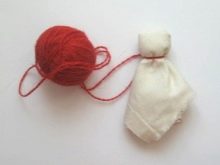
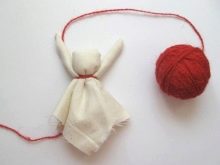
- The cotton wool is placed in the middle of the white piece of cloth intended for the head. Then the head is formed and fixed with threads. The doll's face should be straight, so all the folds are removed to the back of the head.
- The fabric for the hands is folded and curled. Then the hands are tied to the head in such a way that they are directed upward. After every two turns, the thread must be tightened and tied in a knot.
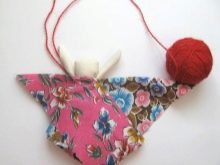
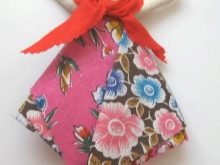
- A skirt for a doll is folded from colored fabric folded diagonally. The fabric is stacked one on top of the other. The bottom piece is bent towards the center, and the top piece downward and around the doll, the direction is from left to right. The remaining free edge of the bottom piece of fabric must also be folded towards the center. The second edge of the top piece of fabric is folded down behind the back.
- The skirt is wrapped around and secured with threads. A kerchief is put on the head of the Maslenitsa doll and tied with one knot in front.
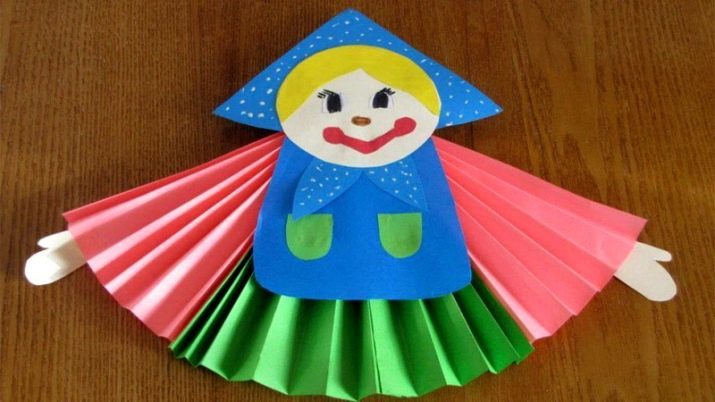
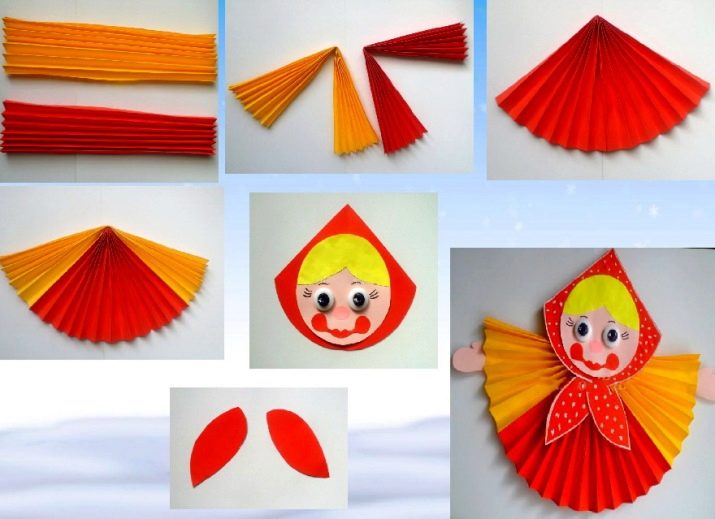
From paper accordion
This is a master class for children. A doll made of paper resembles a Russian beauty madam: a fair-haired braid, a bright outfit, a red scarf on her head.
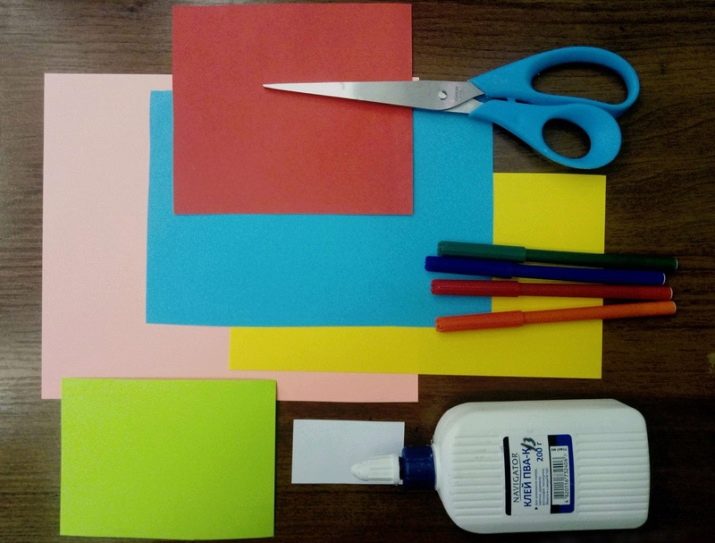
Materials.
- Colored paper.
- PVA glue.
- Scissors.
- Pens or markers.
- The knitting threads are yellow.
- Sequins or flowers for decoration.
Work process.
- The paper for the dress should be of a bright color; several shades can be combined. For this craft, a red A4 sheet is taken (this will be a dress) and a smaller white sheet is the sleeves. It is better to take paper that is not very thick and thick, so that it is easier to fold.
- Along the entire length of the large red sheet, you need to make an "accordion", the size of the folds is about 1 centimeter. The folded sheet must be ironed thoroughly, and then folded in half in the center. The inner contacting parts must be coated with glue and held for a little while until it dries. The result should be a triangle-shaped blank.
- The small white sheet should be folded and glued in the same way. Then the resulting sleeves are glued to the dress - the corners of the blanks are aligned.
- The scarf needs to be cut out of red paper. The headscarf template can be found on the internet. A face is glued to its center - this is a circle of white paper, and tails are glued down the kerchiefs.
- You need to draw a face with pens or felt-tip pens.
- A long braid is made of knitting threads, glued to the back of the head. The head itself is attached to the base-dress - to the top of the triangular blank.
- To make the Shrovetide doll even brighter and more unusual, it can be decorated with sequins or paper flowers.
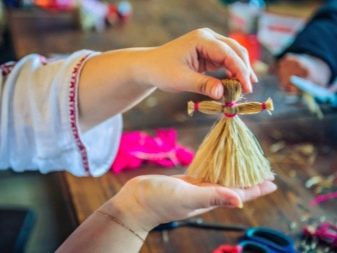
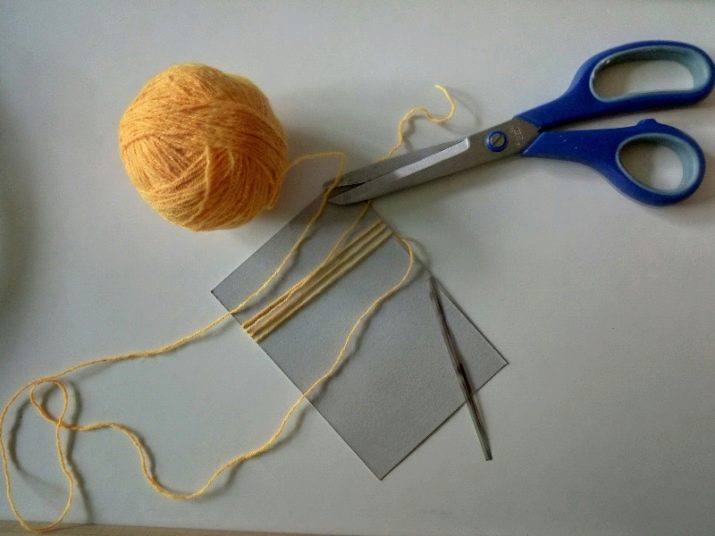
From threads
It is not necessary to crochet Shrovetide from threads; there is another option for creating a talisman.
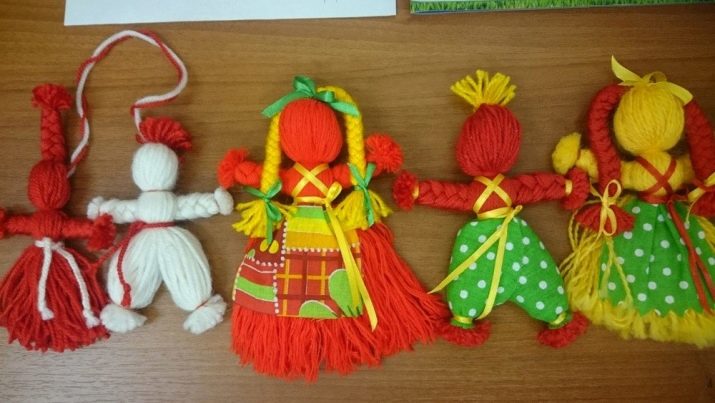
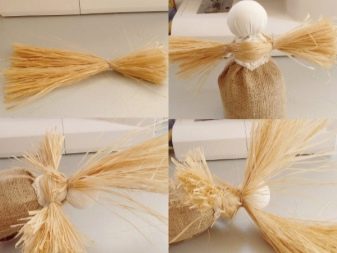
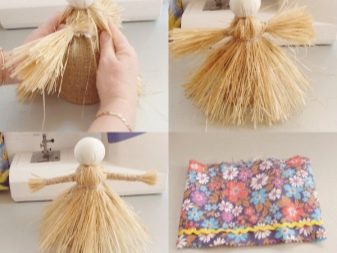
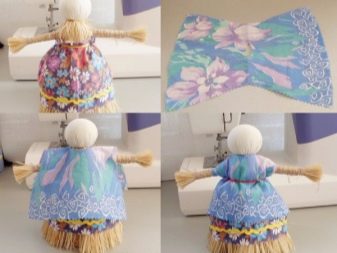
Materials.
- Woolen threads.
- Shawl fabric.
- Wooden stick.
- Scissors.
- Cardboard template 7x15 centimeters.
Work process.
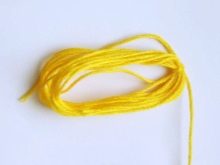
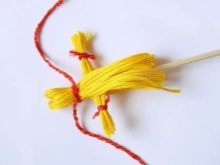
- To make the doll's body, you need to wind the threads on cardboard - on the long side. Then remove from the cardboard and tie into a ring on one side and cut the threads on the opposite side.
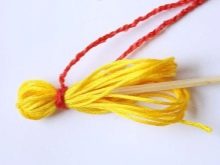
- The wooden stick must be placed inside the threads, and their free ends must be connected together. Under the skewer, you need to tie up the rest of the threads with a red thread, forming a head. The thread does not need to be cut completely, a margin of 10-15 centimeters should remain.
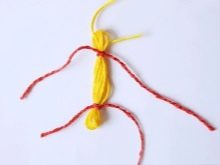
- To make hands, threads are also wound around cardboard, only on the short side. Then they are removed from the template and tied with a thread from each end, retreating 1.5 centimeters from the edge. The ends are cut.
- Next, the hands are passed between the threads - under the head. They are fastened with the free end of the thread, which remained in stock.
- The ends of the threads (the hem of the dress), if necessary, are trimmed with scissors and a scarf is put on the doll's head.

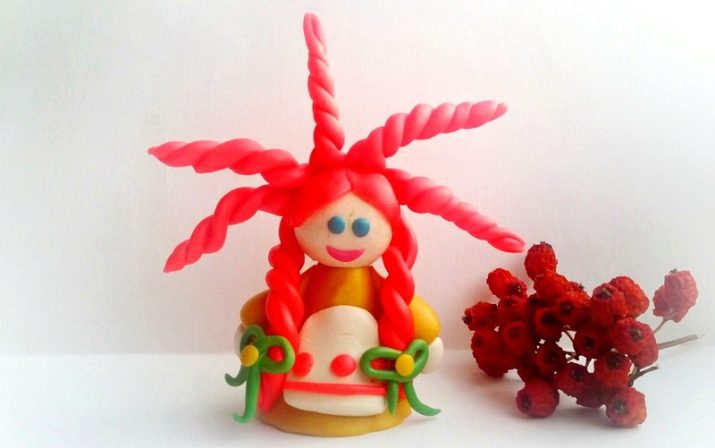
From plasticine
Such a plasticine craft can be made for the smallest children in kindergarten.
Materials.
- Plasticine of different shades. You definitely need a pink color, the rest of the shades can be any.
- A piece of fabric in the shape of a triangle is a handkerchief for a doll.

Process of creation.
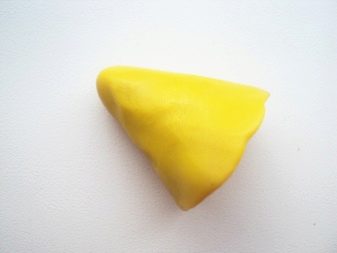
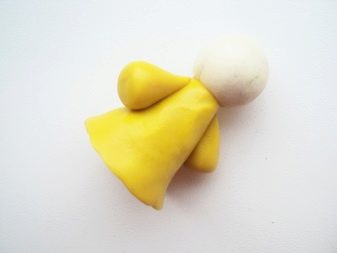
- Plasticine for a dress needs to be rolled into a ball, and then formed into a sausage. It must be sharpened on one side to form a pyramid shape.
- Sleeves are made from two identical pieces of plasticine. Can be made from the same color as the dress, or you can choose a different shade.
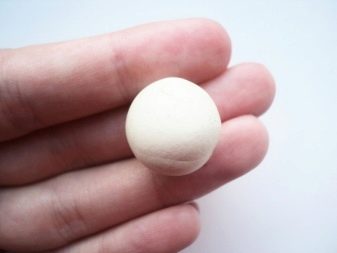
- A ball rolls down from pink plasticine - this is the head. From the smaller pieces, you need to form the hands and nose of the doll.
- Then the hair and face are done. The sundress can be decorated with small balls or cakes made of different colors of plasticine.
- The final stage - a scarf from a piece of fabric is tied to the doll's head.

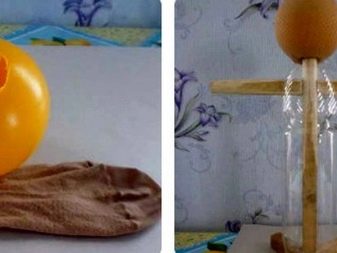
From the bottle
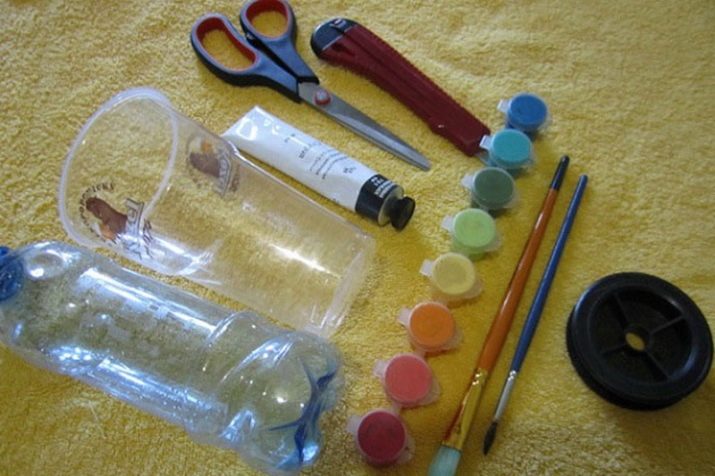
Materials.
- Wooden bars.
- 1.5 liter plastic bottle.
- Plastic ball.
- Nylon tights.
- Cotton swabs.
- Glue, knitting threads, beads.
Work process.
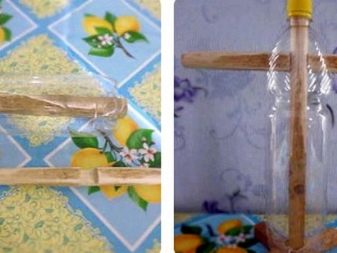
- From the blocks you need to make a stand and a stand for the doll. To do this, one bar is placed in the bottle in an upright position, then the next bar is placed in the prepared holes in the upper part of the bottle - these will be hands. And a stand made in the shape of a cross is attached to the bottom of the bottle.
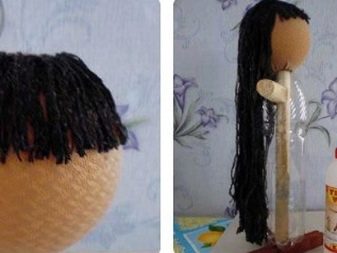
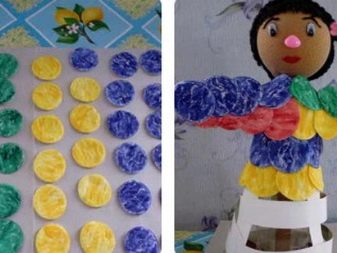
- A head is made of a plastic ball (it can be a table tennis ball). To do this, a hole is cut on one side to fit the neck. The ball is wrapped in nylon, then installed on the neck so that there is no possibility of falling.
- Hair made of black or brown knitting threads is glued to the head.
- Cotton pads are painted in different colors with ordinary paints. Then they are pasted over the body-bottle, after the hand. For the skirt, you can prepare a frame made of cardboard; cotton pads are also glued to it.
- To complete the look, the doll is decorated with beads.
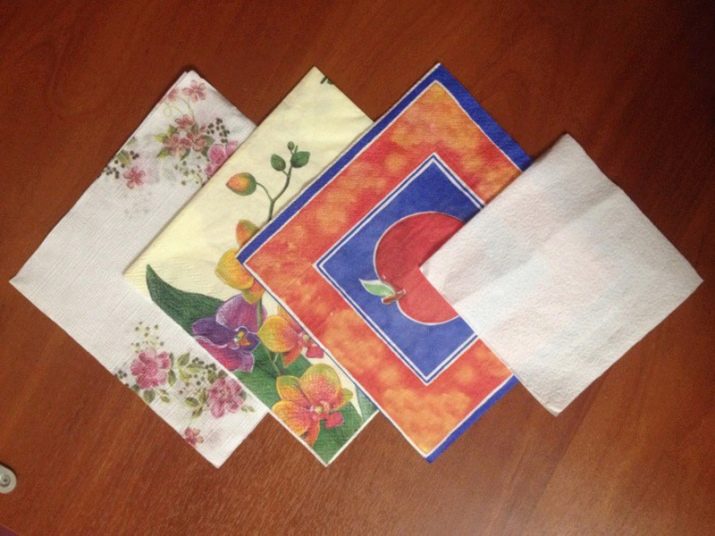
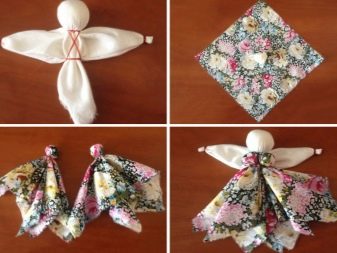
From napkins
Materials.
- Napkins of different colors - 3 pieces.
- Knitting thread.
- Wooden sticks.
The process of making Shrovetide.
- An even ball rolls down from a white napkin.
- A large napkin should be folded into an envelope. A ball made of a white napkin is placed in the middle, then it is folded in half and a head is formed, which is further fixed with threads.
- The third napkin needs to be cut in half, a strip 1.5 centimeters wide is formed from one half. This strip is placed between the two free ends of the napkin from which the head was made. Hands need to be fastened with threads - for this they are wrapped around the body of the doll crosswise. Builds are made on the sleeves - you need to step back a little from the end of the strip and tie it with a rope.
- The doll is ready, now it is being put on a wooden skewer.

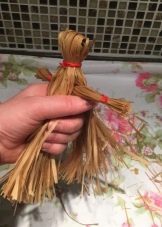
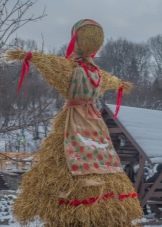
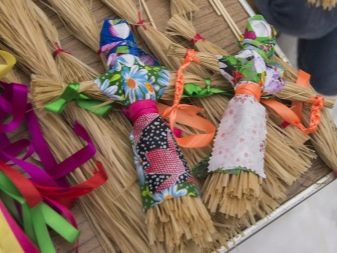
From bast
A bast scarecrow is no longer intended for children's play. This doll is larger than a cloth amulet. And without fail there is a base of wood.
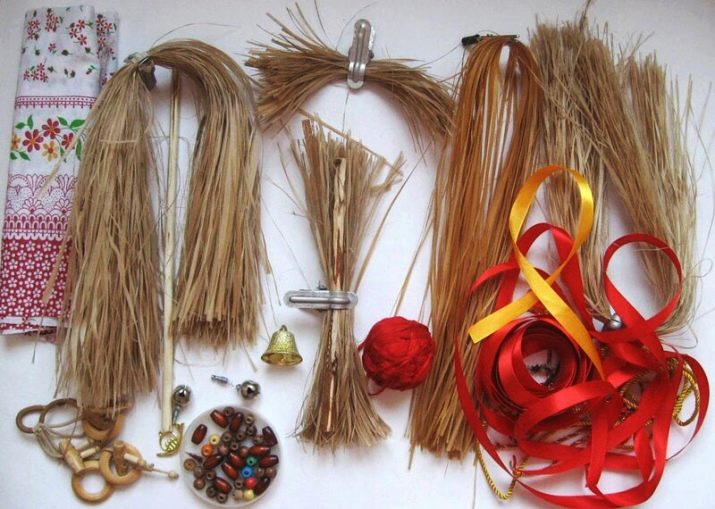
Materials.
- Birch stick about 40 centimeters.
- Bast roll. It is sold in flower and hardware stores.
- Cotton wool, synthetic winterizer or rags.
- A piece of white fabric for the head and pieces of colored fabric for the dress.
- The threads are red and white.
Work process.
- Cotton wool is wrapped in white cloth and fixed with threads on a birch stick-base. The body of the doll is formed from the bast; for this, the bast is attached to the neck in such a way that all pieces of fabric are hidden from the head.
- Hands need to be made from a smaller bundle and tied with threads so that the blank resembles a candy in a wrapper. For stiffening, you can insert a stick into this bundle.
- Now the arms are set in the middle of the bast bundle from which the torso was made. They are fixed with threads, winding the base crosswise.
- You can dress up such a doll anyhow, but there must be a fluffy skirt. An interesting solution is an apron. The kerchief of such a doll should be tied at the back.
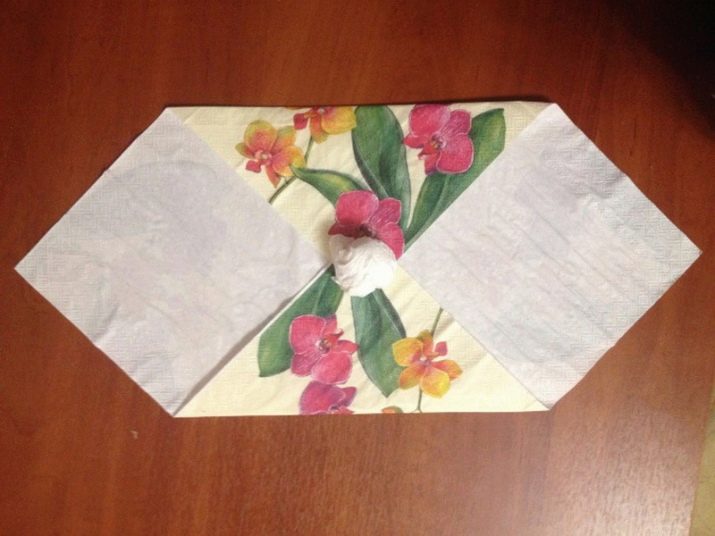
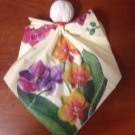
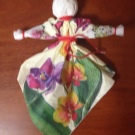
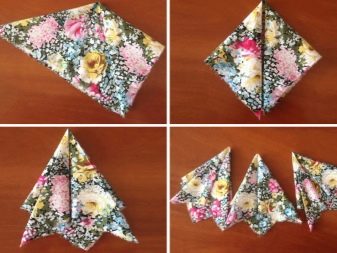
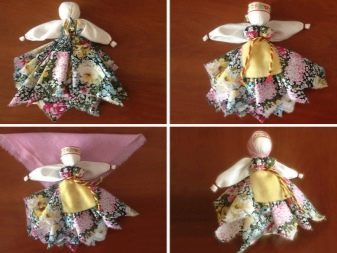
From scarves
Shrovetide from scarves is made according to the same principle as a doll made of fabric.
Materials.
- Sintepon or cotton wool.
- White or beige shawls.
- Stationery glue.
- Wooden stick.
- Knitting thread.
- Two colored scarves.
- Red scarf.
- Yellow scarf and yellow ribbon.
- Hot melt glue.
Manufacturing process.
- Cotton wool or synthetic winterizer is placed in the center of a white scarf, the head is formed and pulled over with threads. It is placed on a wooden stick that serves as a frame.
- Opposite sides of white scarves folded into a triangle are evenly folded inward and pulled closer to the end with a thread - these will be hands.
- The hands are located in the folds of the fabric from which the head was formed, and are fixed with threads crosswise.
- Roll two colored shawls diagonally to form a triangle, overlap them.
- The blank of the doll is placed in the middle of the fabric, wrapped and tied with threads. A scarf is tied over the head.
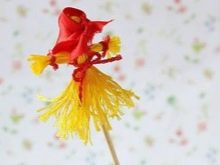
- Since Shrovetide should have their hands up, many needlewomen make additionally the sun, which the doll will hold.
- To do this, cut two circles out of a yellow shawl, and cut the tape into 8-20 identical parts. They are folded with loops and placed between the circles. All this is fixed with glue.
- The finished sun is attached to the doll's arms.
Despite the fact that many customs are forgotten and remain in the past, the celebration of Maslenitsa is still relevant. Making a doll with your own hands is a great occasion to plunge into the atmosphere of the past. Every detail of the amulet is filled with meaning.
For how to make a Shrovetide doll with your own hands, see the next video.


