Do-it-yourself harp

Russia sounds different. Like the sound of trees in the wind and the murmur of water in a spring. Like the hum of cars in a Moscow traffic jam. Like the rustling of the pages of a classic book. Like a pointe slipping on a polished parquet floor. And also - like a gusli. This ancient Russian folk instrument is the basis of the musical culture of those lands that were located on the territory of modern Russia. You can't just ignore it: a worthy representative of the strings, it is still in use. It is played not only by lovers of folk music, but also by such popular nowadays as folk. Learning to extract a beautiful, viscous sound from gusli is no more difficult than mastering the guitar. However, playing a hand-made instrument is much more pleasant than a purchased one.

What is required?
Making a psaltery with your own hands is not so difficult, if, of course, a person has sufficient skills in carpentry. From time immemorial to this day, this instrument is made of dried old, but not cracked wood: cedar, spruce, maple or pine.
To create a psaltery, you need one solid board, and to get it, you need to be able to handle not only an ax, a hammer and a drill, but also with chisels, a file, a hacksaw and sandpaper.

Some gusli elements will have to be glued, therefore, wood glue must also be kept in the arsenal. It is recommended to treat an already made body with a stain: its use will prevent rotting and the appearance of mold if the wood suddenly turns out to be fresh. Guitar or piano strings are often used: they are the easiest to get to, and they are also very easy to adjust.If you don't want to maintain the authenticity of the instrument, then you don't have to make the tuners yourself: just insert the guitar tuners into the body, the harp won't lose anything from such an innovation.

Schemes and drawings
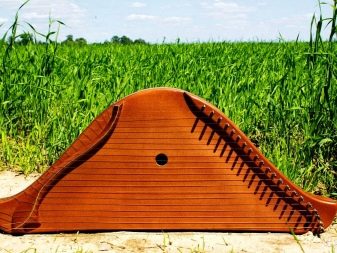
There are several varieties of gusli, which differ not only in shape, but also in the number of strings. The most popular form is the wing-shaped or voiced gusli: they resemble a trapezoid in structure, and the strings (in an amount from 5 to 17) with a diotonic scale are arranged fan-shaped on them.


Psalter gusli are also called helmet-shaped: they have a semicircular shape and have from 10 to 26 strings, tuned in the same way as in wing-shaped gusli.


Lyre-like gusli are easily recognized by the opening at their widened end, which is called the play window. Unlike other types of instrument, which are placed on the musician's lap when playing, these gusli are placed exclusively vertically. The standard number of strings for them is 5. Stationary gusli are rectangular. They are also called clavier-like, table-like and priest-like. They differ from all the previous ones in their immobility and a large number of strings, reaching 66 pieces.
The most common are the winged gusli. Their standard dimensions: length - no more than 80 cm, width depends on the convenience of the musician, and the thickness reaches 4-6 cm ... Its sizes range from 6 to 11 cm.


Calculations must be made even at the stage of creating a sketch, because the size of the log that is taken for cutting depends on the height and parameters of the musician: the optimal length of one log should reach 1 meter, and its diameter should vary from 35 to 40 cm. Another important characteristic is the internal volume of the ghusl: the trough must be deep enough for the sound to resonate well and loudly. The optimal size is from 3 to 8 cm, but you can go deeper: it all depends on the desired effect. The thickness of the bottom should not exceed 2 cm, and the width of the bottom near the "heel" - the place where the strings are attached - should be narrowed.

The borders of the gusli should be 1 cm on the sides, and 2.5 cm above and below. The deck overlapping on the body of the gusli should be made of a thin sheet of wood - no more than 3 mm: so it will resiliently hold onto the springs inside the body, creating tension and increasing the sonority and timbre of the instrument.
It is recommended to plan the wood so that the tree rings are vertical - from top to bottom. This way you can achieve greater strength of the board. The distance between the strings is calculated based on the number of strings, the size of the deck, the playing style and the thickness of the player's fingers. The standard size is 1.7 cm, but this indicator is adjusted for each musician individually.

Manufacturing steps
Making homemade gusli is not so difficult: detailed drawings can be found on the Internet on the forums of woodcarvers or people who create copyright musical instruments. When a log that is suitable for all the main parameters has already been selected, and a solid board with the required height has been cut out of it, you need to draw a sketch on top of it in order not to disturb the shape of the future gusli later. The next step will be sawing off excess pieces of wood and drilling holes for installing the pegs: according to the drawing, at some distance from them there should be a hollow area, which, depending on the softness of the wood, can be selected with a jigsaw. In the inner part of the case, resonator holes should be cut: you can limit yourself to a simple circle, or you can try to approach this process creatively and come up with a beautiful figured pattern.

Before gluing a thin sheet of wood on top of the case, you need to treat all its internal zones with a stain - otherwise there will be no access to them later. Having cut out the opener, you can start fixing the deck and lubricating the entire tool with woodworking mortar. There are many techniques that can allow you to carve curly patterns on the surface of an instrument, so that not only its sound, but also its appearance for the owner is sacred and meaning something more. To make the gusl look brighter, they can be painted either with folk ornaments, or covered with bright paint and varnish - all this, of course, after the final grinding, which will make the wood smooth, pleasant to the touch and safe to play: no one wants to drive themselves into a splinter during picking strings.


By the way, about them. The tailpiece, located at the narrowest edge of the deck at a height of 1.5 - 2 cm, can be purchased either in a specialized store, or made from improvised means: for example, from a curved nail. The length of the strings is determined at a very early stage of design, and their choice depends on what sound the musician wants to extract from the instrument: for gusli it is recommended to choose steel strings with or without winding, so that each melody seems multifaceted, and the tuning in tones was not difficult.


Strings made of nylon, wire, or synthetic line will work, but the volume of the music will be much lower.
Before pulling the strings, you need to insert the tuning pegs inside the tool: they can also be purchased from the store or cut yourself. There are no special preferences as to what material they should be from: for their manufacture, you can use the same wood that went to the body of the gusli. However, some craftsmen basically choose birch, maple or beech for their creation: this material is quite plastic, so it is easiest to deform it. The main thing is that their number coincides with the number of strings, which was conceived in advance. All that is needed is to cut out the required number of pegs, arrange them diagonally according to the sketch at the same level on the peg strip and make a hole in each so that a string can be passed through it. After the fishing line or wire is fixed on the tailpiece and threaded through the tuning peg, it is screwed into the depth of the instrument at an angle - for better tension.


If the bridge is subjected to too much stress while playing, it can easily fly off - and then the harp will be damaged. In order to protect the instrument from such a nuisance, you can mount ducklings into the deck - special planks that fix the metal rod and strengthen its position on the wooden plate. The ducklings themselves should either be tightly glued to the deck or fixed with self-tapping screws: they not only reduce the risk of cracks, but also contribute to the transmission of vibrations from the strings to the deck, which, vibrating from the signal, will amplify the sound of the music. As you can see from the instructions, it is quite possible to create a musical instrument yourself. The main thing is to follow all the calculations, perform each step step by step and just enjoy the process.


How to make a harp with your own hands, see the video.


