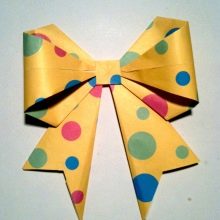
Making an origami bow

The origami technique is very popular, because in accordance with it, a huge variety of figures can be made. Paper bows assembled using this technology are very beautiful and original. In today's article, we will learn how to properly model such objects.


Classic version
There are many different schemes for modeling figurines using the origami technique. The same bow can be assembled in different ways. There are both very simple and complex techniques designed for more experienced craftsmen. For a person who is not familiar with the creation of origami figures, it is better to start with more accessible and uncomplicated master classes. It will be so easy and quick to make a beautiful classic paper bow.


The classic version of modeling origami crafts "Bow" is as accessible and understandable as possible. However, in this case, it will not be possible to do without the use of scissors, so this stationery tool should be prepared in advance.
A simple square-shaped paper sheet can be used as a suitable basis for assembling the product.


Having at hand all the necessary components, you can proceed directly to modeling the origami "Bow". Let's take a step by step how to do it correctly.
- First you need to take the selected piece of paper. It will need to be folded in half along and across.
- After this stage, you will need to fold the workpiece diagonally in the direction of both sides.
- You will need to carefully fold the basic double square shape. Then it is laid with the open part towards itself.
- At the next stage, the upper corner is bent slightly downward.Thus, it will turn out to outline the fold lines on the workpiece.
- Next, the paper part will need to be unfolded and laid in such a way that its wrong side is directed upwards.
- Moving such a figure from two opposite sides, it will be necessary to fold the square along along the fold lines inward.
- Now such a workpiece will need to be put so that the free part is directed towards itself.
- The edges located in the upper half of the workpiece will need to be bent downward.
- Next, the workpiece will need to be turned over again and the steps repeated.
- The paper figurine should be carefully opened and then turned over again.
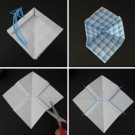
- In the next step, you will need to use scissors. With this tool, the workpiece will need to be cut on 4 sides.
- The top of the paper piece should be folded down.
- The tops of the sides are now folded down towards the horizontal folded lines.
- In the next step, the side parts located on opposite sides will need to be folded in the same way to the horizontal stripes of the formed fold.
- The paper blank is turned over.
- The existing sharp ends are folded to the center point, leading under the edge of the square.
- The workpiece is turned over again. The lower half of the element is cut in half, and the edges are folded into the inner part.
- The product is turned over - the origami bow is done!


Such a homemade product is formed very easily and simply. The very technique of its creation is suitable even for small children. However, all creative processes should be carried out under the strict supervision of adults, especially if a very small child takes on the work.
This is due to the fact that the young master will have to work with sharp scissors.

Assembling a curly bow
Curly bows made using the origami technique are very beautiful and elegant. To make such a charming little thing, you will also need to prepare a clerical knife or scissors. The last components will be needed to form beautiful ribbons.


Let's consider step by step what stages this scheme for modeling an origami bow with our own hands consists of.
- You will need to prepare a standard piece of paper. At the first stage, it will need to be folded in the shape of a triangle. The excess strip must be carefully cut off. The result should be a square with one diagonal fold.
- You will need to form 4 of these folds. This means that you need to bend the workpiece along two diagonals, as well as horizontally and vertically. On the future original homemade product, lines in the form of an eight-pointed snowflake will be clearly visible.
- At the next stage, you will need to put the square blank with its front side towards you. You should grab any pair of opposite beams. They are attracted to the base towards each other inward. The top of these elements will fall on the central part of the snowflake.
- The remaining 2 sides will also attract, thus forming a rhombus with only one diagonal. The square itself will be turned inside out.
- The common top of the rhombus will need to be gently bent with a small corner towards you.
- Having expanded the entire paper blank, it will be possible to get all the same detail in the form of a snowflake, only in its center there will be a small square.
- Next, you need to walk absolutely along all the lines of the formed bends and folds, so that in the future they can be easily controlled by making a bow.
- In the same way as the rhombus was formed, it is necessary to fold the central square into the inner part. The result should be an irregular pentagon.
- The corners of the base of the origami paper blank should be bent towards each other on both sides.
- The product will need to be unfolded again, but it will not work to the end, since at this step the clearly formed sides of the future beautiful bow, fixed by the middle in the form of edges, are clearly visible.
- The workpiece will need to be turned towards you with the front side, and then make neat cuts along the fold from the edge of all four sides. This must be done right down to the foundation.
- One of a pair of pentagons should be taken by the top, and then, pulling it towards you, put on top of the other.
- Now there is an incomplete square in the central part, and purl squares on the sides. It is worth moving on to working with these elements of the craft.
- In the direction of the center line, you need to carefully bend the edge sections on both sides.
- The whole process will need to be repeated on another part of the origami craft. To do this, you need to fold back the part that lies with the front side to the master. She will become purl. On top of it, put the element that was below.
- The freed sides of the paper product are tucked towards each other. This will create sharp triangular details that resemble arrows.
- The remaining square piece should be cut diagonally to the base. The triangle on the left is re-bent towards each other. As a result, tips will form, one of which will be longer than the second.
- After this stage, you can proceed to the design of the ribbons.
- Similar work needs to be done on the right side.
- Now you need to turn the origami paper bow towards you. All protruding pointed corners will need to be hidden in the gaps of the base of the figure located in the center.


The result is a very elegant and neat origami bow that can be attached to a gift.
Other options
There are many more different and interesting techniques for modeling beautiful origami bows. Homemade products that have voluminous details look very impressive and bright. Let's analyze a step-by-step master class on making such a product.
- Use colored paper. The rectangular blank will need to be folded in half along its length.
- Next, the paper blank should be expanded. The original shape now has a well-defined axis of symmetry.
- At the next stage, both corners are folded with corners to the line located in the center. The same actions must be carried out from the edge that is on the opposite side.
- Towards the centerline, you will need to gently wrap both long sides. The result should be a narrow strip with sharp tips.
- This part will need to be folded in half across, namely with the triangular ends towards.
- The corner folds are reconnected by means of triangular pieces. Next, they will need to be straightened and, along the selected lines, bend them with tops into the inner part.
- Exactly the same steps will need to be repeated on the reverse side of the workpiece. As a result, an elongated hexagon should be formed.
- Next, you need to very carefully fold in the middle with an overlap to the base of another triangular piece. In this case, one part should be slightly shorter than the second.
- All manipulations are repeated in a mirror image. After that, both parts will become equal, and a small square-shaped book will form in the gap between them.
- At the next stage, you will need to fold the corners of the triangles towards each other again.
- The paper blank should be expanded, and then straighten the square formed in the middle.
- If the tips are too long, they can be gently bent in half and then tucked in just as neatly under the square element in the center.
Thanks to such actions, the original origami bow will get a more neat, collected and compact look.


There is an option for making a beautiful origami bow figure for children. Let's look at the step-by-step instructions.
- A square paper sheet is folded diagonally in half in the direction of both sides.
- Next, the paper blank is unrolled, one of the triangles is carefully cut off.
- The triangle on the opposite side will need to be cut along the fold lines, but this does not need to be done to the end.
- Now the upper triangular element is folded down. Another small triangle is cut out in its middle.
- The corner of the side triangular part is glued to the center of the workpiece.
- The same actions are duplicated in other corners.
- A beautiful button or decorative stone of any type is glued in the center of the original craft.


A similar scheme can be used by little craftsmen. It will not cause any special difficulties in implementation.
To learn how you can make an origami-style bow with your own hands, see the next video.


