How to fold origami paper without glue?

Origami is a great hobby for both adults and kids. To create beautiful figures, a person only needs colored or white paper and examples of finished works.


How to make a plane?
The first craft of any child is a small paper airplane. It is very simple to make a flying paper toy:
- a rectangular sheet of paper must be bent in half, and then unbent back;
- the corners of the sheet need to be bent to the middle;
- further, the edges of the triangle must be carefully bent;
- an acute triangle is required to be bent to the center of the craft;
- then the figure needs to be bent in half;
- having straightened the future airplane, its wing must be lowered down;
- the same must be done with the second half of the figure.


The wings of the finished aircraft must be spread. The figurine is three-dimensional. It flies well and can be used while playing games.
Folding flowers
You can make beautiful flowers for your grandmother or mom from colored paper. They will be pleased to receive such a gift. One of the simplest options is a spring tulip. To create such a beautiful flower, red and green paper is used. The figure creation scheme is very simple.
- A square piece of paper should be carefully turned over and folded in half.
- The triangle must be turned with its bottom towards you. Next, the left edge of the craft needs to be folded towards the middle. Its corner should protrude slightly beyond the base of the triangle.
- The second part of the sheet must be folded in the same way. All lines must be ironed carefully.
- The lower part of the figure is additionally bent.
- Having finished with the base of the tulip, you can start forming the stem. The edges of the rhombus must be folded towards the middle.
- Next, the workpiece must be carefully bent in half.
- The lower part of the stem must be raised to form a leaf. Next, the two parts need to be connected to each other.


This craft option is great for beginners.
Creating animal figurines
Without glue and paper scissors, you can make beautiful animal figures.


Dog
One of the simplest options is a dog's face. The step-by-step process for creating such a craft is as follows:
- a square sheet of paper must be folded in half;
- the corners of this triangle must be lowered down;
- having ironed the ears of the animal, you need to bend the lower part of the muzzle up;
- the finished figurine can be additionally painted, which will make it more attractive to children.


The technique for creating an animal's face is quite simple. Therefore, anyone can make a craft.
Fox
A full-fledged chanterelle can also be made from a rectangular sheet of paper. It is done as follows.
- The first step is to outline the fold lines. A neat triangle should be formed from paper.
- The workpiece must be turned over, and its sharp edges must be bent to the upper corner. A small rectangle will remain in your hands.
- This part must be bent in half. The fold lines need to be ironed.
- After that, you can start forming the figure. Bend a wide line from the edge.
- The double sheet must be expanded. The middle corner must be carefully lowered down.
- All fold lines must be gently ironed.
- Having turned the paper figure, you need to bend its edge to the base of the craft.


Having finished with the craft, you can draw a nose and eyes on the fox's face.
Pigeon
Making a paper dove with your own hands is also very simple.
- The paper sheet must be folded in half, marking the fold lines.
- Having formed a paper triangle, you need to turn it with the base towards you.
- Next, the upper part of the figure must be folded. Its edge should extend slightly beyond the line.
- After ironing the fold line, you can proceed to the next step.
- The top sheet must be carefully lifted. The two triangles must be connected to form a rhombus.
- The resulting workpiece must be folded in half.
- The craft needs to be turned over. The upper wing must be lifted carefully.
- After that, the figure must be turned over again. Do the same with the second wing.
- The free edge of the wing must be folded inward. This procedure also needs to be done with the second wing.
- The upper edge of the figure must be bent inward, forming the head of the bird.
- Next, the base of the craft must be expanded. Free corners in the opposite part of the figure must be folded inward.


A pigeon made without the use of tape and glue is neat and even.
Butterfly
The best way to create colored butterflies is to use colored double-sided paper. The process of creating such figures consists of the following steps.
- The sheet must be folded in half twice, marking all the necessary fold lines.
- Then it needs to be folded diagonally several more times.
- The side edges of the workpiece must be bent inward, forming a three-dimensional figure.
- The upper corners of the workpiece must be lowered to the base of the craft.
- Next, the figure needs to be turned over and turned at an acute angle towards you.
- The lower part of the corner must be raised. Its edge needs to be bent, starting at the base of the triangle.
- The craft must be turned over. After that, you need to gently bend the upper wings, ironing the fold lines.


Ready-made butterflies can be used to decorate the room. They can be used to decorate a wall or a dollhouse.
More ideas
People who are fond of origami can make not only flowers or animal figures out of paper, but also more complex crafts. These can be hearts, bracelets, firecrackers, rings or voluminous boats. Consider several product options.


Ship
A great craft option for little girls or boys is a paper craft. It can be made from both colored paper and white. The step-by-step process for creating a craft looks simple.
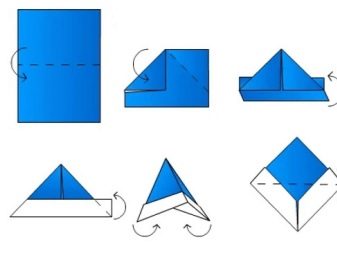
- A sheet of A4 paper must be bent in half.
- The upper corners must be brought to the center.
- Next, the free edges must be lifted up.
- Their corners need to be brought into the base of the figure.
- The workpiece must be bent by pulling the corners. Sharp edges must be in contact with each other.
- After that, the lower parts of the rhombus must be raised so that their corners are connected to the upper ones.
- All fold lines must be neatly smoothed out.
- After that, the edges of the figure must be pulled in different directions again, slightly lowering.
- Further, the corners of the future figurine must be straightened.


The ship is beautiful and neat. It floats well on the water. Therefore, it can be used for games. The surface of the ship, if desired, can be decorated with various drawings or inscriptions.
Clapperboard
Another craft option to play with is a paper cracker. It can also be made quickly and easily from a sheet of tissue paper.
- A sheet of paper must be folded in half and immediately unfold. This is done in order to outline a clear line.
- The top and bottom corners should be folded towards this line.
- Next, the resulting workpiece needs to be bent in half.
- Sharp corners must be lowered down. They must be connected together.
- Next, the figure must be bent in half, carefully ironing the fold.


To create a craft, it is quite possible to use a double notebook sheet. The clapper will turn out loud.
Heart
An excellent gift for a loved one will be an elegant heart made of pink or red paper. It is done very simply:
- for a start, the sheet must be folded in half, marking the fold lines;
- the side of the sheet must be bent to the middle;
- turning the workpiece over, its edges must be lowered down;
- then the figure must be turned over again;
- the lower edges of the craft are also bent to the center;
- after that, the lower corners of the workpiece are raised upward, forming an acute angle;
- the resulting figure is folded in half;
- the upper pockets must be carefully smoothed;
- having expanded the workpiece, the upper part of the craft must be placed inside;
- the edges of the heart must be carefully bent.


The finished figurine really looks like a real heart. Having learned how to make such crafts, it will be easy for a person to master modular origami.
Products created according to the described schemes can be used for games or made part of a small collection.
To learn how you can make origami in the form of a crane with your own hands, see the next video.


