Creation of a person using origami technique

The Japanese origami papermaking technique allows craftsmen to make a wide variety of figurines. An origamist can fold structures in the form of animals, plants, and various techniques. Handicrafts in the form of a person turn out to be interesting and original. In today's article, we will learn how to properly model such products.


What is necessary?
Before modeling the figures using the origami technique, it is necessary to prepare a number of suitable materials. It is advisable to immediately free up a convenient workspace for all work.
To model origami figures in the form of a person, the master will need to prepare the following components:
- a piece of paper of yellow or white color (even a sheet taken from a notebook in a cage will do);
- scissors (this stationery tool must necessarily have sharp and well-sharpened blades, otherwise it will not be possible to make even and neat cuts);
- felt-tip pens or markers;
- if desired, you can additionally decorate the figure with paper strips or threads that will act as hair.


Each origamist decides for himself how exactly he will decorate such a paper craft. A complete list of materials that will be needed for all work will depend on this.

Simple options for kids
It is better for novice craftsmen and little origamists to learn the Japanese papermaking technique on light and uncomplicated schemes.
Tinkering with complex and cunning designs with many small details should be a little later, when the basics of origami are mastered.

Simulation of a human figurine is available for both adults and children. Consider the step-by-step instructions for folding such a craft with your own hands.
- First of all, you need to prepare a square piece of paper. The leaf must be folded in half, directing the workpiece from left to right. The next step is the disclosure of the future craft. Now the product will need to be folded in half again, but this time from top to bottom.


- The blank is opened. The side corners located on top are laid towards the middle. At the next stage, the workpiece is turned over to the other side.


- The parts of the product on the sides are folded towards the middle. The corner at the top is bent downward. The lower part of the future figure "Man" is folded up.


- The corners of the structure will need to be carefully bent inward. The paper product is turned over to the other side.


- The corner, located at the center, is very neatly tucked inward. At the final stage, you will need to arrange the head of the craft. On the finished figurine, you need to carefully design the face: draw the eyes, nose and mouth.


This paper craft is assembled very quickly and easily. It will be available for small origamists 4, 5-6 years old.

This kind of simple "Human" figurine can be used by a child to study different emotions. A little master can make a ready-made person sad, cheerful or thoughtful. You can also experiment with hairstyle, eye color and other details.
You can easily make a little man according to another simple scheme.
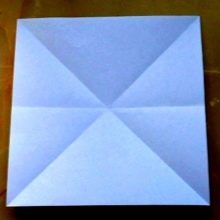
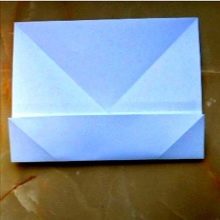
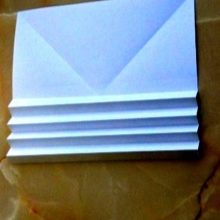
- Take a paper square. On it, fold lines are marked across and diagonally in both directions. The lower half is bent upwards in half. An accordion is formed at the bottom of the workpiece. You should get 4 folds "mountain".


- The same steps will need to be done at the top. The leaf is turned 90 degrees. Form another accordion. The sheet is straightened. The lower and 2 lateral folds are folded in a "mountain" at the same time.


- The upper fold is also shaped like a mountain. We must continue to fold the product towards the center. As a result, the letter "X" should be formed. The top is straightened.


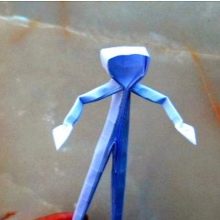
- Next, the arms and torso are formed, based on the fold lines. The product is turned over. Hands are laid in half and lengthwise, as well as legs. At the same time, addition is continued on the body.


- Straighten the hands, make bends at the elbows. Straighten the feet, make bends at the knees. The craft is ready!


More complex schemes
Many other human figurines can be made from paper. These can be not only simple, but also complex variations, for the manufacture of which a certain level of knowledge and skills is required.

Let's consider a step-by-step description of how to make a more complex craft from a sheet of A4 paper.
- First you need to take a sheet of paper of the specified size. It is necessary to make a square base from it. For this, the short side of the blank is folded towards the long side. All excess must be cut off. As a result, a square with dimensions of 21x21 cm should be formed.It is cut into 2 halves, that is, into 2 rectangles
- From such blanks it will turn out to make two men. You will need to put a rectangular leaf in front of you on your work surface. In this case, its long side should be directed downward. The workpiece is doubled and then opened. After that, each long side should be bent to the formed line in the central part.
- Next, you need to put a rectangle with a cut in the upward direction, but with the shortened side towards you. You should carefully bend the 2 upper corners from the center to the edge. The result will be 2 triangles with right angles. All the folds made will need to be ironed well.
- The product is turned over to the other side, after which it is laid on the side on which the corner bent up is located. The short part is folded over to the long one - in the same way as for the formation of a square at the very beginning of work.
- Next, the paper blank is unrolled and the steps are repeated on the reverse side. After that, the product is folded again.As a result, a rectangular element with a triangle at one end will come out. The top of the triangle will need to be bent towards the base. Then the workpiece is opened again.
- As a result, you should get 3 outlined triangles: one at the top and one more opposite the other. The side triangles will need to be tucked in, and then covered with the triangles from above. This basic shape is called the "double triangle". Thus, the craft will be divided into 2 parts: legs and torso. Next, you need to start shaping the legs of the figure.
- We need to work on the bottom rectangle. You will need to fold 2 small triangles at its top. Then these details are unbend.
- In the next step, the upper triangle rises. The corners from the bottom are connected in the intended area. Next, the workpiece is bent, but this should not be done clearly in half, but so that the lower half is 1.5-2 cm larger.
- The product is turned over to the other side. Then the lower part is folded again by about 0.5-0.7 cm.
- Now the longer sides of the product are folded towards the center line. The "houses" formed in the upper part are pressed against the workpiece, and then triangular elements are formed.
- The rectangles must be opened and then bent across: the short side towards the other short side.


You can also make a "tough man" figurine. Let's find out how it is modeled.
- You will need a sheet of thick square paper. A material with dimensions of 20x20 cm is suitable.
- The leaf is bent in half diagonally and in two directions. Press the fold lines with your fingers to create stable boundaries. After folding, the leaf will look like a square with diagonal folds intersecting in the center.
- Then the sheet is folded in half. The fold line is well ironed.
- The workpiece is opened, and then doubled again, but already perpendicular to the previous fold line. But the bend must be done not in the same direction, but by turning the workpiece over to the other side.
- Now the sheet of paper needs to be folded in half again. In accordance with the existing fold lines, the sides of the paper base are folded inward. As a result, a triangular element should be formed.
- The top of the formed triangle will need to be bent to the bottom of the product so that it touches the base. As in the previous steps, the fold lines will need to be smoothed out well.
- After that, the tip of the paper blank will need to be carefully folded again, but already in the direction of the formed fold line.
- In the next step, the master will need to bend the tip of the tip in the same way. After that, all fold lines are folded like an accordion.
- After that, the workpiece is opened and folded again. It is necessary to fold in accordance with the fold lines on all sides towards the central part.
- Now you need to form additional fold lines at a small distance from the main line. In the future, this will be the face of the paper man. Now the paper needs to be folded again in an accordion towards the center, as last time.
- In conclusion, you need to do the shaping of the face of the cool paper man. You also need to make your hands.


You will find a detailed master class on making such a figurine in the next video.


