Paper origami options for children 5-6 years old

The origami paper craft modeling technique is very popular. It can be mastered not only by adults, but also by little masters at the age of 5-6 years. There are many simple and understandable schemes that children can use. In this article, we will look at the best paper origami options for children 5-6 years old.


Peculiarities
The origami technique is not in vain that it is so popular. The thing is that its development has a positive effect on many processes in a growing organism.
-
Children who master the origami technique simultaneously acquire the skills of a more beautiful and accurate writing technique. To fold paper figures, it is necessary to make the most clear movements with your fingers, so that after such "training" in the future, writing letters for a child no longer causes great difficulties.
-
Children develop the ability to construct while they learn the origami technique.... As a rule, guys who are very familiar with making paper figures find it much easier to master geometry and 3D modeling. In addition, their spatial thinking develops.
-
Thanks to the origami technique, hard work is brought up in children 5-6 years old... Little craftsmen are really delighted when they see excellent results of their work, therefore, they continue to act diligently and responsibly.
-
Acquaintance with the origami technique contributes to building the correct speech of the child.... The vocabulary of a young origami master, his ability to express himself cleanly and clearly depends largely on fine motor skills. The latest origami technique has the strongest impact.
-
Modeling figures using origami technique contributes to the development of neatness in children. If you fold paper blanks carelessly and hastily, then, indeed, you will not be able to make a beautiful craft. In such a creative business, one of the main roles is played by the high accuracy of movements, the concentration of the little master.


The formation of paper figures using the origami technique has a predominantly positive effect on the child's body. In the course of folding this or that craft, both hemispheres of the brain are involved.

The level of their activity turns out to be the same, so the work of the brain becomes as synchronous as possible. At the same time, the balance of the main thought processes is leveled.
By resorting to making a variety of paper crafts, a little origamist can easily get distracted from sad thoughts and depressive moods. Modeling figurines using origami technique is an excellent way to deal with stress.

How to stack animals and birds?
Children aged 5-6 years easily learn a variety of schemes for modeling paper figures using the origami technique. Little craftsmen are especially attracted by the manufacture of handicrafts in the form of various animals and birds.
Such creative activities are great for young origamists, cheer them up, and develop their creative abilities.


Let's figure out in detail how to correctly fold various animals and birds out of paper in accordance with certain patterns.
Turtle
A child aged 5-6 years can easily and quickly make a pretty paper turtle figurine with his own hands. There is nothing difficult in making this craft.

Let's take a look at the step-by-step instructions for creating such an origami craft.
-
It is necessary to pick up a square piece of paper with a side of 21 cm. At the first stage, this square will need to be placed on the table with one of the sides towards you.
-
Next, the paper blank will need to be carefully folded into a triangle.
-
The outer corners of the product will need to be bent up.
-
As a result of the above actions, a neat "double square" should be formed.
-
Now the right half of the top layer of the workpiece will need to be folded in half. This must be done only from top to bottom.
-
The same steps should be applied to the left side of the product.
-
The valve located below on the right side will need to be bent as shown in the diagram.
-
Similar actions are required for the left side of the workpiece.
-
Next, the future turtle figurine should be rotated 180 degrees. For a triangular element, which will be in the lower part, you should carefully separate the top layer, then you need to cut the part from the top to the center point.
-
At the next stage, both halves of the paper product can be folded as desired.
-
The valves located at the bottom are also allowed to be bent at your discretion.
-
The valves at the bottom must be folded in the same way as the valves at the top.
-
The sides of the workpiece are folded into the inside, but not brought to the center.
-
One of the tops of the figurine should be lowered.
-
Forming a double fold, the product should be returned to the opposite position.
-
The blank is then turned over, folded along a line along the line to give more volume. A simple and cute turtle figurine is ready!


Cat
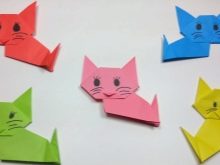
A child 5-6 years old can just as easily and quickly make origami in the form of a cute cat with his own hands.


Let's analyze in stages how to correctly model a figurine in the form of a cat's face.
-
You need to take a square piece of paper of any color that the child likes best.
-
The paper is folded in half along a diagonal line to form a triangle. Further, the edges of this blank will need to be wrapped from the base to the middle. This should be done at a slight angle - these will be cat ears.
-
The vertex is tucked down. This will form the head of the cat.
-
The workpiece should be turned over to the other side, and then draw with a felt-tip pen or glue the eyes, nose, mouth, antennae.


This craft is very simple, so children under 5 years old can model it.
Crab
A figurine of a crab made using the origami technique can turn out to be very interesting.


To make it, you will need to prepare a square sheet of paper with dimensions of 10x15 cm. And it is also worth purchasing ready-made plastic eyes in advance, which are sold in many creative stores.


Let's analyze the algorithm for modeling origami in the form of a crab.
-
At the first stage, the paper square will need to be folded in half diagonally. This should be done in two directions. Then the product is folded in half like a "book".
-
The workpiece is opened. Reverse folds are formed diagonally. In this case, the extreme points of the line in the middle are connected in the center. The result will be a "water bomb".
-
It needs to be placed with the base down. The corners located outside are folded inward in accordance with the dotted lines in the diagram.
-
The workpiece is turned over. The lower half is folded. Be sure to iron the fold carefully. The side parts are folded down along the dotted lines.
-
The product is turned over again. You need to fold the claws of the crab along the dotted line. After that, they are unbent.
-
The claws must be shaped like a scissor. For this, the outer parts of these parts are folded back along the fold marked earlier.
-
All that remains is to glue the plastic eyes, and the figure will be completely ready!


Woodpecker
Let's consider an algorithm for making a simple figurine in the form of a woodpecker.
-
You need to prepare a square sheet of paper. It must be placed with the colored side up.
-
The paper is folded in half. The corner should adjoin the corner. White should be inside. A triangle will form.
-
Then they connect a couple of other corners.
-
The paper is opened, placed in front of you with a corner upwards. In the lower half, the sides are aligned in accordance with the fold.
-
The workpiece is turned over. In the upper half of the product, the sides are also folded along the inner fold.
-
The workpiece is turned over again.
-
It is necessary to turn the upper white part to the left. This should be done so that there is a noticeable corner on the left side. This detail will play the role of the bird's beak.
-
Next, the corner is raised at the first part of the paper blank.
-
The body of a paper woodpecker is folded in half, after which eyes are drawn or glued.


How to make a postcard?
A young origamiist at the age of 5-6 years with his own hands can easily assemble an original and very beautiful origami card for his birthday.


Consider a step-by-step workshop on modeling such a creative craft.
-
First you need to pick up a square sheet of paper with dimensions of 15x15 cm. One side of it should be white, and the other - colored. The color can be absolutely any, for example, pink.
-
The assembly of the product should be started from the white side. First, fold the basic triangle shape. It is placed with the tip away from itself.
-
The corner of the upper layer must be bent, slightly not reaching the base of the figure.
-
The same part must be folded like an accordion. First, raise the workpiece 2/3 up, and then lower it down 1/3.
-
The workpiece is turned over. The left half is folded so that the top rests on the opposite edge. The same should be done with the left side.
-
In this case, the upper corner must be bent down a few centimeters.
-
The figurine is turned over again. The triangle is folded forward twice from above so that its tip protrudes slightly on the front side.
-
Now you need to arrange the base of the postcard itself. It is advisable to use a cardboard sheet for scrapbooking. Its size should be approximately 21x28 cm. This part is folded in half in the transverse direction.
-
You can use elegant wrapping paper and cut a strip out of it to decorate the "table", as well as a second narrower strip - for the "candle".
-
First you need to glue the base to the card, and then on top of it a cupcake figure.It can be additionally decorated with rhinestones, sparkles and any other decorations.


More ideas
There are many other interesting origami ideas for children 5-6 years old. There are cool modeling schemes for beginner origamists, thanks to which it is possible to create figurines of flowers, trees, vehicles, underwater inhabitants and many other objects.


The child can be carried away by the process of making a beautiful paper craft in the shape of a maple leaf. Let's consider step by step how such a craft should be properly made.
-
The sheet will consist of 10 square pieces of paper. Of these, 9 squares will go to the leaf itself, and 1 to the stem. The sizes of these materials can be absolutely any.
-
First you should put one of the squares in front of you.
-
It is bent in half, connecting the corners to each other, located on opposite sides. As a result, a triangle should form.
-
The side of the fold should be well pressed.
-
The triangular part must be opened, and then bent, aligning along the fold line, as shown in the diagram.
-
First, one side is folded, and then the other.
-
To model a paper maple leaf, you will need to make 3 similar parts and 6 more with a more complex structure.
-
To make a complex part, you first need to carry out the same steps as for a simple one. After that, the workpiece is turned over and one side is folded, aligning in the center.
-
Then the second side is also folded, as in the diagram.
-
You need to make 6 of these elements.
-
The finished components will need to be folded into a single structure.
-
Take 2 complex and 1 simple parts. The two complex components will be connected by 3 simple component glued on top.
-
You need to make 3 components of the petal. After that, they are overlapped. Each subsequent part should be glued to the previous one. It remains to make only the stalk.
-
Glue is applied to a half of a square of paper, and then glue it behind the leaf, more reliably fastening the 3 main parts.
-
The visible triangle is cut, the stalk is bent to one side, and then to the other. A beautiful modular craft is ready!


For more information on paper origami options for children 5-6 years old, see the video below.


