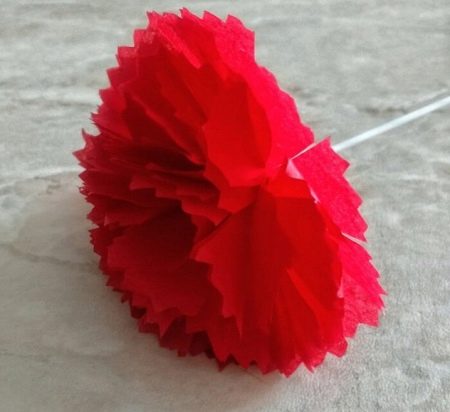
Origami carnations

In the origami technique, carnation is performed without any particular difficulties; similar activities can be recommended for children. It is nice to give a symbolic flower to friends, parents, acquaintances on February 23 or May 9. The special value of the gift lies in the fact that the work is done by hand. In the article, we will present several types of instructions and tell you in what ways you can make simple and complex versions of a carnation.
Simple options
Let's start developing our origami skills with the simplest figures. We offer step-by-step instructions that will help you make a carnation for decorating the St.George ribbon. Prepare in advance paper of red and green colors, curly scissors, glue and a ruler with a pencil.

- Cut two 9x9 cm squares out of red paper.

- Take one and fold it in half diagonally. Fold the resulting triangle in half again. Expand the workpiece, and you will see a cruciform hall on it, dividing the square into 4 triangles. Now fold the square with creases in half along a straight horizontal line, forming a rectangle.

- Using the creases, we bend the ends along their marks so that we get a triangle turned downward with an angle.

- We pull the ends of the triangle to the center, and connect them to each other, forming a vertical line at the junction.


- The result is an angular workpiece. With the help of curly scissors, its upper part must be made semicircular. If the scissors are ordinary, we cut out the teeth by hand.

- Now we take the second red square and do the same work with it as with the first option.

It's time to tackle the receptacle:
- Cut out a 5x5 cm square from green paper.

- Fold it diagonally in half, and we get a triangle turned upward.

- Divide the lower horizontal line of the triangle (hypotenuse) in half, but do not bend it, just mark the center.

- From the center, we lift the two side ends up. We get symmetrical triangles deployed from the center in different directions.

- We round off the resulting workpiece with curly scissors, forming a toothed semicircle.

- The receptacle is ready. Gently insert a red carnation into it and fix it with glue.

Connect a pretty flower with a St.George tape with a glue gun.

A detailed master class can be viewed below.
Creating a realistic flower
Now we will tell you how you can make a lush, beautiful volumetric flower out of paper. Despite the fact that it bears great resemblance to a real plant, the work is not difficult, and we do not need a diagram.

For work, prepare:
-
colored corrugated paper;
-
floral stem for stem;
-
scissors;
-
glue gun;
-
a small piece of foil;
-
tape for gluing the stem, but you can get by with green paper.

The procedure will be as follows:
- Using curly or ordinary scissors, cut out 12-15 round blanks with a diameter of 8 cm. The edges need to be decorated with small teeth. Carnation will look more realistic if you use more than one shade of red paper.

- We put the petal blanks aside for now, and proceed to work with sepals. To make them, we take a piece of green corrugated paper with dimensions slightly exceeding the parameters of round elements. Cut out a cruciform piece with tapered ends. To make the flower look more natural, one pair of rays should be shorter than the second pair.

- Having prepared the sepals, we again return to making the flower. We fold each circle in four to determine its center point. Then in the middle along the mark we make a small hole, with the help of which the flower will be planted on the stem.

- We unfold the workpiece again, and make cuts in the form of petals. Cut should be randomly in a circle and shallow so as not to touch the center. Similar work needs to be done with all the round parts.

- Next, we prepare the stem. To do this, we take a floristic rod and wrap it on one side with a small loop. We will need it so that the petals do not slide off the stem and leave the carnation.

- Now take the round piece and slide it over the rod, passing the sharp end through the center piece until the circle rests against the loop. Use a glue gun to secure the paper circle to the loop on the stem.

- Do all the above steps with the rest of the round details, filling the carnation with petals step by step. The result is a lush fluffy flower.

To give the finished flower a natural look, gather the petals into a fist and twirl them slightly.

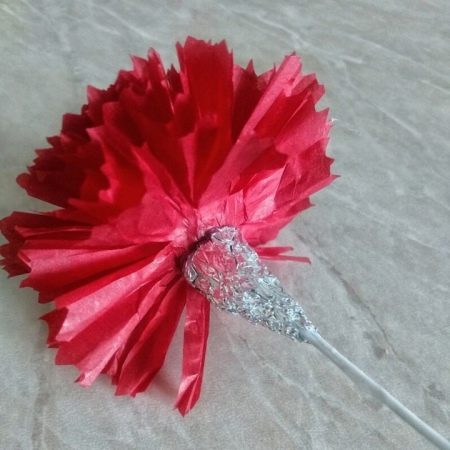
- Use the foil to form a receptacle around the rod and glue it.

- Tape tape around the stem together with the peduncle. If green paper is used for these purposes, it will have to be fixed with glue.

- Make cuts in the center of the sepal blank. They are needed to put on the part on the receptacle, adjusting it to the very bud of the carnation. Fix with a glue gun.

- The peduncle can be wrapped in green corrugated paper over the tape. Make and attach several leaves from the same material.
The volumetric realistic carnation is ready.

For a detailed video, see below.
How to make modular origami?
Modular craft is easy to execute and looks good. It is a flower assembled from many parts. To create it, we need scissors and glue. Choose the color of the paper for the flower and stem to taste. In our case, it is red and green, you can take pink and blue, other shades.

- Cut a red sheet of paper into 5x5 cm squares. You can prepare from 8 to 12 blanks, their number affects the splendor of the bud.In our case, the flower will contain 8 elements. Further, using the example of one square, we will tell you step by step how to make a part for a carnation, the rest of the petals are made in the same way.


- The red square must be folded diagonally in half, dividing it by bending into two triangles.


- We fold the double triangle diagonally again. If you unfold the workpiece, you can see how the bends are already drawn by 4 triangles.


- In a part folded twice diagonally, we give one edge a small volume due to additional bending.
- Next, we put the workpiece on the table, and fold the upper triangle in half. Outwardly, the detail begins to resemble an arrowhead.
- One fragment of a carnation bud is ready, we make all the rest in the same way.


- It's time to collect the flower from the completed modules. To do this, take one blank and slightly push the walls of the large triangle apart. We insert the wing of the second blank into the resulting groove.
- With the inserted part, we do the same: insert the third part into the groove of the second triangle, and do this 5 times. We get a fragment of a flower, assembled from five elements.
- In this way, it is necessary to compose another fragment of a carnation, assembled from the remaining three elements.


- We connect both blanks with glue into a single lush flower.


- We turn to the manufacture of the receptacle. For work we need green paper. We cut out 2 squares from it with dimensions of 6x6 cm.

- Then everything is simple: we make two parts from the squares the same as they were folded for the petals.


- We glue one blank with "wings" to the bottom of the flower so that the large corner goes down with its free end. Set aside the second identical element for now.

- Let's move on to making the stem. For it, we need a 10x10 cm square cut out of green paper.

- We turn the part into a tube, you can use a knitting needle, it is easier to twist the paper around it, then the knitting needle can be easily removed. To make the stem, place the square on the table with the corner down. We begin to fold not from the straight side, but from the corner - this way the stem turns out to be longer.


- To prevent the part from diverging, we glue the tip and fix it on the stem.

- We flatten one of the ends of the stem and glue it to the inner side of the receptacle so that it rests on the lower part of the flower.

- It's time to use the second identical element. We connect it with glue to the first half. Now the lower part of the flower is covered on all sides by a receptacle.

- The carnation is 2D and is not intended to be viewed from the side. But in a plane from two obverse sides, it looks great.


Origami was invented by the Chinese almost immediately after they invented paper. Very soon, this kind of creativity became a favorite in Japan. And today he is known all over the world. Paper crafts are incredibly popular with us.
Do origami with children, develop perseverance, patience, imaginative thinking in them, unleash their creative potential.


