Origami cube

In the well-known origami technique, you can model a variety of types of original cubes. These can be both familiar and unusual and funny options. In today's article, we will figure out in detail how you can make a cool cube using the origami technique with your own hands.


Classic version
There are many schemes for making an origami cube yourself. If a person does not have much experience in modeling such crafts, it is better for him to start acquaintance with the origami technique, using simpler and easier schemes. There are quite interesting and understandable options that are suitable even for young children.
The easiest way to do a classic cube is to do it this way.
- First, you need to download the exact "pattern" in the form of a diagram of the future product. It must be printed on suitable paper, and then carefully cut along the outer contours.
- After that, the classic figure must be folded in accordance with the inner contour lines.
- You need to put glue on the small white tags. After that, these parts are slipped under the edges of the future cube and briefly pressed with fingers to fix it.


Modular
To assemble a more attractive modular cube, you need to prepare 6 paper pieces of the same size. You can use materials of different colors. No glue is needed for creative procedures.
Making an original volumetric craft, consisting of separate modules, begins with folding the paper square from bottom to top. Next, the paper blank must be expanded. The top and bottom will need to be bent towards the resulting basting line.


The workpiece is opened. After that, it is folded vertically.The upper right and lower left corners will need to be carefully folded in accordance with the nearest marked line. The sides on the sides of the paper product are bent towards the middle.
Now the corner on the left side will need to be folded to the right edge, and the right goal from the bottom - to the left edge. The corners will need to be carefully tucked into the inside of the workpiece.


The corners at the top and bottom must be folded in such a way that the required square is formed. After that, a kind of module for the cube will be made.


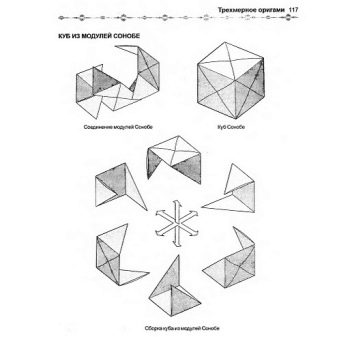
In the same way, you should assemble the rest of the necessary elements for the structure. When assembling such a cube, the free corner of one of the elements should protrude into the pocket of the other from the side where the second element does not have a free corner. At this point, the cube will be ready.


Sonobe cube
With your own hands, you can make not only a classic, but also an original moving sonobe cube. To assemble it, you will first need to model 9 small modular-type cubes. In total, you need to make 3 rows of 3 paper blanks. The closing tab of each of the modules must be left untucked. Then all the components of the structure are combined into one composition.
- The tongues of paper blanks are neatly placed in the pockets in the adjacent cubes. 3 rows should be formed, fastened by means of pointed corners, like 3 rhombuses, if you look at them from above.
- It is necessary to pull out the tabs of each cube. Having spread them out in 3 rows, they are put into cubes from the rows next door.
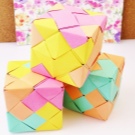
The assembled paper structure is capable of compressing and expanding. The cubes in her device can even rotate without separating from each other. The sonobe cube looks especially impressive if you simulate 3 cubes of different colors.


Making a funny face-changing cube
Young craftsmen are very interested in making an original paper box, from which a funny little face peeps out. To simulate such a craft, you need to prepare a double-sided sheet of A4 colored paper, scissors and a white piece of paper with dimensions of 20x20 cm.
Consider the instructions for making such a funny magic craft step by step.
- A4 sheet must be folded in half along the line along.
- Guided by the fold, the sheet is cut into 2 halves.
- 2 more equal square elements are cut out of the formed rectangular parts.
- The square will need to be folded twice along a diagonal line.
- Each of the corners of the structure must be bent towards the central part.
- The edges located at the top and bottom should be carefully folded towards the middle.
- Now you need to unfold the formed folds, leave only a couple of corners of the rhombus in the folded state, directed to the central point.
- The outer corners of these folds must be folded towards the outside.
- The bottom edge is folded up to the very center of the workpiece.
- To the same line, you will need to gently bend the edge that is located at the top of the product.
- At the next stage, the paper blank should be unbent and then unfold.
- It is necessary to make a diagonal in the lower square on the right, as well as in the lower left and a couple of upper parts.
- The product must be turned over.
- Now you need to press on the corners of the structure. After that, you need to assemble the original box.
- The same steps should be repeated, collecting the second paper cube.
- The next step is to nest the finished boxes into each other. In this case, it is necessary to form an opening box.
- A simple white square must be folded in half along a diagonal line.
- The workpiece is turned over and folded in half.
On one side of the white part, draw a funny face, and then place it in a colored box. This will create a funny face that will look out of the colored craft.
To draw a face, you can use ready-made stickers of various types, plastic eyes from shops for art and creativity, and any other details that the master chooses.


More ideas
Origami cubes can be crafted in many other ways. It can be a very original endless and even inflatable type of unusual homemade products. If you want to model the most unusual and cool paper construction, you can make a small movable cube that transforms into a rose. Also, a large multi-colored cube can turn out to be very bright and beautiful.
To make a cool multi-colored cube with your own hands, you must first prepare 6 squares of high density paper. For their creation, cardboard is also suitable. The larger the squares, the larger the finished original design will turn out. When the necessary elements are prepared, you can proceed to further actions.
- Each of the 6 sheets of thick paper must be folded in half.
- The workpieces will need to be bent both at the bottom and at the top. This should be done towards the central axis.
- The edges on the right and left will need to be folded towards the center point of the workpiece.
- One of the paper blanks should be placed so that its lower part is directed downward and the top protrudes into two wings.
- On top of this component, 4 more paper blanks are laid at the edges of the square base.
- The "wings" of these blanks are tucked into the corresponding element pockets in the neighborhood.
- On top of the structure, the final part of the multi-colored cube is fixed.


To make a magic cube, such manipulations will be needed.
- Prepare a sheet of A4 paper.
- On the long side of the paper sheet, 5 strips of 55 cm each are marked.
- Next, mark the short side.
- It is also necessary to mark the fold lines. The parameter of such markings is 15 mm.
- The parameter of the width of the stripes on the paper should have a direct impact on the dimensions of the inner hole of the future paper cube.
- Next, you will need to carefully cut off the excess edges of the paper with scissors.
- After removing the edge, the assembly diagram of the future magic cube will be completely ready for further manipulations. Bends will need to be formed along the lines drawn.
- In order for the paper cube to be folded according to all the rules and from the slightest light clicks, it is advisable to thoroughly "work out" the folds.
- Now you can proceed to the final assembly of the future original paper craft.
A similar origami figurine can be made from paper of any color that the master likes.
For information on how to make a magic cube using the origami technique, see the next video.
Useful Tips
The technique of making paper and cardboard origami figures is very popular. She captivates both adults and children of all ages. From simple and accessible materials, craftsmen can make not only elegant cubes, but also any other objects. Let's consider some useful tips for self-modeling such crafts.
- It is important to find the right paper for making cube origami. It can be either plain colored paper or special paper designed specifically for origami. The density of the material must be sufficient for making crafts.
- When assembling a modular or classic cube structure from paper or cardboard, it is recommended to follow the sequence of actions, to avoid unnecessary haste. All actions should be calm, orderly and unhurried. If the master is in a hurry, then the figure may turn out to be sloppy, having many errors and flaws.
- If an adhesive is used in the assembly of the paper structure that forms the cube, then it should be applied in small quantities.If you use too much liquid glue, it will negatively affect the neatness and visual appeal of the original origami craft.
- If you need to use scissors to make origami homemade products, it is recommended to ensure the quality of their blades. The latter should be well sharpened. A stationery tool with dull blades will not make precise and accurate cuts, which can seriously damage the appearance of the modeled craft.
- If a small child is working on modeling the original craft, parents are advised to be nearby and keep the whole process under their control. This is especially true for those master classes that involve the use of sharp scissors.
Adults need to make sure that the young master does not get hurt when making a paper cube using the origami technique.


