How to make origami in the form of a water lily?

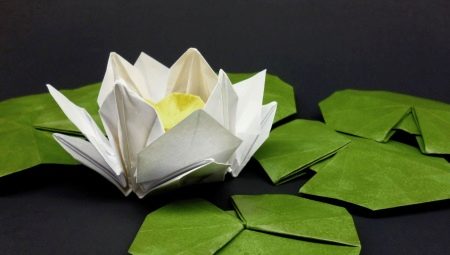
The water lily folded from paper looks very impressive and original. It can be a decoration for any interior. You can decorate a gift with a beautiful flower made using origami technique.


Simple option
It is not difficult to make origami "Water Lily" with your own hands. It is necessary to prepare square sheets of pink and green colors, as well as scissors. At the initial stage of training, it is advisable to use a large square 30x30 cm. It is best to use thin paper, because a too dense sheet tends to tear when trying to open the petals of a flower.


As you acquire the skill, water lilies of various parameters will be available, up to the smallest sizes. A smaller model can be inserted into a larger flower for a lush water lily. Let's write down a step-by-step list of necessary actions for beginners who like to make paper crafts.
- Use double-sided colored paper. It should be the same density as a regular office sheet.
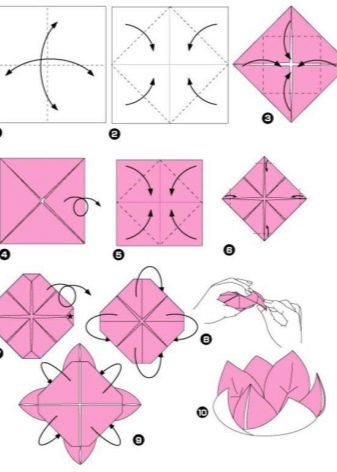
- Fold the square sheet diagonally, then unfold it. Do the same for the second diagonal fold line.
- Bend all 4 vertices one by one towards the central part. The result should be a smaller square. Iron all wrinkles carefully to form a flat figure.
- Repeat all the previous steps one more time, pulling the formed vertices to the middle a second time.
- Do the same procedure a third time.
- Flip the square upside down. Fold the corners, carefully ironing the fold lines.
- The next step is to slightly tuck the tops.
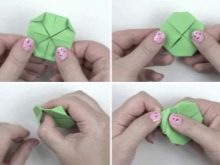
- Now, carefully pull the layer of paper out of the formed flap, turning the petal from the wrong side to the front side.
- Lift the triangular flap of the inside of the petal.
- Spread out all the other corners.
- Form the second row of petals by smoothing out the next layer of corners.
- Another smaller lotus can be placed inside the opened bud.


The formation of the leaf should begin in the same way as the flower itself was folded. After the last bent corners have been straightened, you need to glue the lotus into the resulting rosette.


Simple flower folding options are suitable even for children. Any child is able to cope with a simple craft. First, you need to cut out two white circles of different sizes. Then you should fold each circle in half, then fold it several more times. Along the fold line, it is necessary to make cuts almost to the core.
Next, you need to tuck the petals and glue them on the back. The next stage involves gluing two blanks. The middle can be decorated with yellow paper balls, beads or shiny rhinestones.
A child can cut a flat sheet of the appropriate shape out of green paper and place a water lily on it.


Assembling modular origami
The water lily can be folded from modules. In this case, you get a voluminous water lily. To make the craft, you need to prepare 8 pink and green square sheets of 10x10 cm paper.
Step-by-step instructions for beginners:
- fold the pink sheet in half from bottom to top;
- repeat the same action again;
- unfold the last bend;
- pull the bottom corners towards the central part and smooth the resulting lines;
- make the corners from the front layer on top;
- pull the free edge down and bend the shape in half;
- turn the craft over;
- bring the upper corners to the horizontal line;
- close the strip from top to bottom;
- straighten the edges of the resulting boat;
- lift the bottom edge towards the center and press it well;
- smooth out the finished module;
- make 7 more exactly the same petals;
- try to fold the green leaf in a zigzag manner;
- fix the formed folds;
- expand the workpiece;
- pull the right edge to the nearest line;
- bend the front edge in the opposite direction;
- make the same fold on the left;
- open the workpiece in the same way as swing doors are opened;
- unfold the sheet 90 degrees;
- connect the bottom edge to the top, fixing the fold line;
- pull the upper and lower corners of the first layer one by one to the middle line;
- perform actions similar to those that were carried out to make the petal of the water lily itself;
- assemble all modules by inserting the left corner of each petal into the pocket of the adjacent blank;
- turn the water lily over and repeat the same steps in a circle until the craft is completely rounded;
- collect the leaves in a similar manner;
- insert the flower into a green socket.


More ideas
There is an interesting idea for turning a paper water lily into a lamp. Its safety is ensured by the low power of the battery. First, stick the tape on the back of the lily prepared in advance.
A square piece of tape will prevent the paper from tearing when placing the LED on the bottom of the flower.


A 3V CR2032 round battery should be inserted between the LED pins... Then you need to bend the resulting structure and fix it with tape. You can place 2-3 LEDs in the lotus.


The small water lily is a wonderful hair accessory. Origami is made from starched fabric and attached to an invisible hairpin or hairpin.
To prevent the product from starting to crumble, it should be thoroughly smeared with nail polish or PVA glue.
Origami can be made from three-layer napkins that resemble fabric in their elasticity. The plasticity and strength of such napkins allows you to fold a water lily out of them. The origami water lily serves as a good decoration for the festive table.


Looks great paper lotus on a gift box... You will need colored wrapping paper to fold the original packaging. It is best to find a craft with a picture. Shades should match well.
Consider the box manufacturing scheme:
- prepare a square sheet;
- bend the light craft diagonally;
- bend all the corners one by one, connecting them in the center of the figure, then unbend;
- fold the resulting triangles again, forming a kind of square frame;
- turn the craft over with the back side;
- bend the side edges towards the central part;
- straighten the folds;
- lower the upper part to the center and raise the lower edge;
- open the side flaps one by one;
- press the upper right corner, forming a triangle along the axis;
- do the same at the bottom;
- put the valves back in place;
- on the left side, do the same procedure;
- insert your fingers into the crevice;
- open and pull apart the sides of the packing box.


To make a water lily, you need to take a square sheet and make diagonal folds on it. Next, you need to tuck the corners towards the center and turn the figure over. Then you should bend the corners again. Turn the workpiece over again. Repeat all steps. On an upside-down garment, fold back each edge of the top layer with a triangle and smooth. The next step is to lift the corners of the second layer and connect them to the previously opened valves.
At the final stage, the lotus is fixed on top of the prepared box. On its basis, it is necessary to make cuts in advance to place the corners of the made water lily there.


You will find a video tutorial on how to make origami in the shape of a lotus below.


