Origami in the form of a fox

The origami technique allows you to make amazing, beautiful paper crafts with your own hands. There is a huge variety of workshops that help make such products. Today we will talk about how to make an origami fox.


Description
Simple origami fox crafts are perfect for kids in kindergarten... More complex options are optimal for schoolchildren. As a rule, when creating such a shape, bright colored paper is used. You can take a special corrugated material.
Most often, you don't even need glue and scissors to assemble such a craft. If desired, ready-made figures can be decorated with a variety of decorative elements. It is recommended to use double-sided paper at once, but you can take plain single-sided paper as well.


Craft for beginners
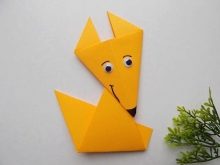
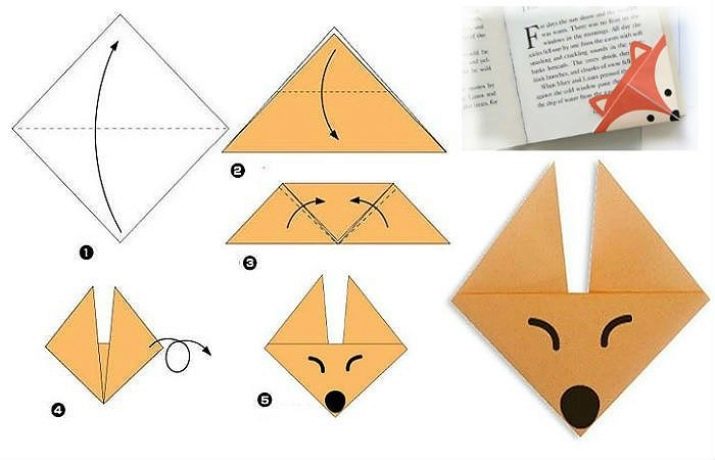
To begin with, consider the simplest scheme for creating such a flat chanterelle.
- First, a square sheet of yellow or orange is taken. Then it is carefully bent in half along the diagonal line from top to bottom.
- After that mark the middle of the triangle. Its sharp corners fold in and then straighten in the opposite direction.
- Next, the right and left parts of such a paper blank are folded obliquely so that the sides form a wedge along the center line. This will highlight the fox's ears.
- At the end, the product received turn over and decorate.

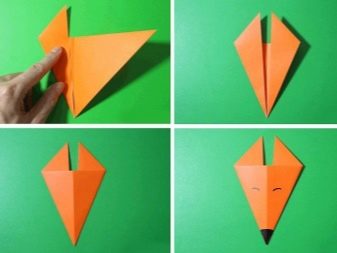
Consider another simple option for creating such a paper craft.
- Take a one-sided square sheet of paper. It is folded in a "valley" along the diagonal line. The result is a triangle.
- The triangular workpiece is placed with its apex upward and again bend everything in half "towards itself". The result is a strip of three triangles.Side elements will be positioned with top up, and central ones - with top down. The figures will have two common sides, along which you need to bend the side triangles.
- Then the workpiece is turned over. At the end, with the help of a black marker, the muzzle of the chanterelle is drawn.


Complex modular origami
Next, we will look at how you can make a complex modular fox-shaped craft. First, you will need to prepare a large number of paper modules. To make them, you need to follow these steps.
- An A4 sheet is taken. It is divided into 16 or 32 identical rectangles.
- Each rectangle is doubled along the long side.
- After that, mark the center line, bending and unbending the workpiece again from right to left.
- Then the workpiece is turned "mountain" towards itself, the edges are connected in the center.
- The paper product is turned over, while the lower free edges are raised.
- Later, the lines of the bends of the corners are marked, bending them through a large triangle. Further, all this is unbent back.
- The corners fold neatly inward along the marked stripes, the edges rise slightly again.
- The module folds in half from right to left, and the junction of the free edges must be inside.
- The result is a module that looks like a right-angled triangle with two small pockets and two corners.


After the modules are made, you can start making the craft itself.
- First, the base of the product is made. To do this, 16 modules are placed in one row, while the direct rays will have to stand on the desktop. Next, prepare the second level of 16 paper parts, while their right angles should look up. The modules of the first row should be connected to the modules of the second row in a checkerboard pattern. The resulting double chain is closed in a ring.

- To make the third level, three white modules (to indicate the chanterelle's belly) and 15 orange modules are used. They are also placed with straight rays upward. After that, the base is carefully turned inside out. All the following rows will consist of 18 parts, they must be inserted into the pockets of other elements.

- In the 4th tier, it is necessary to add 4 more white details, in the 5th tier - 5. At the same time, they should be staggered relative to the previous levels. The result is the contour of the abdomen. In the sixth row, 4 more white modules are taken, and in the 7th - 3.

- From the 8th row, the chanterelles begin to form the neck. For this, two orange modules are fixed in the middle of the short side. Next, 16 orange elements are inserted with the long side.

- From level 9, a muzzle will begin to form. For this, one black module is placed in the middle. Along the edges of it, one orange part is inserted. Next, 15 more orange elements are fixed, as a result, you get a rounded head.

- To make level 10, two white modules are used, they are inserted with straight rays upward, one black module must be placed above them. Along the edges of the white modules, two orange elements are fixed.

- At level 11, the figure's neck is formed. To do this, you need to fix one orange module in the center between the white parts. Along the edges of it, one more white module is attached. Next, 15 orange parts are attached in a circle.

- In the 12th row, you need to fix two orange parts and 16 white elements. Rows 13-15 will also be the head. To make them, you need to string 18 orange paper blanks in each row. Six orange modules are placed in the middle of the 16th row. 3 more orange elements are fixed along the edges (they will become the basis for the fox's ears).

- To get the 17th tier, you need to fix one orange module, then 3 more of the same elements are attached to them. At level 18, ears continue to form. Three orange modules are attached to each side of the figure. In the 19th row, the tips of the ears are already made. For this, two white modules are used. In row 20, you will need to wrap the ear with one white module.

- At the final stage, a chanterelle tail is created.
If desired, the finished volumetric craft can be additionally decorated.


How to make a step by step talking fox?
Next, we will analyze in detail how to correctly and easily make a beautiful craft in the form of a talking chanterelle with our own hands.
- First, a square sheet of double-sided bright colored paper (yellow or orange) is prepared... The basic figure "house" is formed from it. To do it, you need to divide the square in half along the direction. Both sides fold in half again towards each other. As a result, small "doors" are formed. The folds-pockets on the sides will need to be opened and smoothed out.

- The product is turned over to the back side... The right edge folds towards the center. The same is done with the left side. In this case, it will be necessary to bend the corner from bottom to top along the diagonal line.

- Next, you need to shape the fox's ear. To make it, the lower half of the product is taken, it is folded along the diagonal line. Next, the front layer is bent to the top.

- Then the paper blank is turned over to the other side again. All the same manipulations are repeated, but at the same time they start from the left edge. The workpiece is directed with the middle part towards itself.

- After that, the sidewalls are carefully pulled, they are pushed apart in different directions.... At the same time, it is important to give volume to the figure; for this, the convex back part is gently pushed apart. Then it folds in half and slides inward to form the fox's mouth.
All joints must be smoothed out so that they look neat.

Other interesting ideas
There are still a large number of instructions that will allow you to make beautiful paper figures with your own hands in stages.


Japanese fox
To make such an unusual craft, perform the following manipulations.
- Take a square sheet of orange or yellow paper. It is folded in half along the diagonal lines.
- After that, the sheet is folded in half along one of the folds so that an isosceles triangle is obtained.
- The sharp corners of the resulting triangle are bent to an obtuse angle.
- Then the paper blank is neatly folded in half away from itself. They capture all three free corners, they need to be bent towards you, while being guided by the vertical axis.
- After that, you need to unfold the bent corners. The extreme corners will become the chanterelle's ears.
- The double corner in the central part must be expanded and squeezed in such a way that the animal's muzzle is formed.
- A tail made of colored paper is folded into the inside, this is done so that the finished figure gains stability.


There is another option for making a Japanese fox. This will also require a colored square sheet of paper. The first three steps will be the same as in the first option.
Then you need to bend towards you not the free corners, but a strip of the plane on the same side. This will create the paws of the animal.
After that, the muzzle of the animal unfolds from the central corner. At the end, you need to straighten the fox's ears a little, and also bend the tail arbitrarily so that the figure is stable. At the final stage, use a dark marker to draw up the muzzle.


Volumetric complex fox
To make such a beautiful craft, the following steps are performed.
- A square sheet of paper is folded horizontally so that its side borders converge in the middle. Further, the paper blank should be slightly sharpened (both from below and from above). To do this, you need to bend all four corners inward, later they are turned back.
- Bottom corner pockets open neatly from the inside. They are squeezed along the plane. At the same time, the upper corners are bent into the inner part.
- Then the corners from above are bent towards themselves, the ears are folded towards themselves again, while it is necessary to reduce the resulting regular triangle. The ears should overlap.
- The corners of the bottom edge, which protrude upward, are folded downward.The bundle is folded in half, and then it returns to its previous state.
- The blanks are folded axially in the form of a step. In this case, the lower part should overlap slightly with the upper one.
- The corners of the steps are bent towards themselves.
- The product is turned upside down, the head of the future animal is bent towards itself. After that, bends are made to separate the front legs from the hind legs.
At the final stage, the muzzle, tail and legs are finally formed so that they do not seem so angular.

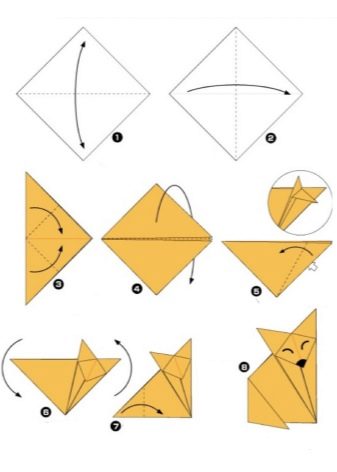
To make a seated fox, perform the following manipulations.
- Prepare a square sheet of orange colored paper. It is bent along one diagonal line, and then unbent. Next, the paper is folded on a different diagonal and also unbend. As a result, you should get a workpiece with an inflection in the middle.
- Then, to the inflection line, you need to wrap the corners on the side, so that the result is a rhombus.
- The rhombus is folded in the center with a "hill" away from you.
- The triple-edged side should be folded back about 1/4.
- Further, the corners bent in the center are opened. In this case, the middle angle should go down and form the muzzle of the animal. The two upper corners will become his ears.
- On the opposite side, the tail is bent, the figure must be stable.
- At the end, using a dark marker, draw the fox's face.

Often, when making such figures, the technique of wet origami is used. In this case, paper soaked in water is used in the process. This technique allows you to form more beautiful products. All sharp folds become much softer and neater.
Recommendations
When making such decorative figures, you should not take too thick cardboard, since it will be quite difficult to work with it. In addition, the finished product will not be able to hold its shape for a long time without glue.
If you have just started doing origami, then it is worth choosing the simplest schemes. If you already have experience in creating such products, then you can start making voluminous, modular crafts in the form of a fox. If you want your product to look more interesting and beautiful, it is better to additionally decorate it.


For information on how to independently make origami in the form of a fox, see the next video.


