Creating a modular origami in the form of a swan

Origami is a Japanese technique for folding figures without scissors and glue, although its roots go back to ancient China. Paper figurines intended for religious ceremonies gradually entered civilian use, firmly taking their place among the various types of applied art.


Peculiarities
Initially, origami could only be learned, but over time, paper fell in price, became available to all sectors of society. The art of folding paper figures can be practiced by anyone who has a desire. In the classical version, one square sheet of paper, painted on both sides or just white, is used to make the figures. In this way, the simplest constructions are created:
- airplanes;
- frogs, boats;
- traditional cranes, animal faces.
These are cute crafts, loved by children, developing patience, perseverance and fine motor skills in toddlers and adults. Over time, origami has become more complicated, new types of crafts have appeared.

Paper folding techniques
There are several different techniques for how to fold a sheet.
- Regular. This style was developed in England as the initial stage in comprehending the capabilities of the paper sheet and the technique of folding it. The usual technique does not have complex techniques, therefore it is available for people with disabilities, children and beginners.

- Modular. This technique is most popular, with its help they create bright volumetric figures in a wide variety of topics. The overall impression of the finished product is insanely difficult work. In fact, everything is not so: making figures from separately made modules is available even to a beginner in this kind of creativity. It is difficult to deal with modular origami for energetic people for whom movement and dynamics are important.The thing is that for each figure, hundreds of modules are needed, sometimes thousands: this is exactly what the bulk of the work is spent on, so perseverance, patience and diligence are needed.

- Wet folding. Origami owes its origin to Akira Yoshizawa, whose art deserves a separate museum. It was this origami master who came up with the idea of using wetted paper to add shapes, giving them smoother shapes, bringing them closer to the natural look of the originals. Wet technique is widely used for making flowers, animals, trees.
This technique uses special paper coated with an adhesive solution, which is stronger and more flexible than an ordinary paper sheet.

- Kusudama. A very popular modular folding technique. In this case, the figures are also assembled from modules made according to the classical canons (from one sheet). All modules are connected by nesting one into the other, and the friction force holds the structure, sometimes very complex. In this way, various balls are performed: large and not very, multicolored and monochrome, made of the same or different-format modules.

- Kirigami is paper architecture. This is the only technique where you cannot do without cutting objects: scissors or special knives. Instead of plain paper, white or multi-colored parchment is used. Kirigami is classified into three types, one of which is described above as kusudama. The other two are scrapbooking and jenigami. As a rule, kirigami are used to make 3D postcards. Highly skilled craftsmen such as Ingrid Siliakus create world-famous paper architectural masterpieces.

- Manigami. Origami view, where banknotes are used as a material for creating figures.

- Quilling. In this technique, the paper is cut into strips and folded in a special way. With the help of quilling, they perform volumetric panels, paintings, postcards. The technique is simple, but requires perseverance and patience.

Modular technology is the simplest and most accessible for the manufacture of bulk products. Swans are especially popular: plastic and universal modules allow you to shape figures, adjust the width, height, and angle of inclination.
Paper and other materials
For beginners, you can even use a notebook sheet for a small structure: a frog or a boat. Making modules requires stiffer paper, for example, for a printer, with a density of 70–90 g / m². The wet folding technique means an even thicker paper - over 100 g / m². You can purchase special origami paper (kami) already cut and colored. Experienced creators use a variety of textures to create figurines. It all depends on the level of skill and the complexity of the design being performed. Some types are made independently from unusual bases:
- powdered sugar;
- fabrics, tortilla;
- seaweed leaves, special dough, etc.


All of them require appropriate processing to be converted into sheets for folding. There are even more ready-made types:
- foil, papyrus, parchment;
- tracing paper, drawing graph paper, crepe, craft, ink, rice;
- colored, patterned, velor, metallized textured paper;
- silk, mulberry, Elephant paper, the thinnest sheets of metal, silver and gold.


Any of these papers and textures is quite expensive, and spending money on it is justified only with a certain level of experience.
Classic version
To create a modular origami swan, ordinary office paper is perfect, especially since manufacturers offer it not only in white, but also in color. Below is a step-by-step instruction with a diagram of how to make a small module, assemble the parts of a swan and the whole figurine.
Preparation
The assembly module is made from a rectangular sheet of A4 paper in a ratio of 2 to 1. This size combination originated in China when thrifty people used discounted banknotes to fold origami figures. History tells that at the dawn of the birth of this art, only three models were known: pineapple, boat and swan. The bird was then very popular, and even now it is in the arsenal of every master. The explanation is simple: the swan symbolized the masculine principle among the people of the Celestial Empire, personified the half of Yang and the connection between earth and sky.


There is no single sample of the designer, each has its own, as well as ideas about the color and entourage of the swan being created. The beauty of modular origami is also that structures can be disassembled and reassembled by modifying the model. Just like "Lego", only a paper construction set. Ready-made modules made of printer paper are very dense, capable of serving more than once or twice, and can be stored for many years.
A sheet of office paper should be divided into equal shares: 2, 4, 8, 16, 32. The standard is cutting the sheet into 16 or 32 shares. To get 16 identical parts, it is not necessary to perform measuring and drawing operations. It is enough to fold the sheet in half horizontally, and then again in half. With the resulting folded workpiece, they do the same thing, only fold it across. As a result, having expanded the sheet, 16 identical segments are obtained, after which it remains to cut them. For 32 blanks, the sheet is divided into 4 segments vertically and 8 horizontally.


Next, work begins on adding the module:
- the workpiece is folded in half, then unfolded and folded in half again, getting the main line marks;
- after that, the edges of the folded rectangle are folded inward, aligning them in the center (middle line);
- then the figure is turned over, the outer protruding corners are bent to the main field, receiving a triangle;
- this triangle is again bent in half.


As a result of all these manipulations, a ready-made module with pockets and corners lies on the table.
After the technology has been mastered, it remains to start preparing the required number of modules.


When all the modules are ready, it's time for the most interesting stage - the long-awaited assembly. Three methods are used for connection, given that the module can "stand" on a long or shorter edge:
- bonding with elongated sides;
- articulation through the shortened sides;
- one module is on a short edge, two are attached with the elongated side.


Any instruction should indicate the connection method that is proposed to be used.
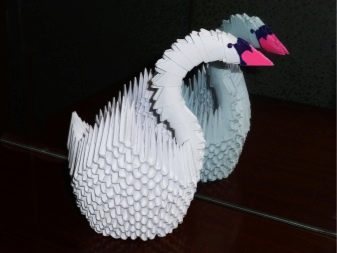
The phased assembly of the swan figure is quite simple and understandable to everyone, the main thing is to count the modules, follow the photo of the master class, and even a beginner will succeed. First of all, you need to make 1 red and 355 white blanks. Red will be needed for the beak.


Torso
The phased production of a bird's body is as follows.
- Two white triangles are connected to the third, making sure that they look in the same direction. The ends of the first two are fastened with the pockets of the third part.

- On the left side, add another module and connect it to the third, then substitute the next one and reconnect. This has already been done in two rows, where the first has four, and the second has three modules. It is most correct to immediately execute the next, third, in order to insure the resulting structure from disintegration.

- Now you can connect the second row to the third and get three ready-made ones, where in the first 4, in the second 3, in the third 2 modules. Continuing with the same algorithm, you need to get a long strip.

- After such a strip is made, as in the attached photo, the modules should be counted. The result should correspond to this ratio: 1 row - 30, 2 row - 29, 3 row - 28 modules. The resulting workpiece is connected in a circle by the modules of the lower rows.


- The next stage can be called routine: continuing in the same order, you need to collect 7 rows of 30 modules.

- Now it is the turn of the wings: 10 modules are inserted into the body (the place is arbitrary). It is necessary to collect a truncated cone, 1 module remains at the finish line. Opposite the first wing, the second is performed in a similar manner. The distance between the base of the wings is 3 modules.


The torso and wings are finished, followed by the turn of the neck and tail.
Tail
The tail is made in the same way as the wings, but with a difference in size. The place for it is chosen where there are more free modules between the wings.


Neck and head
To complete the neck, you will need white blanks and 1 red one (for the beak). The length is chosen arbitrarily, but one should not forget about the harmony and correspondence of all parameters. A pair of modules is inserted opposite the tail and the neck is attached to them. The figurine of a swan from triangular modules is ready, it remains to give it the necessary curves, follow the symmetry, stick the eyes, and the proud bird is ready to decorate the surrounding interior.


Assembling wedding swans
Wedding swans are a composition with specific requirements. It must contain accessories of wedding symbols (rings, flowers, hearts). A similar composition, made with your own hands for a wedding, is intended to decorate the table, photo zone. In this case, fixing points are used: glue, paper clips, a solid support base.
This work will require the performer to be ready for long and painstaking work, because you will need to make a large number of multi-colored modules. The level of difficulty here is higher than that of the model described above, but not enough to consider the undertaking impossible. It is enough to follow the instructions, be careful, count the modules in your work, and everything will work out even for a novice creator. The choice of color palette depends on the taste of the manufacturer, the wishes of the customer, etc.


The presented composition is made in three main parts: base (base), stylized hearts and a double symbol of love - swans. The difficulty in manufacturing is that in the work you will have to use glue to fix the modules. Care will be required, because it will be more difficult to fix a defect than in the case of loosely coupled modules.
To assemble the base, you will need modules in the 1/16 format, of which 929 are golden - later they will be marked with the letter (h), 596 blue (c), 176 red (k), 30 purple (f) and 18 chocolate (w) size 1 / 32.
The first row is collected with golden blanks, making a circle, and then they continue to do the work, following the scheme.
|
The ranks |
Modules |
|
1 |
6 |
|
2 |
12 |
|
3 |
18 |
|
4 |
24 |

In the fourth row, they begin to add blue color every two modules.
The scheme looks like this: 2 s, 1 s, 2 s. In order not to be mistaken, you must act according to the table of rows.
|
The ranks |
Modules |
|
5 |
2 s, 3 s, 2 s |
|
6 |
3 s, 1 s, 1 s, 1 s, 3 s |
|
7 |
3 s, 1 s, 2 k, 1 s, 3 s |
|
8 |
3 s, 1 s, 1 k, 1 f, 1 k, 1 s, 3 s |
|
9 |
3 s, 1 s, 1 k, 2 ph, 1 k, 1 s, 3 s |
|
10 |
3 s, 1 s, 1 c, 1 f, 1 s, 1 f, 1 c, 1 s, 3 z |

Then they work in row 9, replacing the purple tone with blue, and finish the cones... The base is ready, it is the turn of the middle in the form of a flower.


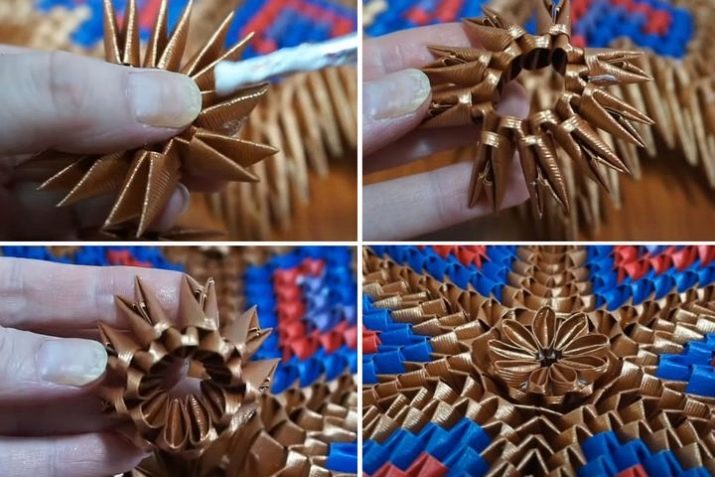
It is performed in two rows of a golden hue with a module size of 1/32. The resulting circle is turned inside out, resulting in a delightful flower, which is used to decorate the center of the base. The base itself is given the shape of a hemisphere.

The stand-leg is made in the form of a tape of 1/16 modules, assembled in 17 rows with 4 s alternation. Along the edges there will be 5 s, 5 s. The finished strip is enclosed in a ring and glued to the underside of the base-base.


Hearts are assembled from four ribbons: two of them for a large heart are made of 30 1/16 modules, two smaller ones are of 25. Diagram for assembling tapes:
- 1 h, 1 h, 1 h;
- 1 sec.

After the tapes of the required length are assembled, they are given an even bend, bending around a reel of scotch tape or something else. All fragments of hearts are performed in the same way. After that, they are glued together, closing the long ends at the base. The finished hearts are set on the base. Then it remains to gradually collect the multi-colored swans according to the already familiar principle, while trying to achieve perfect symmetry. After making the swans, they collect the entire composition, decorate it with flowers and ribbons.


Useful Tips
A little secret from experienced craftsmen - ready-made modules can be bought in specialized stores for creativity. In the proposed wedding model of swans, it is permissible to replace ordinary office paper with more interesting options, for example, metallized, with an ombre effect, patterned. In the work you will need scissors, so you need to take care of their sharpness and sharpening. It is most correct not to use them anywhere else. When making modules, it is necessary to stretch, and then fix the folds well, squeezing all layers.
To learn how to make a modular origami in the form of a swan with your own hands, see the next video.


