How can origami be folded in the shape of a deer?

The origami technique is a whole art that allows you to make various interesting crafts out of paper. Origami deer creation schemes are especially popular.


Simple option
Let's consider the most simple scheme that can be suitable for children and beginners.
- A square with dimensions of 15x15 centimeters is cut out of a sheet of paper. You can take creped or corrugated material. If not, then a simple sheet will do. It is folded in half along the diagonal line from top to bottom.
- Then the workpiece is folded from right to left.
- The layer is opened from the top from the inside.
- The material is slightly flattened into a diamond shape.
- All this is turned upside down.
- Further, the previously performed actions are repeated, forming the basic "double square" shape.
- The paper blank is placed with its free end towards itself. The corners on the left and right are folded towards the central part. The upper triangle is gently lowered down. All folds are revealed.
- The bottom point rises. The formed side flaps are smoothed out, as a result, a "bird" figure should be obtained.
- The product is turned over to the back side.
- The bifurcated ends go up and to the sides, while they are slightly bent at a slight angle.
- The triangular flap at the front is lowered.
- An acute angle is tucked from below twice.
- The upper acute corner is slightly tucked towards itself.
- Next, the ears of the deer are twisted.
- After that, the upper triangle is cut in half, both ends are opened to the sides.
- The extreme points gently rise upward.
- The corners are smoothed out and then folded back.
- At the end, draw the muzzle of the animal.

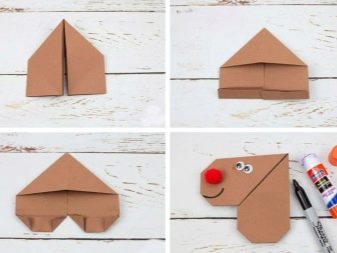
You can make a craft in the shape of a deer head. To do this, first draw a scan.The easiest way is to print it ready-made on a printer. The sketch indicates the lines along which the bends need to be formed.
All folds are made to the inside, while leaving a little space on the material to glue the figure into one piece.


Folding the running deer
Now we will take a closer look at how you can make a figure in the form of a running deer with your own hands.
- To begin with, a square-shaped paper base is also prepared. The figure is folded from top to bottom, and then everything unfolds.
- After that, the corners from below and from above are bent to a diagonal line.
- Next, a repeated fold is formed, but at the same time from the other side.
- The resulting pockets open neatly. They are flattened a little.
- After that, the paper product is folded in a "mountain".
- The left side of the paper folds to both sides at an angle.
- Making a reverse fold, the left side is brought inside the figure.
- The same steps are repeated with the upper part of the figure. As a result, the head of the animal is formed. You don't need to put it inside.
- The corner is tucked, the muzzle is rounded.
- The head goes down.
- The triangular flaps on both sides slide forward. Then they fold in half.
- Then the right side is bent first forward and then backward.
- The back of the neck is cut from bottom to top.
- The corners are raised, deer ears are obtained.


How to make a modular shape?
Now let's look at how easy it is to make a volumetric modular figure in the form of a deer with your own hands.
- First, the modules themselves are prepared, they need to be made from white and orange paper. They can be of various sizes, it all depends on what size the craft you want to end up with.
- Further, the assembly begins with the torso. For this, the first two levels are made from 6 elements, the third and fourth from 12.
- The fifth level is already formed from 24 modules.
- In the same way, everything is collected up to 20 stripes.
- Then you can start assembling the neck of the animal. The first row will consist of 6 parts, the second - from 5, the third - from 6. Six more rows are also assembled.
- Then they begin to make the head of a deer. The first two levels are made of 5 parts, the third and fourth are made of 10.
- Stripes 5 to 8 are assembled from 20 modules.
- When assembling the ninth level, the elements are inserted with the back side and 3 stripes are made in the same way.
- You can proceed to the horns. The first row is made of 4 parts, two modules are placed on the corners of the previous one.
- Next, you will need to put on 2 modules in turn.
- Then they start assembling the legs. The first row will consist of two modules, the second - from 1, the third - from 2. In the same way, 13 levels are made, 3 paper modules are put on the 14th row.
- The 15th row will consist of 2 orange blanks, 16 - from 3, 17 - from 2.
- Three more legs are made according to the same scheme, they should turn out to be the same.
- At the final stage, all the finished parts begin to gradually assemble into one craft. The body is taken, the head and legs are glued to it with the help of PVA glue.
- Then horns are attached to the head. After that, the eyes and nose of the animal are cut out of dark paper.
They are also glued with a PVA mixture. The result should be a volumetric paper figure of a deer.


For information on how to make origami in the form of a deer, see the next video.


