Making origami in the form of spiders

Origami is a special technique that allows you to fold beautiful paper figures without glue or scissors. It makes it possible to create a variety of interesting crafts with your own hands. Today we will talk about how to make such a figure in the form of a spider yourself.


Option for beginners
To begin with, we will consider the easiest way to make a spider using this technique. It includes several stages.
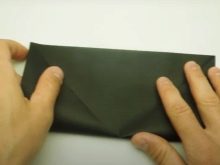
- For work, you need to prepare a square sheet of paper with dimensions of 21x21 centimeters. The base is folded in half diagonally.
- After that, the square is turned over and folded in half again to make a small square.
- Individual square parts are wrapped diagonally as well as laterally into the inner part.
- Then the corners from the bottom of the resulting rhombus will need to be carefully bent up. The small rhombus is unfolded and folded along the fold lines.
- The lower sides are bent into the inner part of the product, then the distance is cut to the offset of these sides.
- The paper blank is straightened in such a way that four legs are formed on each side, with all the folds from the front.
- The upper side is bent in front, bending it slightly. A small spider tail is formed.
- Later, each foot is bent back, and this must be done at different angles.


The result is a bouncing paper spider. This easy scheme can be suitable for children and beginners.
How to make a complex craft?
Next, we will consider a more complex version of making this spider from paper.
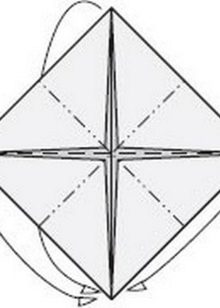
- In this case, you will also need to prepare a square sheet of paper. It is folded in diagonal stripes twice.
- Next, the sheet is again folded twice into two equal parts.
- The base is folded in diagonal stripes into a small square.
- The result is a rhombus, its free sides must be bent inward.
- The workpiece is turned back, a small incision is made along the folds from the central part of each side.
- The whole craft is folded again.
- All long parts are neatly folded inside the product.
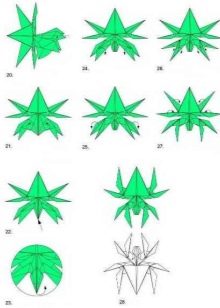
- In the upper part, you will need to bend the corners inward, after which the product unfolds in the middle, and the corners are wrapped again. The narrow side opens, while the corners need to be straightened a little. All these actions are repeated with all the other sides at the top.
- The spider's legs must be cut along the entire length.
- Legs are opened and bent over their entire length in half.
- The legs are spread in different directions, the body is bent in half.


Let's analyze a way to create such a craft in the form of a tarantula with our own hands.
- A square paper sheet is folded in the shape of an accordion.
- The corner is turned up, and then left and down.
- The lower part folds upwards.
- The corner is bent from bottom to top. This action is also carried out with all other angles.
- After that, all the corners are neatly wrapped in the central part.
- The corner from above is turned to the left.
- The resulting elements are wrapped in the middle. The same is done with the opposite side.
- The tips are bent upward in front.
- The upper part of the front side of the product is folded down and then folded up.
- All small items add up. The paper blank is turned at an angle of 90 degrees, then the spider legs begin to form.
- The tips of the legs are neatly folded up. The part of the craft, which will become the head further, is bent down.
- The legs are wrapped inward so that they are rather thin and look as natural as possible.


Consider another more complex option for creating a spider.
- To begin with, prepare a square-shaped sheet of paper. Diagonal stripes should be marked on it. The corners are folded towards the middle.
- Further, the workpiece is folded to the left and up. The same actions are performed with the other three parts of the product.
- After that, you need to carefully pull out one layer and fold it up.
- Further, the part is bent down, and all actions are repeated again on all other sides of the paper blank.
- The front part of the workpiece is bent and unbent, then all this is turned over and the actions are repeated on the other side.
- The front and back layers fold neatly into the interior.
- Later, a small rabbit ear fold is made. The actions are repeated on all other sides of the product.
- The workpiece is again leafed from the back and front. After that, a rabbit ear fold is formed again on all sides.
- The workpiece is folded from the back and front to the right.
- After that, the product is folded back to the left and repeated from the back. The front layer of paper is folded in front and back.
- On both sides, the paper is flipped again and the material is folded to the right.
- The upper section is also folded to the right and the same is repeated on the other side of the product.
- The top side is then folded down at the front and back. Then the next layer is folded to the central part and repeated on the other side.
- Then the steps taken are repeated with the next paper layer.
- At the end, the legs are turned out from the sides, one layer is pulled out and the steps are repeated from the back.
- It will be necessary to turn out all the legs, they are straightened in different directions.
- At the final stage, all parts are carefully straightened, giving the product a three-dimensional shape.


At the same time, the mouth and legs are slightly bent.
Creation of modular origami
Let's look at how you can make a paper spider from individual origami modules. In this case, we need 147 black, 18 purple and 70 orange modules in the form of triangles.
- The assembly starts with three black parts. Two of them are recorded by the third. The assembly continues level by level.In this case, it will be necessary to alternate colors and gradually increase the number of used blanks on the sides by two pieces.
- After that, from the eighth tier, they begin to reduce the number of parts until there are three modules left.
- Then you should mark the places where the spider's legs will be attached. There should be ten of them in total.
- Next, they start assembling the paws, each of them is formed from eight modules. In this case, you also need to alternate colors. It is recommended to fasten the parts with glue so that the product does not crumble in the future.
- Later, the finished legs are connected to the body.


You can make several such crafts at once and create a single original composition from them.
Making origami in the form of spiders, see below.


