How to make origami in the shape of a peacock?

In the well-known origami technique, you can make a variety of figures and whole structures. Crafts in the form of an elegant peacock are very beautiful and original. They are assembled in different ways according to different schemes. In today's article, we will take a closer look at how you can make origami in the form of a peacock.


Simple option
Origami technique attracts many masters. It can be mastered not only by adults, but even by small children. Fortunately, a great variety of interesting and accessible schemes have been developed, suitable for inexperienced origamists and children of different age groups. While mastering the basics of making original paper crafts, it is advisable to start with simpler options. Only after that it makes sense to move on to modeling more intricate and complicated figures.
Almost everyone can make a simple paper peacock. If you strictly follow the instructions and rely on the manufacturing scheme, you will get an elegant bird with a lush, loose tail. To make such a beautiful figurine, you need a minimum amount of materials.
It will be necessary to prepare only a square paper sheet, the dimensions of which are 21x21 cm.


Let's find out exactly how to correctly model a simple peacock from a square of paper.
- At the first stage, it is enough to fold the paper sheet so that it forms the appearance of a double square. To do this, you need to perform several important steps.
- First, the paper sheet will need to be folded in half along a diagonal line. After that, you will need to do a second diagonal folding.
- All subsequent folds of the transverse type must be performed in such a way that they are directed in the other direction.
- The required folds should appear on a square sheet of paper.
- In the next step, it will be possible to fold the paper blank in the shape of a double square.
- Now you need to start shaping the tail of an elegant bird. It should be made from a pair of upper folds of a double square base. First you need to bend the corner located on the left side of the workpiece.
- Next, you need to slightly straighten the bent triangle in the paper structure.
- After this step, the craftsman will be able to fold the above piece into a double fold.
- Then this fold will need to be carefully straightened.
- Additional folds will need to be formed from each half. For these purposes, first bend the side that is located on the left.
- At the next stage, in the place of the formed bend, you need to create a double fold.
- On the right side of the paper blank, you will need to carry out the same actions, while performing a triangular bend towards the central part.
- Now, on the right half, it is necessary to form a double fold.
- Next, narrow folds will need to be turned over so that they are directed to the left side.
- It is necessary to take the next part of the double square and bend it to the center point of the product.
- On the section of the bent triangle, you need to make a large double fold. After that, this fold will need to be expanded.
- From each of its halves, it will be necessary to make even more miniature double folds.
- The next step is to evenly distribute small folds to the right and left sides.
- The workpiece must be turned over and turned 180 degrees.
- At this stage, you need to start shaping the body and head of the future paper bird. To do this, bend the sides in the form of triangles directed towards the middle.
- The corner located at the bottom must be bent up.
- The formed folds need to be straightened.
- The figure needs to be given a diamond-shaped structure.
- The workpiece is again turned over to the other side.
- The protruding corner will need to be carefully bent upward.
- Next, the workpiece must be folded along.
- We need to move on to modeling the body and head of the paper peacock. For these purposes, the lower half of the workpiece will need to be bent to the left.
- In place of the bend made, a uniform double fold is created.
- The narrow corner is folded up again.
- At this point, the double fold is re-made.
- It remains to form a small head of an elegant bird. To do this, the corner should be bent to the side.


An original and very beautiful bird with a loose tail folded like an accordion is ready.
To model such a peacock figurine, you can use paper of absolutely any color that the master likes. For the manufacture of such a bird, it is advisable to select brighter and more saturated palettes.
Creation of modular origami
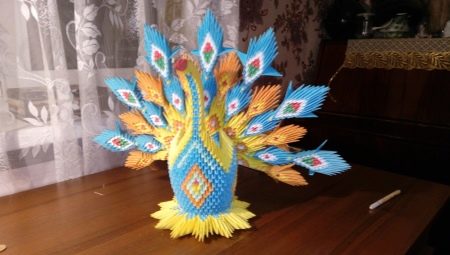
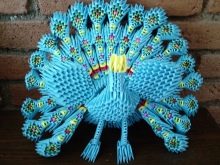
Large and voluminous crafts assembled using the modular origami technique are especially effective and beautiful. In accordance with it, structures are made from pre-prepared paper modules in the required quantity. Let us consider in detail a master class on assembling such an interesting figure in the form of a peacock with our own hands.


Preparation
Before assembling beautiful modular figurines, proper preparation is necessary. This stage consists in the manufacture of modules, of which the design of the future peacock will subsequently consist.
To make modules, you need to pick up rectangular pieces of paper with an aspect ratio of 2 to 1. The size of the modules themselves and the entire craft as a whole will directly depend on the dimensional parameters of these components.


To create a module, you need to fold a piece of paper in half along its length. The fold line should be at the top. The blank is then bent and unbent in width to mark the center strip. After that, both upper edges are folded in the middle.The workpiece is unfolded so that its back side is directed towards the face. The right and left corners, located at the edges, are folded to the base of a large triangle. After that, the lower half is folded up again. The base of the triangle will serve as the fold line. It remains to fold the triangle in half, after which the module will be ready for further operations.


To assemble a paper peacock, the following components will be needed:
- 856 yellow modular components;
- 114 white modules;
- 465 green;
- 1 black module;
- 1 red modular component;
- a small amount of glue;


Assembly
Consider a detailed step-by-step instruction for assembling a peacock figurine from paper modules of different colors.
- The starting 3 circles of the future figure must be made up of 31 yellow modules. The first circle should be connected by means of the modules included in the second circle. Two corners located next to each other will simply need to be inserted into the pockets of one modular component from the next crown.

- Then you can proceed to the assembly of the 4th row of the structure. Here you need to use 1 green, 1 yellow, 1 white component, as well as 5 more yellow, 1 white, 1 green module.
To fix the rest of the elements, you should choose the yellow modular components.

- The next 8 rows will need to be done with decreases. The paper structure should be turned upside down. In each next row, the number of yellow modules is reduced by 1 piece. Thanks to the decreases, the shape of the peacock's body will be more rounded.

After this stage, the body of an elegant bird will be almost ready. Next, you need to move on to assembling the breast.
- To do this, you need to correctly fold 1 row of 1 green, 3 yellow, 2 more green, 3 yellow and 1 green modular components.
- After that, each of the subsequent rims must be made 1 module less.
- Then collect the rest of the peacock breast circles. In total, 8 rows should be formed, in which the modular elements of yellow and green colors should be combined.
- When the work on assembling the breast is completed, you need to move on to modeling the neck of the paper bird. It must be formed from 17 rows.
- After creating the neck, it is advisable to start modeling the head of the original figure. The first 3 rows here need to be assembled in about the same way as in the case of the neck, but for the 4th row you need to take only 2 modules, for the 5th - the green module. The next row should use a black component. 1 red module is needed to assemble the final 7th crown.
- The next step is to collect the bird's wings. They are modeled symmetrically on both sides of the made neck.
- The paper peacock can be placed on a specially made stand, assembled from 8 rows of modular components.
- Now we should model the most beautiful part of the figure - the tail. It will consist of 3 rows of modules of different colors - white and green.
- The final happiness of the step-by-step assembly of the peacock will be the formation of aesthetic feathers with an "eye" for the tail design.
- Modular "spare parts" must be assembled in the following sequence: 1 green, 1 yellow, 1 green, 1 white (2 times). In the next crown there will already be 2 yellow modules. The next row must be assembled from 1 yellow, 1 green and 1 more yellow module.


All the necessary elements of the figure are done. Now all that remains is to combine them into one neat structure.
If you do everything clearly according to the instructions and work without unnecessary haste, then a modular figure in the form of an elegant bird will turn out to be very aesthetic and neat.
More ideas
There are many more different schemes for modeling beautiful origami in the form of a handsome peacock. Let's get acquainted with another interesting instruction that is suitable not only for experienced, but also for novice origamists.
- First of all, you need to prepare a square piece of paper.Its color can be absolutely any - it all depends on the preferences of the master.
- The paper sheet must be folded in half.
- Further, the lower corner, which is on the right side, will need to be gently bent into the inner part of the workpiece.
- The valley line should be in the middle of the strip. The above steps will need to be duplicated on the back of the paper blank.
- At the top of the product, bend the triangle backward. On the left side and at the bottom, the triangle is folded inward. These steps will need to be repeated on the back of the workpiece.
- In the lower left part of the future paper peacock, it will be necessary to carefully combine the left corner with the corner that is located below.
- In the upper part of the workpiece, you need to bend a triangular element clearly along a line that extends from one corner to another corner. These actions must be duplicated at the back of the workpiece.
- The "slide" fold strip should clearly divide the corner in half. Similar actions must be repeated from behind.
- Now you will need to gently arch the neck of the paper peacock. At the same stage, bird legs should be formed. The lower strip "mountain" should divide the corner into 2 halves.
- The triangle, which will play the role of the peacock's head in the future, must be correctly bent. In this case, the paws of the bird will need to be bent inward.
- In the next step, the master must carefully shape the tips of the bird's feet. The peacock's lush tail should be revealed. To do this, the paper will need to be folded along the indicated lines both front and back.
- A few more lines should be drawn on the tail of the product. They will make this part corrugated.
- Now you need to bend the very base of the peacock's paper tail in half. After that, the colored figurine must be turned over.


A beautiful and original origami craft is ready.
For information on how you can make origami in the form of a peacock yourself, see the next video.


