How to make origami snowdrops?

Origami is a technique in which you can do, if not everything, then almost everything. For example, flowers that will be very similar to real ones, but at the same time the style of the Japanese type of creativity will be guessed. And the most beautiful thing about origami is that kids can do it. Even preschoolers can learn a little magic with paper. And adults can swing at a paper masterpiece.


Simple options for kids
The sweetest work you can imagine for preschool children (4-5 years old) is an application with snowdrops using the origami technique. The flowers themselves are made according to templates that are offered to the children as a simple (adapted) technological map. The template is transferred to paper, and the guys make as many snowdrops ("airplanes") as there will be on the applique. Usually these are 5 flowers. And then they can be either planted in the grass (cut out a lot of green leaves according to the template), or planted on a stem from a plastic tube. And all this with glue on a bright cardboard background.


There is also a more complicated scheme, it can be offered to older preschoolers, 6-7 years old. And this will no longer be an applique, but a hand-made bouquet.
Step-by-step instruction.
- We prepare 3 sheets of white paper 6x6 cm, one green square 7x7 cm, a wooden skewer, PVA glue, a glue brush.
- You need to start with the petals of the flower. They will be made of white squares. The photo offers a larger square than indicated in the first paragraph, but only for the convenience of visual perception of the diagram. So, it needs to be bent with a scarf. And then unbend to see the formed diagonal line.
- The basic kite shape is made from the square. Opposite angles are folded along the midline.
- The upper corner of the figure goes down.All folds need to be ironed well - this is the key point.
- The folded top corner is brought under the side ones. It turns out a triangle.
- It is necessary to continue - the upper corners are also bent, aligned along the center line.
- All folds were made to form the reference lines. Therefore, now everything must be turned back. Except for the top folded corner.
- Now the reference point is on the green line. The paper folds towards these green arrows.
- You will get a star figurine.
- The protruding corners go down and are smoothed out.
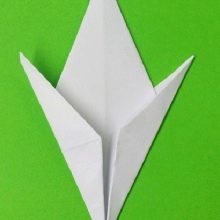
- Turn the resulting figurine over and see the formed primrose petal. And this is a module for a snowdrop, for one flower of such you need to make 3 pieces.
- After all three are ready, they need to be connected. A brush and glue will help.
- On the place of the first petal, smeared with glue, the second is placed on top.
- Now the second is oiled, and the third is placed on it. You get a semi-star.
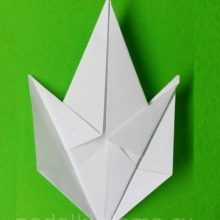
- It is necessary to form a bud from it by gluing the two extreme petals.
- Each of the sharp petals must be bent outward, for a greater resemblance to a flower.
- Take a green square. Folds into a kerchief, unbends back.
- And again the figure "kite".
- The same is on the other end of the figure.
- The sheet is folded in half. He's ready.
- The stem is made from a wooden skewer, it delicately pierces the bud below. Leaves are glued to the stem.


There can be as many such snowdrops in a bouquet, if only the master is not tired.
Craft with a complex flower
The hardest part about this MK is not to screw it up at the end. The last steps are more difficult for children, so you need to help them in the final. For work, you need a white square of paper.
Complex snowdrop in stages.
- The square is folded in half with a downward angle.
- It is necessary to bend the corners, trimming them in the middle along the fold. This is important precisely for the formation of folds.
- The paper must be opened, then the side corners must be folded again, trimming those along the extreme side folds.
- And again, you need to open the paper to see how the folds turned out. They should be exactly the same as in the photo. One in the center, a couple at the edges.
- The corners are now folded over the new last fold. It turns out that a third fold has just been added to the sides of the paper.
- The corner on the right should be folded to the third fold, and the second will appear in the center.
- And then everything is the same with the corners on the right. The petals are looming.
- Here comes what is difficult for children to repeat. It is necessary to combine the formed petals in front, during this action pushing the fold from front to back.
- Further, the folds on the sides are redirected inward.
- It remains to press them, and the flower is ready.


Then you can finalize the figure - plant it on the stem or "drown" the grass in the greenery.
Creation of modular origami
This is a job for older children, it is multi-stage, laborious, and requires a lot of time.
Preparation
First you need to prepare everything that will make a beautiful craft. Namely:
- red, blue and green sheets of A-4 size;
- white paper squares 4x4 cm;
- crepe green paper;
- wire 0.3 mm wide;
- PVA glue and scissors.


The most time-consuming thing in such master classes is to make modules. This is what the most time and effort is spent on. And already collecting a craft from a variety of ready-made parts is much easier.
Instructions for the manufacture of modules.
- One flower requires 9 equal modules. Then the petals will stick together, and a voluminous flower will come out.
- The white square is folded diagonally.
- The workpiece returns to its original position, the side corners are folded to the center line.
- The figure must be turned up, bend the small triangle along the line.
- Place the small triangle inside the shape.
- The lower corners of the large triangle are folded towards the center.
- The folded corners are carefully unfolded and then hidden inside the form.
- Corners - as in the illustration - lift up.
- Turn the module over, fold the emerging corners to the middle.
- The lower rhombus part turns upward.
- You need to evaluate how the figure looks from the inside out - we are equal in the photo.


And there should be 9 such elements.
Then the half of the rhombus is coated with glue, the second module is inserted there. 3 modules are glued together to form a snowdrop flower.


Then you can shape the stalk. Fold the wire 4 times. A centimeter (width) green corrugated strip, smeared with glue, is wrapped around the wire. The stalk is very delicately pushed into the inside of the snowdrop, the wire is bent towards the flower base. Then you can make sheets of crepe paper, and if it is thin, it is better to fold them in half.


Now about the modules for the vase. Primroses can be in a basket, or in a vase. In our case, the second option is chosen. For a vase, you will need to build as many as 308 modules: most of all white - 152 elements, 92 red and 64, respectively, blue. The size of one element is 1/32 of A4 sheet.
The vase module step by step.
- Take one square, bend it halfway from top to bottom.
- Then from left to right and in half.
- Bend back, consider the formed strip. Then bend the edges of the leaf to the middle.
- Turn everything inside out, bend what is left below, bend the corners.
- Fold back the lower part, hide the corners inward. The workpiece is folded in half. That's all - the module is there.


And there are 308 of them, not just one evening, of course.
Assembly
Now the process of making a vase with snowdrops will go much faster.
How to do it.
- Take 2 white modules, with their long sides to each other, but then connect them with a short side to the blue module.
- In one row, 20 white elements will come out, in the second - 20 blue ones.
- Fold the third row as follows: 3 blue elements with a long side, 1 red - short, and in the same way to the end of the row. The figurine is turned in the opposite direction.
- On the white element of the third row, 2 white modules are put on with a longer side, on red ones - 3 blue short ones. Etc.
- The middle of the white modules is connected with a blue (short) side. Then he puts on white, red, again white with a long side and again blue with a short side. Let's continue.
- 1 white, 2 red, 1 white - long side, 1 blue, on the contrary, short.
- White, red, blue, then again red and white - all one element at a time, long side.
- 3 white, 2 red - long side.
- 4 white long sides, 1 red short side.
- Make blanks from 7 red and white elements, 10 stripes in total (5 white and the same amount of red).
- The red stripes are connected in the center of the vase with the same module, the white ones are in the middle of the white elements.


Finally, the vase is assembled.
The cool composition "Snowdrop in a vase" according to the origami method will look beautiful in the interior and claim high places in the handicraft competition. Beautifully, with your own hands, from the simplest and most affordable materials.


For how to make origami in the form of snowdrops with your own hands, see the next video.


