Origami glass

Origami cups can be used for games or as handy organizers. Both adults and small children can learn how to create such crafts with their own hands.
Simple glass folding scheme
There are several different schemes used to create such glasses. Beginners should pay attention to the simplest of them. A small paper cup is quite simple to make.
-
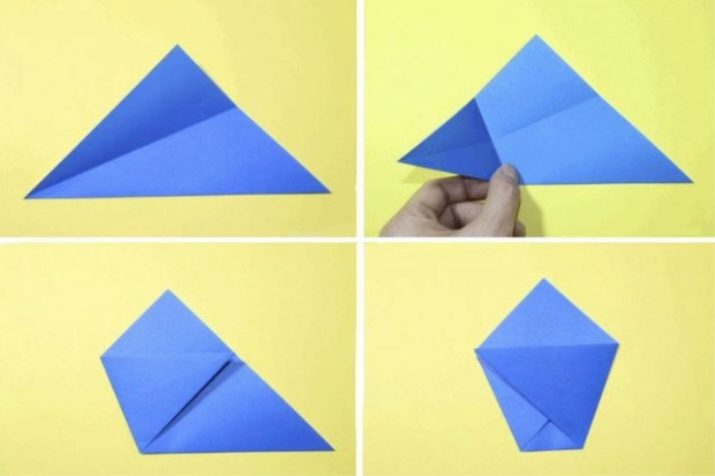
Fold an even square of paper in half.
-
The edge of the resulting triangle must be ironed.
-
Next, one side must be carefully folded.
-
The resulting corner must be bent.

-
The same part of the sheet must be folded towards the right side of the triangle.
-
Do the same with the opposite side of the figure. One corner should be on top.

-
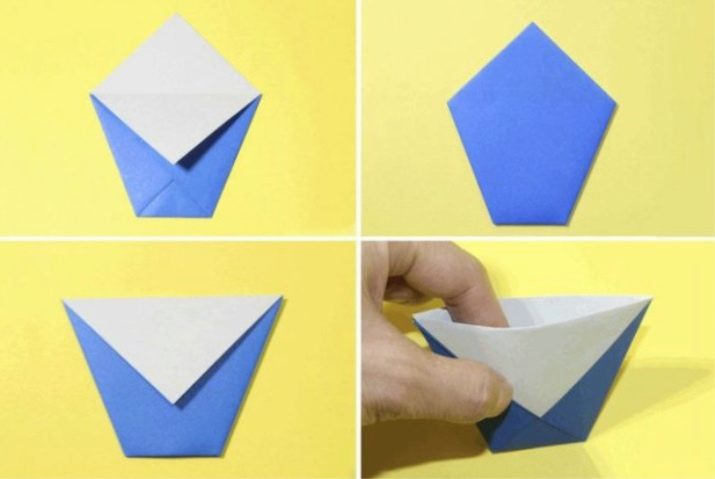
The upper triangle must be bent down.
-
Next, the shape needs to be rotated. The second corner must also be lowered down.
- The glass must be straightened, giving it the desired shape.

A product for children should be made of bright paper. If you use a waterproof material, you can pour sweets or ice cream into it, as well as pour various drinks.
Step-by-step instructions for a modular cup
The process of creating a voluminous modular cup takes longer. But the finished product looks brighter and more interesting.

First of all, you need to prepare small modules for work.

They are done according to the following principle:
-
To begin with, a sheet of A4 paper must be cut into 4 or 8 pieces. The size of the finished modules depends on their number.

- Each leaflet prepared in advance must be folded in half.

- Next, the workpiece must be bent across, and then unbent.This is done in order to outline the line.

- The side edges should be raised towards the middle. They should protrude slightly beyond the line.


- Next, the leaf must be turned over.

- The bottom of the edges must be folded up.

- The edges must be carefully bent over the base of the triangle.

- Next, the base must be unbent.

- After that, the lower part must be bent back.

-
The resulting workpiece must be slightly bent in half. The triangle must be stable.

It turns out a convenient module with two pockets and bottom corners. Such blanks are easy to insert into each other to obtain three-dimensional figures.


To create a cup, you need to prepare in advance the modules of white, yellow and blue colors. Any other shade can be used instead.
Assembly diagram of the finished cup:
-
The first step is to collect three rows of 20 modules. Two of them should be white and the third should be blue.
-
All these blanks need to be assembled into a ring.
-
The resulting workpiece must be turned with the short side out.
-
When creating the fourth row, it is necessary to alternate the modules of blue and yellow colors.


-
Thus, you need to form another 5-7 rows. In each of them, the color must be shifted to the side. To make the glass stable, the modules must be tightly fixed.
-
The tenth row must be laid out with white modules, the eleventh with blue ones. The parts are fixed with the short side out. Then another white ring is formed.


- The next row is laid out according to the following scheme: 1 blue corner, 1 yellow, 1 more blue. After that, 1 corner is skipped. The same is done 4 more times.


-
On the next row, only yellow modules are used. First, two parts are fixed on the base. After that, 2 corners are skipped. This fills the entire ring.
-
The last row is decorated with white modules.

This glass is suitable for storing pencils. Besides, it can be used as a vase for artificial flowers.
Other glass making ideas
A more voluminous square-shaped paper cup can be made from scrap materials. The instruction for its creation consists of several stages.
-
First, on a square sheet of paper, you need to outline all the fold lines, folding it in all possible directions.

- After that, the sheet must be folded diagonally.

- The top of the resulting triangle must be bent, and then immediately raised.

- The right corner of the upper triangle must be bent to the left.

- By the same principle, the left corner must be bent to the right.

- The protruding corner must be brought inside the resulting workpiece.

- Next, the figure must be turned over, and then the three previous steps must be repeated. The finished glass must be unwrapped. It will be square.

The craft is very stable. It is convenient to store pens and various art materials in such a cup.
Any of these cups can be made with your child.
You can watch the video about how to make a glass using the origami technique.


