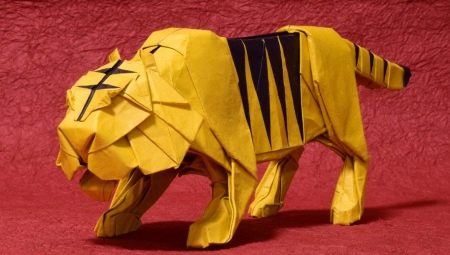
Making origami in the form of a tiger

Both beginners and experienced craftsmen can make a very beautiful tiger using the origami technique. Fortunately, there are many simple and complex schemes for modeling such a figure. In this article, we will show you how to correctly make origami in the form of a striped predator.


Simple options for kids
The origami technique is very popular because it is available not only for adults, but also for children.
Even the smallest master can make very beautiful and original paper crafts. There are a lot of interesting and the easiest possible schemes for modeling origami "Tiger".


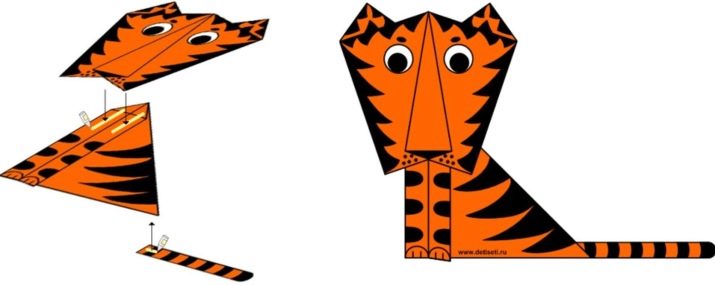
A child can make a beautiful homemade tiger from 2 square sheets of orange paper. Modeling a simple Tiger figurine will consist of several stages.
-
You need to take the first square of orange paper. It must be carefully folded in half along a diagonal line. This must be done from the top on the right side to the left and downward. This will outline the fold line. After that, the paper part will need to be expanded.

-
The left corner, located on top, will need to be folded with the tip towards the diagonal.

-
Now the paper blank needs to be folded neatly along a diagonal line. It is advisable to use the existing fold line as a guide.

-
Next, the left side of the blank is bent towards the central part.

-
At this point, the torso of the striped wildcat will be ready.

-
At the next stage, you will need to take the second prepared square. It is folded crosswise in half from right to left, and then unfold.

-
Next, the upper part of the paper blank is folded downward. This should be done approximately to the middle of the paper part.

-
The corners of the workpiece will need to be turned up to the sides.

-
Next, you need to bend the right half of the product in accordance with the dotted strip in the diagram.

-
Then the right side is folded back in the opposite direction.

-
The same steps will need to be repeated on the left side of the orange blank.

-
Now the paper element will need to be turned over. The tiger's head is done.

- At the final stage, you will need to draw the nose, eyes and whiskers of the animal on the face. Black stripes should be depicted on the body. Do not forget about the tiger's tail - it also needs to be painted over with black stripes. The original children's craft is ready.

Consider another master class on modeling a simple origami "Tiger".
-
You need to take a 15x15 cm square of a suitable color. One side of it must be just white.
-
You need to start work from the wrong side. It is necessary to outline the fold diagonally. The corners of the top and bottom are bent to it.
-
The edges are bent again, moving towards the center point.
-
The product is deployed.
-
The square blank is folded along the marked strip.
-
The angle is folded back.
-
Steps 5 and 6 are duplicated on the reverse side.
-
Form a zigzag along the dotted line.
-
Fold the right half of the workpiece.
-
The next step is to shape the tiger nose. To do this, you first need to tuck the corner on the right.
-
Form a fold in the form of a "slide" along the dotted line in the diagram.
-
The upper and lower parts of the workpiece are connected.
-
The right side of the product is opened from the inside, creating a fold like a dart.
-
The workpiece is turned over.
-
The same fold is formed on the reverse side.
-
The figurine is folded according to the dotted line. In this case, it is necessary to outline the hind legs of the tiger.
-
Another fold is formed next to it.
-
The homemade product is opened from the inside, focusing on the directional arrow.
-
The craft is flattened, and then the lower part is folded up.
-
The sides are bent along the dotted line.
-
The right side of the workpiece must be folded.
-
The top corner on the tiger's head should be folded forward.
-
Creates a zigzag fold.
-
The tiger's ear is gently pulled back.
-
The product is turned over.
-
Steps 22-24 must be repeated, making one more eyelet.
-
Sharpening on the tiger's face should be removed by means of a reverse fold.
The figurine is ready. It remains to supplement it with stripes drawn with a felt-tip pen or black marker.


Complex origami creation
You can make a more complex and attractive figure with your own hands, consisting of several main parts - the head, body, tail, which are assembled separately, and then glued to each other.


To make the head, you need the following steps.
- You need to prepare a paper square 15x15 cm. You should start working from the colored (front) side.
- The square must be folded in half from top to bottom. After that, the wrong side will be on the outside.
- Each half will need to be doubled over again.
- The corner at the bottom is raised, marking a fold.
- Now you need to open the top layer of the paper blank. The product must be flattened.
- The workpiece is turned over.
- Now steps 4 and 5 will need to be repeated, but on the reverse side.
- It is necessary to gently bend the ears of the future tiger forward.
- You should outline the diagonal fold of the paper figure.
- The right side of the workpiece should be lowered downward - this will be the head of a wild cat.
- It is necessary to take care of the more accurate shape of the tiger's ears.
- The figurine should be turned to face you.
- Next, you need to tilt the protruding triangular elements of the craft towards each other.
- At the next stage, you need to fix the parts with narrow tape or hot glue so that they do not start to diverge. At this stage, the modeling of the tiger head will be completed.


Now we need to make the body of the tiger. Let's analyze the step-by-step instructions.
- It is necessary to fold the 15x15 cm square into a two-layer triangle.
- The top of the workpiece should be lowered down.
- Now both pockets open from the inside.
- The workpiece is straightened, then flattened and smoothed.
- The resulting workpiece is bent in accordance with the central axis of the "slide" type. At this point, the tiger's torso will be complete.
- The lower half of the tiger's neck should be cut off with scissors, leaving only a small fragment after that.
- Next, you need to bend the right corner located in the upper part along a diagonal line.
- Now you should roll the paper strip into a narrow roll.
- The resulting paper tube should be neatly curved. After that, the finished tail can be safely glued to the body of the striped predator.
After that, it remains only to decorate the finished craft beautifully. The neatly formed figure must be supplemented with painted black stripes. On the face of the paper animal, you should draw eyes, a nose and a long mustache.


How to make a modular tiger?
Very beautiful figurines of animals can be assembled not only extremely easily. There are countless original and more complex schemes for modeling such origami homemade products. Of course, it makes sense to resort to the manufacture of such items only after getting acquainted with the simplest master classes.
Modular origami figures are much more complicated and take longer to make. They are assembled from many triangular-shaped components - modules.


Using such components, it will turn out to make a very beautiful and charming tiger cub. To construct it you will need:
- 156 modular components in orange;
- 85 white elements;
- 59 black components.


Let's consider in stages how this original volumetric beast is assembled.
- First you need to form the first row of a large craft. It will consist of 32 snow-white modular elements.
- The second row will need to be formed from 16 orange and 7 white components. Also here you will need black modules (12 pieces) and additional white elements (8 pieces).
- In the next step, the figure is unfolded.
- Assemble 4 rows of 16 orange and 7 white modular "spare parts".
- For the 5th row, you need to prepare 2 orange elements, 6 white and 15 black components.
- Now you can start assembling the 6th row. To do this, you need 7 snow-white and 16 orange parts.
- The 7th row will consist of 6 red, 6 white and 11 black elements.
- To assemble the 8th row, you need to use 18 orange and 5 white elements.
- The 9th row should be carefully assembled using 14 red and 9 black modules.
- Next, you need to go to the assembly of the 10th row. To do this, you need to fix 18 orange and 5 snow-white modules.
- The 11th row should have 5 red, 6 white and 12 black components.
- For the 12th row, you need to install 18 orange and 5 snow-white modules, and for the 13th - 23 orange ones. In this case, it is very important to bring all modular components towards the central part.
- It will be necessary to carefully cut and glue the legs and ears of the volumetric tiger cub to the workpiece.
- All finished parts will need to be glued to the finished body. It is necessary to arrange the head of the tiger cub. Eyes and nose should be glued to his face.


Next, watch a master class on creating a tiger using the origami technique.


