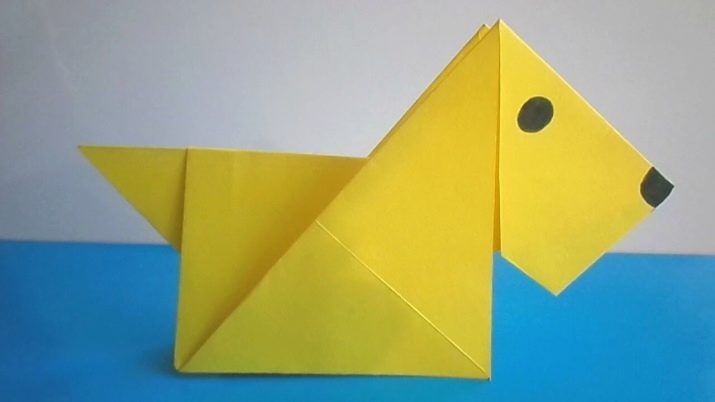
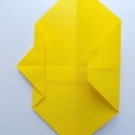
How to make origami in the form of a dog?

The creation of various figures using the origami technique is available to almost everyone. Both adults and children can model a huge number of beautiful and original paper products. In this article, we will show you how to make different origami options in the form of a dog.


Simple options
Japanese papermaking technique is available for both adult craftsmen and children. Origami can be studied by kids aged 3, 4, 5 years old, as well as children 6-7, 8, 9 years old and older. Such a hobby has a positive effect on the fine motor skills of young craftsmen, as well as on their accuracy and hard work.


Let's take a look at some simple instructions for making attractive origami dog figures.
Brown
It is very easy and quick to make a brown dog figurine. To carry out all the work, you will need the following components:
- 2 square sheets of brown paper (you should choose one-sided colored paper);
- black marker or felt-tip pen;
- glue stick.

When all the necessary components are ready, you can start modeling origami.
- From one brown paper square it will be necessary to form the head of the dog, and from the second - its body.
- Modeling should begin with the head of the animal. To do it, you need to fold a square sheet in half along a pair of diagonals. Then the workpiece must be left in the state of a triangular base.
- The corner that is at the bottom of the workpiece must be bent upward from the upper layer of the triangular base.
- To form the ears of the future paper dog, you will need to carefully bend the corners on the sides.
- Further, the formed ears will need to be straightened so that they acquire a diamond-shaped structure.
- The upper half of the paper blank in the next step should be folded down a little.
- In order for a brown dog to form a nose from a piece of paper, you need to bend the corner upward from the bottom.
- Next, the paper blank will need to be folded in a strip along the center line. As a result, you should get the head of the animal in profile.
- The next step is to prepare the second paper square. It will be necessary to form the body of a brown dog from it. To do this, the leaf will first need to be folded in half diagonally.
- On the lower half of the product, which has acquired a triangular shape, it is necessary to mark the middle by means of a bend.
- Now we need to move on to modeling the dog's tail. To do this, you need to bend the corner that is located on the right.
- The curled tail will need to be turned outward. As a result, a white tail of a brown dog will be made.
- The left side of the triangle must be bent towards the middle. In this case, you need to focus on the previously formed fold located on the underside of the product.
- The top of the body blank must be bent towards the left in the shape of a triangle.
- Next, the workpiece will need to be carefully turned out so that the breast of the figure is white.
- Using a glue stick, you need to attach the head to the body.
- The next step is to use a black marker or felt-tip pen. With the help of this "tool" you should draw eyes on the paper figure.
This paper craft is made quickly and easily. A similar scheme is suitable for children 4, 5, 6, 7 years old.


Fox terrier
In the Japanese origami technique, you can model adorable figurines of purebred dogs. For example, it can be a fox terrier. To make such an original structure, the origamist will need to prepare:
- square sheet of paper;
- black marker.

Let's take a look at the step-by-step instructions for creating a fox terrier figurine out of paper.
- At the first stage, the paper square will need to be bent in half along two diagonals.
- The corners on the sides of the workpiece will need to be bent towards the central part of the sheet.
- One of the corners of the structure should play the role of a pedigree dog's tail. The corner on the left must be slightly bent to the side. As a result, the corner should go beyond the workpiece.
- On the right side, a small corner will need to be bent inward. From this side, further it will be necessary to shape the dog's face.
- Next, the workpiece will need to be folded in half. Thus, the body of the fox terrier will be formed.
- The layer on top of the paper product will need to be bent in the form of a triangular element to the left and up.
- Now the corner on the left will need to be bent back.
- The workpiece must be turned over.
- Now the master will need to duplicate all the actions, but already in a mirror image, so the corner must be bent to the right and up.
- Further, the corner that was bent away will need to be bent in the opposite direction. After that, the outlines of the dog will be marked.
- To form the fox terrier face, you will need to straighten the inner fold to the outside in the lower half of the workpiece.
- The ears of the paper dog must be bent downwards from 2 sides.
- After that, it remains only to depict the eyes and nose with a black marker or felt-tip pen. The craft is ready!


In the form of a box
If you want to make an original craft using the origami technique, then you should take a closer look at the doggy figurine in the form of a box.
The manufacturing scheme of such a product is not the most complicated, so even small children can master it.
To model an unusual origami dog in the form of a box with your own hands, you will need to prepare:
- a sheet of square paper;
- black marker or pen.

We will find out how to assemble such an interesting volumetric paper craft for beginners correctly.
- In the first step, a square sheet of paper will need to be folded in half vertically. After that, it is deployed.
- In the second step, the workpiece is folded in half again, but already along a horizontal line.
- Now you need to unfold the paper blank. As a result, 2 marked lines should be formed.
- The edges at both the top and bottom of the workpiece will need to be folded towards the centerline.
- In the next step, the product will need to be deployed.
- A piece of paper with all the marked lines must be folded diagonally, and then unfold.
- The square must be folded in accordance with the second diagonal.
- Next, the workpiece will need to be expanded. As a result, you should get several marked bent lines, which will further help the origamist to correctly fold the planned craft.
- At the next stage, 2 corners located at the bottom of the workpiece must be bent towards the center line.
- A pair of upper corners are bent to the central part of the product.
- Along the outlined lines, you will need to carefully open the pocket from the bottom, after which it must be folded towards the line in the center.
- The same should be done with respect to the pocket located in the upper part. It will also need to be folded towards the center of the product.
- Next, the two upper corners of the lower rectangle must be folded, as shown in the diagram.
- The corners of the workpiece are unfolded. As a result, you should get two outlined diagonal stripes.
- Along the outlined lines, you will need to bend the upper edge downward. The corners are smoothed.
- The edge at the bottom is now folded up.
- The upper edge of the formed polygon must be wrapped inside the structure.
- A similar procedure should be done with the rectangle at the top. First, the corners are folded, then they are unfolded, and the top layer is turned upwards along the marked line.
- In the next step, the top paper layer is lowered downward.
- Next, it is wrapped inward, while bending the corners to the right and left.
- Next, the workpiece is folded in half, turned over so that a pair of corners are at the bottom.
- The corner on the right is folded inward, and then the same is done with the left corner.
- The product is turned over.
- The right and left sides are folded towards the center. Do the same with the edges on the other side. After that, the corner is folded from top to bottom.
- Next, the right, left and bottom corners are slightly bent. As a result, the ears and nose of the dog will form.
- Fold the inner triangular piece from the right to the middle. This will be the front foot.
- In the same way, the left inner triangle is folded to the middle - this will be the second foot.
- The product is turned over, and then the corners on the left and right are slightly opened and folded inward.
- The workpiece is folded again.
- The corner is bent from top to bottom.
- Next, the right corner is folded to the left, after which the left corner is folded upward to form a triangle.
- The upper corner on the left is bent downward, and then to the side.
- Now, along the marked lines, the corner is pushed forward - this will be the nose of the dog.
- Then it remains only to take the workpiece by the nose and tail, and then gently pull it to the sides, as if "opening".
- The lower half of the product is folded up.
- At the final stage, the eyes, nose and mouth are drawn to the dog with a felt-tip pen / marker.


Puppy
It is extremely easy to assemble a puppy figurine using the Japanese papermaking technique. To do this, you need to take a piece of paper and a felt-tip pen. The progress of work will be as follows.
- First, make a diagonal fold of the paper.
- The paper is opened and the corners on the sides are folded to the marked diagonal fold. As a result, the workpiece should acquire a diamond-shaped structure.
- The corner at the top now needs to be bent down.
- The workpiece is turned over in the opposite direction.
- The corner at the bottom of the workpiece will need to be bent upward.
- The corners on the sides are bent to the middle.
- At the next stage, the corners on the sides are folded back, and the workpiece is turned over. On this part, the face of the animal should be formed.
- The corner from the bottom is slightly turned upwards - this will be the nose of the figure.
- Then the ears are shaped. For these purposes, the corners on the sides are bent downward.
- Form a symmetrical fold on the other side. So the ears of the dog will be outlined.
- The craft is unwrapped again. It is necessary to further shape the tail and ears.
- The protruding corners of the ears should be folded to the vertical line.
- The formed triangular element will need to be straightened and smoothed.
- Do the same on the opposite side.
- Now they make a ponytail. The vertically located triangular element is folded to the left, and then the edge is folded from top to bottom.
- Make a fold in the inside.
On the frontal basis, crafts depict eyes, a nose with a felt-tip pen or marker.


Dachshund
Consider how you can model origami in the form of a dachshund with your own hands.
- Initially, you need to take a square of paper with dimensions of about 9x9 cm, or cut out such a square from A4 sheet. The origamist can choose absolutely any color of paper that he takes as a basis.
- The prepared square is bent diagonally in half.
- Then all 4 corners are bent to the central part.
- The workpiece is bent diagonally again.
- Then they bend back along the midline.
- Next, you need to bend at the same time along the lines marked in steps 3 and 4.
- Bent over the bisector of the right corner from above. The action is repeated with the rear triangular element.
- Open and flatten the top right and left triangular pockets for symmetry.
- A right triangular piece is bent inside the figure.
- Half of the upper ear is folded back.
- Next, you need to bend inward and pull the triangle up and to the right from below.
- The ear half is returned to its place.
- The future nose and hold of the body should be bent outward.
- We must try to bend the top of the dachshund's head inward.
- Next, make the body of the figure. Take a rectangle 9x12 cm. It is bent in the center, and then bent to the center line of the side on the sides.
- 4 corners are marked, 2 strips are folded.
- The bottom and top of the figure are revealed.
- The upper trapezoid should be bent in half, and the lower one - along the lines outlined in the diagram.
- Now we need to tackle the upper corners. You need to open and flatten the pocket.
- The triangular piece is thrown to the right and hidden in the left pocket.
- The top layer of paper is wrapped twice.
- Further, individual parts of the structure are connected with hooks. After that, the body is folded in half.
- For the tail, take a strip of 3x7 cm. It is bent along the center line, the sides are bent towards it.
- On the right, folds are needed along the bisector of the corners, on the left, a zipper fold is made for a hold with the body.
- The upper folded part is inserted inward.


How to fold a dog from a banknote?
Let's take a look at the step-by-step instructions on how to simulate an original craft in the form of an animal from a banknote.
- The bill should be placed horizontally. To give it a square shape along a vertical line, a pair of narrowed sides of a rectangular base is brought to the center point.
- Bends should be done in this state. The booklet-style triangle is bent horizontally. The rectangular piece is smoothed out.
- The fold formed before is straightened, but the bill should remain assembled in the form of a square. Two corners located adjacent to the sides are bent by about 1 cm, highlighting miniature triangles.
- On the opposite side, the corner is bent from below, but deeper (by 2 cm), not joining with the central point.
- Need to fold the remaining corner on top. The formed triangular element must be oblique.
- The workpiece must be turned from the center. A small distance is left to the side.
- The workpiece is bent horizontally in the center, while the corners should be folded.
- One side is turned to one side, as if outlining a triangular particle. You need to put your finger between the paper layers, and then unfold the part from the side towards you.In this case, it is necessary to straighten the triangular element.
- The tips of the ears are grabbed, spread apart. The figurine is assembled!
With a pencil on the triangle, you can draw the eyes and nose of the dog.


Creating a modular craft
Modular figures are assembled in stages. First you need to make modules, from which the craft will then be constructed. These components have a triangular structure formed from a square. The number and colors of the modules will depend on the size and shape of the future dog figurine.
Modules can be made of paper of absolutely any color. The origamist himself chooses what color his original craft will be made in. Modules of different shades can be used in one design.
So that the modular pattern is not too complicated in further assembly, it is worth choosing simpler designs, especially if the master has not previously resorted to such a scheme. The basic origami silhouette of the modules can be modeled in the same way as a simple egg. At the end of all the work, a gorgeous craft will be released in the form of a charming puppy. The master will only have to attach the eyes, ears, nose and mouth to the constructed base.
The finished craft will become an original interior decoration if you put it on a shelf in the room.


For information on how to make a dog out of paper, see the next video.


