Origami Valentines Ideas

Valentine's card is a traditional present on Valentine's Day. You can buy a beautiful postcard in a store, or you can make it yourself, giving it a variety of shapes. Valentines, modeled using the famous origami technique, look creative and original. In this article, we will look at interesting ideas for creating such crafts.


Simple voluminous heart
If you do not have a wealth of experience in modeling origami crafts, it is best to start with simpler and more affordable options. It is advisable to move on to the manufacture of intricate and complex products later.
A very beautiful valentine can be made according to an extremely simple and understandable scheme. Voluminous hearts turn out to be especially original and cute. Very cute gifts for February 14th come out of them. In addition, these crafts can be used as pendants, garlands or decorations for cocktail tubes. You can hide a miniature gift in a ready-made voluminous heart, for example: a ring or a chain. To make the product more effective and aesthetic, it is advisable to stock up on high-quality and attractive paper in advance.
The best solution would be copies that are made specifically for origami.

To make a beautiful voluminous heart, you will need:
- square piece with dimensional parameters 15x15 cm;
- if you take heavier paper 90 g / m2. sq., then dimensions of 21x21 cm are suitable.


Let's consider a modeling scheme for a simple, but very attractive and voluminous valentine.
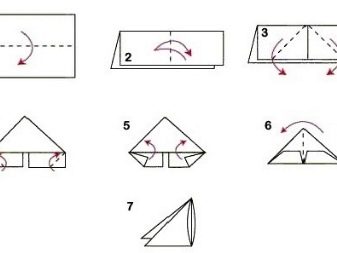
- All manipulations should start from the white side of the paper components. First, the leaves are bent in half from top to bottom. After that, the paper blank will need to be opened.
- At the next stage, you will again need to fold the workpiece, but this time from right to left.
- You will need to make a noticeable notch in the center of the paper product. In this case, the entire line does not need to be selected entirely.
- The next step is to fold towards the center of both the right and left edges of the workpiece.
- The result is a basic "locker" or "door" shape.
- The formed paper blank will need to be re-folded from top to bottom.
- As a result of the actions taken, a square should again be formed, but already of a more compact size.
- The right corner, located at the top, will need to be folded 1/4. Accuracy is not very important at this stage.
- Now the corner on the left side is folded towards the right.
- The workpiece is opened, a small corner is formed on the left side.
- Now the left corner is folded towards the right.
- As a result, you should get a neat V-shaped fold in the center of the workpiece.
- The product must be expanded in such a way that the basic shape of a "cabinet" is formed.
- Further, the corners located below are bent towards the axis in the center.
- At the next stage, the paper blank is opened, and then folds are formed in accordance with the lines formed earlier.
- By means of a reverse fold, the corners of the homemade product are brought into the inside.
- Now open the front layer of the workpiece on the right side while supporting the flap.
- A small pleat is formed inside the product to join the front and back halves together.
- The same steps will need to be repeated on the left side.
- The front layer will need to be closed again.
- The craft will need to be turned 180 degrees. The lower corners are tucked towards the center point, after which they are opened and folded towards the middle.
- In the inner part of the workpiece, the valves are fastened.
- The heart is folded in half. The corners on the right and left are hidden in the inner part of the figure.
- The shape of the workpiece can be accentuated by the formation of sharper folds in the form of a "slide".
- Now the heart is closed, while pressing the upper part. Its shape should resemble a saddle.
- The valves should be slightly opened and see what is inside the product on the right side.
- The inner triangle is folded so that the product can be held together.
- The tip of the pencil is a great help. For more safety, you can drip a little glue.
- On one side, the flaps must be placed in the opposite pockets.
Using a pencil, the figure is carefully straightened from the inside so that it comes out more voluminous.


Creation of modular origami
Original and beautiful valentines can be made using the modular origami technique. Such homemade products look very unusual and lively, but they usually take more free time to make.
Working with the modules is somewhat similar to meditation, since it requires compulsory perseverance and concentration. To make an aesthetic modular craft for Valentine's Day, you need to stock up on the following components:
- one white A4 sheet;
- 3 paper sheets of the same size, printed in red;
- scissors and ruler.


Let's figure out how to properly fold such a creative paper craft.
- Using a pencil and a ruler, you will need to draw all the sheets of paper into rectangular elements, the dimensions of which will be 6x4 cm.As a result of these actions, you should get 100 cut rectangles.
- Since the craft is modular, 18 white modules and 71 red modules need to be constructed from the cut rectangular elements. All rectangles that remain after that will no longer be needed. How to make neat and correct modular components can be seen in the diagram.
- When the paper modules are done, they will need to be put on top of each other. To do this, hold the two triangular pieces with the long side up.Other modules are put on them with the side where there is a pocket.
- The considered origami craft from modules provides the simplest assembly scheme. At the first stage, the upper part of the future heart is assembled, and at the second stage, its lower component. After that, the finished halves of the modular valentine are connected to each other by means of white modules.


Other options
There are many other interesting options for making valentines yourself using the origami technique. You can simulate cute specimens in the form of an unusual box, miniature bookmark, and so on.


"Heart of the Harlequin"
If you want to model a creative craft using the origami technique, then a valentine with a diamond pattern would be an excellent solution. Let's analyze in stages how it can be done correctly.
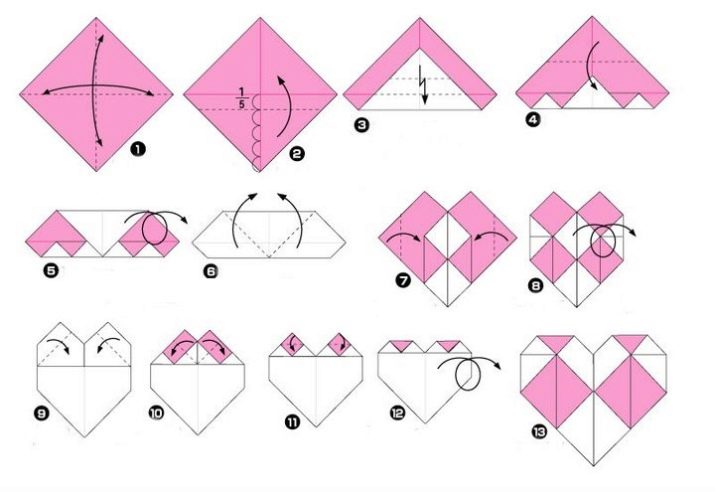
- First you need to take double-sided paper with dimensions of 15x15 cm.
- The paper square will need to be folded along its diagonal line. After that, the workpiece is opened.
- The lower half of the future valentine is divided by means of a ruler into 5 parts. This should be done strictly horizontally.
- The workpiece is folded by 1/5.
- Now the layer located at the bottom is folded in a zigzag manner.
- The top is lowered to the bottom edge.
- The product is turned over.
- The corners on the sides are raised. Alignment needs to be done in the middle.
- The new corners on the sides are bent to the center component divided into diamonds. The workpiece is turned over.
- The outer edges need to be folded over, and then the same should be done for the inner edges.
- The triangles are also folded from above.
- The craft must be turned over to the front side.
The Harlequin-style valentine is ready!

In the form of a bookmark
It is easy and simple to make a valentine in the form of a bookmark. To model it, you will need:
- square paper leaf;
- scissors;
- decor elements;
- paper glue.


Let's analyze the master class in detail.
- The paper square is folded in half. A cut must be made along the fold lines. Each detail of this kind can be modeled on a separate tab.
- Next, the resulting paper blank is re-folded in half.
- At the next stage, the product is turned over in slices towards itself, after which it is folded in half, but now across. The workpiece is folded over, the folded place is indicated and the sheet is opened.
- Each side must be folded to the existing section with a fold upward.
- The craft is turned over so that the side facing the table is now directed to the master. Each side of the craft is folded down.
- Next, at each top strip, you will need to bend the corners inward.
- The next step is to secure the incision. This can be done with stickers.
- It is recommended to fix the corners that have been bent with glue for greater reliability.


Such a scheme will be an excellent option for children or novice craftsmen who are not familiar with the origami technique.
In the form of a box
A creative solution is modeling a box with a heart. This is a wonderful gift for Valentine's Day. A note with a romantic message or confession can be placed in the finished product.
To assemble this product you will need:
- adhesive composition suitable for working with paper;
- high-density colored paper (colors are selected individually);
- pencil and ruler;
- scissors with sharp blades.


Such a homemade product is made extremely simply. To do this, it is enough to transfer the diagram of the future box to a sheet of paper. After that, the applied elements are carefully cut out with sharp scissors. Then you can start assembling the original product. This should be done starting from the bottom. The upper parts of the box must be closed to form a small heart.
The finished craft can be elegantly decorated with paper flowers, lace details or sequins.


From a strip of paper
Small but cute origami valentines can be made from regular paper strips. Such a homemade product is modeled extremely simply and quickly. To do this, you just need to prepare a strip of paper with parameters 2x20 cm. The color and print of this important component can be absolutely any.


The very process of assembling this product will not cause labor even for the smallest craftsmen. To do this, it is necessary to bend the corners of the paper blank in turn on both sides. This must be done to the very end of the strip.
The tip of the original craft being made will need to be carefully hidden in its inner part, after which this component is pushed to a depthto form a small heart as a result. If the tips are too sharp on the craft, then they can be made more neat and rounded using scissors. You can do without a sharp clerical tool by simply bending the pointed origami elements.


For how to make an origami valentine with a pocket with your own hands, see the next video.


