Origami in the form of a crane
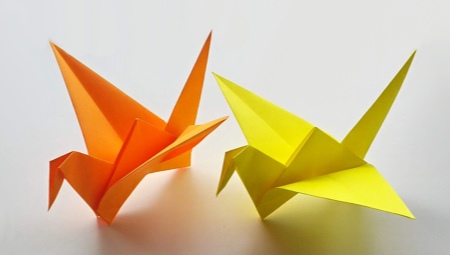
The paper-making technique called "origami" is becoming more and more popular every year. Even the smallest masters can learn it. Countless different figures can be made from paper without the use of glue. In today's article we will find out how you can model origami in the form of a beautiful crane with your own hands.


Peculiarities
Paper is a pliable and versatile material from which it is possible to make almost any figurine and structure. In the origami technique, attractive cranes of various levels of complexity are obtained.
The figurine "Crane" itself has a special meaning. So, in Japan there is a legend that says that if a person makes 100 paper cranes and makes a wish, then it will certainly be fulfilled.


There are many interesting stories in which the crane is involved.... For example, there is a special song about a Japanese bird that tells the story of a girl Sadako Sasaki, who received a dangerous radiation sickness as a result of an atomic explosion over Hiroshima. She began to fold her 1000 cranes, hoping to be healthy. Unfortunately, this story ended tragically. Sadako did not manage to make another 357 paper birds and died due to her terrible illness.
The Chinese and Japanese crane with a beautiful long neck has always symbolized a successful life, happiness and longevity.
Origami in the form of cranes is a very popular idea for creating figurines of varying complexity. There are both very simple and the most complex schemes for modeling such crafts. All of them require maximum care and accuracy from the master.


How to make a crane?
Each person can easily make a beautiful figurine, a symbol of happiness and longevity. The main thing is to act without unnecessary haste, strictly adhering to the step-by-step instructions.... Let's consider several master classes on modeling origami "Zhuravlik".
Simple craft for beginners
Origami can seem like a daunting technique, especially for young children.
If the baby is not yet familiar with this type of paperwork, you should not immediately give him too intricate and complex schemes for familiarization. You need to start simple. After that, the child will already be able to master complicated master classes.

We will learn how to make the simplest and most understandable paper crane step by step.
- It is necessary to take a sheet of paper (preferably a white piece of paper) A4 format, cut a square out of it.
- In the next step, the workpiece is folded diagonally.
- The edges are folded up.
- Form a triangular base.
- The workpiece is folded again.
- Both corners of the triangular base are wrapped in turn.
- A diamond-shaped part will form, the edge sections of which will need to be bent. The figurine should then be turned inside out.
- Next, the edges are folded again on both sides in turn.
- The edges will now need to be bent to get the head and tail of the crane.
- A beak is formed.
- Spread their wings. A beautiful and simple craft is ready!

Classic Japanese version
To make a classic crane, it is enough to take a one-sided A4 paper sheet. Let's consider how using this component it is easy to assemble a beautiful figure with your own hands.
- The sheet should be placed on the work surface. All manipulations should be started from the back (white) side of the sheet.
- The original square will need to be folded neatly diagonally.
- After this action, a triangular blank will lie in front of the master. It will need to be doubled again.
- Now the paper blank should be unrolled on the working surface so that its square corner is located in the upper part and to the right. This will form a pair of pockets on the left side. The one on top will need to be opened, gently pushing the folds apart in different directions.
- The pocket will need to be smoothed out, moving along the axis in the center. As a result, a square is formed.
- At the next stage, the paper blank will need to be turned over.

- Next, you will need to repeat the steps taken in steps 4 and 5.
- You get a double-type square. It will be necessary to neatly fold its side to the right, placing it along the axis in the center.
- The folds must be carefully smoothed out with your fingers so that the desired elements are printed on the paper. Further, the workpiece can be opened.
- The steps must be repeated, but on the other side of the workpiece.
- The fold will need to be ironed thoroughly again. After that, the square can be straightened.
- On the points marked when bending the sides, you will need to "close" the corner located on top.
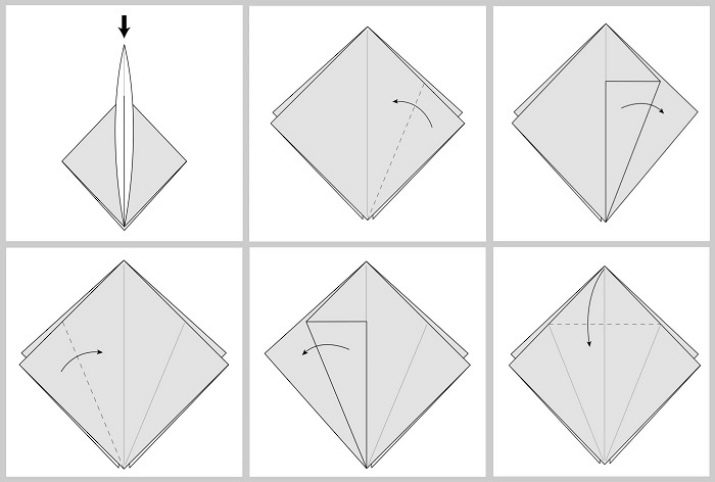
- You need to run your finger along the fold, and then open the workpiece back.
- The entire square should be raised up to the last bend strip.
- The formed "pocket" must be opened.
- The lower triangular part is raised upward, while simultaneously bending inward the folds marked earlier on the sides.
- As a result, the basic "petal" shape will be formed. The product is turned over to fold another square in the same way.
- Bend the sidewall on the right, trimming it in the center.

- The product is opened again.
- Next, you need the steps on the left side.
- The craft is returned to its original shape.
- The figurine should be folded in half from top to bottom.
- It is necessary to iron it with your finger several times, fix the fold, after which you should start opening.
- You need to start lifting the upper plane. In this case, it is necessary to prepare for modeling one more “petal” blank.

- Step 15 is repeated.
- Step 16 is duplicated.
- The petal fold is done.This will be the body of the crane. It remains to model the ponytail and the head.
- Fold the right side of the rhombus to the center line.
- The same steps will be needed on the left side. The product is turned over.
- You will need to duplicate the 2 previous steps.

- The figurine should be symmetrical on both sides.
- The product is unfolded with a forked tip towards you. Further, one narrowed part will need to be bent upward at a slight angle.
- Now the part is returned to its original place again.
- The same should be done with respect to the second narrowed half.
- The product is rolled up and unfolded.
- The workpiece must be turned over.

- Now the bifurcated tip is folded along the formed fold, but in the opposite direction.
- Step 35 is repeated.
- The second part of the paper blank is folded up.
- The fold is straightened and turned inside out.
- Raise the tapered tip on the right.
- Folds are made along the folds outlined before.

- The formed element is inserted into the top of the crane's body. After that, you need to fold the left tapered tip in the same way as the right one.
- It must be located in the inner part of the body, but already on the other side.
- The head should be formed. The top is folded down.
- The workpiece is opened.
- The product must be turned over.
- Next, you need to fold the same vertex, but already in the direction in the other direction.

- The product is unwrapped again.
- The structure is returned to its original position.
- It is necessary to form the bird's head, bending over the folds that were laid in steps 45-48. You need to place the piece inside the neck.
- The wings of the crane will need to be bent along the dotted line, as in the picture.
- The craft is almost ready. The body of the bird can be made voluminous.
You should turn the figure over, find a hole in the area where the wings are fastened, slightly push it apart and blow there.

Flapping wings
To model such a figure, it will be necessary to prepare not only a paper sheet, but also sharp scissors, as well as colored pencils or felt-tip pens.
We will learn how to gradually fold a crane that flaps its wings.
- A sheet of paper is placed on the work surface. It must be bent diagonally.


- Scissors cut the rectangle to leave a triangular piece.

- The triangle is folded back again.

- From the formed one of the two triangles, it will be necessary to form a square, straightening it from the inside.
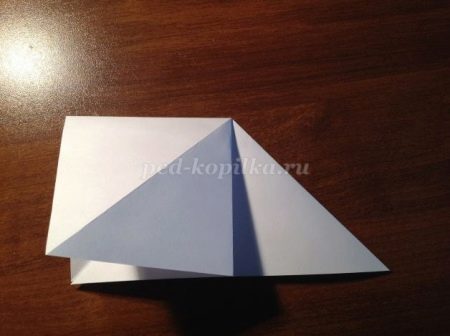
- The same steps must be repeated on the second side.

- You need to take the top edges, and then bend them to the center point.

- The triangle is bent from above to obtain the future contour.

- It is necessary to unbend the details. The contours will turn out.

- You need to grab the corner from below, bend it along a horizontally located contour.

- The sides should be folded, straightening at the inside of the fold. You will get a rhombus.

- On the other side, the same manipulations are performed.

- A pair of rhombuses will form.
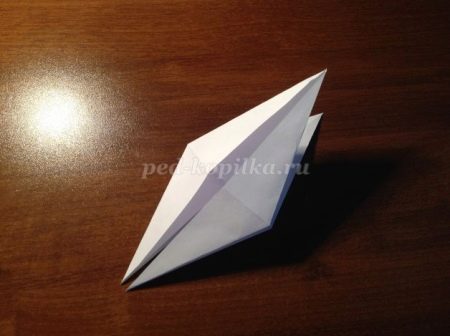
- Next, you need to take the bottom part. It is folded over the inner fold to form a neck.

- A ponytail is formed on the other side.

- Tuck the tip of the neck to form a beak.

- Bend the wings at a small angle.
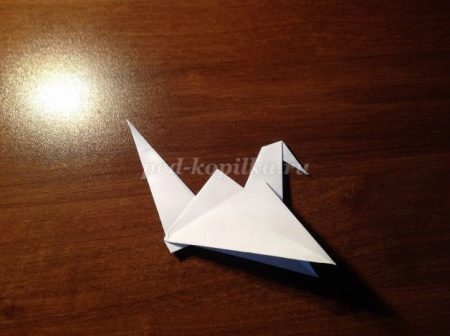
The beautiful figurine is ready! With pencils or felt-tip pens, you can decorate it in an original way or completely repaint it. To set the wings of a paper creation in motion, you will need to grab the bird's chest with your left hand, and grab the tip of its tail with your right hand. Next, you need to very gently and smoothly pull the tail to the side, while holding the breast. Due to such manipulations, the wings of the crane can bend.

Crane from modules
If you want to make a more original and attractive figurine of a crane, you can turn to the modular origami technique. In execution, modular structures turn out to be more complex and intricate, therefore, a small child or inexperienced origamist cannot do without help.
The principle of modular technology is simple. Previously, blanks-modules of triangular shape and different lengths are prepared from paper of a suitable color. So, to assemble a crane, a large amount of these blanks may be needed. A total of 199 modular components need to be crafted.
You can make these components with the whole family - so the process of preparing the modules will be faster.


When the required number of modular components is ready, you can start modeling the flying figure. It is advisable to start assembling from the tail of the bird. To assemble these or those parts, the modules are attached to each other. After the tail, you need to start assembling the feathers in order. In this case, you can use modular components not only in white, but also in other colors.


By drawing up modular rows, it is necessary to collect the long neck of the bird with a beak at the end. Once all the constituent parts are assembled, they should be stitched together into a single figure. In this case, the use of an adhesive solution is not a prerequisite. You can only apply glue to add stability to the assembled paper crane.


Other folding options
There are many more interesting schemes for modeling a paper origami crane. Among them there are both extremely simple and very complex master classes.
So, you can make an original bird out of paper. In this case, the modeling technique will not be the most difficult.
- To make an original crane, you first need to model a classic Japanese figurine. All corner elements in it will need to be carefully folded towards the central part.
- After that, the formed diamond-shaped workpiece will need to be very carefully opened by raising the corners. The procedure is carried out in the same way with the next paper layer.
- The corner located on top is bent to the central part. Do the same with the corner opposite.
- The upper part of the workpiece should be bent in opposite directions. After that, they should be bent into the middle.
- At the moment, outwardly, the figurine will resemble a lotus. One of its petals will need to be bent to form the crane's head.
- The wide parts will serve as the wings of the bird. They must be opened in both directions.
- After all the operations, only one triangle will remain, with which you will not need to do anything. This element will play the role of the tail of a paper bird.


When modeling any origami cranes, you can additionally decorate them with various drawings and patterns applied with felt-tip pens, pencils, markers. To make birds, you can also use not ordinary colored paper, but sheets, initially supplemented with various prints and images.
Especially original and elegant birds are obtained from such materials.


Tips for Beginners
Let's look at some useful tips for making origami figurines.
- When modeling absolutely any origami figures, in no case should you rush... Due to unnecessary haste, an inexperienced craftsman can make a lot of serious mistakes, and end up getting completely different results than he expected.
- If the figure modeling scheme involves the use of scissors, then they must have very well sharpened blades.... If the scissors are blunt, neat cuts will not work, which will have an extremely negative effect on the appearance of the finished origami craft.
- It is recommended to create beautiful and neat origami figures on a flat work surface. A table or cabinet will do. It is unlikely that it will be possible to assemble an attractive piece of work “on your knees”, especially if the master does not have rich experience in this matter.
- Even preschoolers can make aesthetic origami figures.... It is recommended for adults to keep the process of creating any crafts by kids under strict control, especially if at some stage of the work it is necessary to use sharp scissors.
- After assembling any paper shape, you can complete it by drawing the eyes, nose and mouth. It is not necessary to do this, however, with such additional drawings, any character becomes more lively and vivid.
- For beginner origamists, it is recommended to use special paper for the papermaking technique in question to model the figures.
Of course, you can use simple sheets of different colors, but it is advisable to start acquaintance with origami with special paper.


For information on how to make origami in the form of a dancing crane with your own hands, see the next video.


