DIY paper and cardboard postcard ideas

To congratulate loved ones on a particular holiday, you can make postcards from various materials with your own hands. Master classes will show how to make them out of colored cardboard or paper for children under the supervision of adults or older children. This will be a pleasant addition to the prepared present and an exciting activity for children.


Warm kind words spoken at special meetings are kept in postcards for many years, especially if they are made with your own hands.

Birthday options
It's nice to receive a gift and a beautiful postcard with gentle words for your birthday. Parents and grandparents love the postcards that their little children and grandchildren make in kindergarten. For children, there are simple options, but made with great love. Common materials for making are glue, paper, scissors, you can make cards from corrugated paper with the addition of beads, buttons, ribbons.


Simple
This simple postcard can be made by kids 3-4 years old. But adults or older children should help.
For a postcard you need:
- narrow beautiful bandage tape;
- scissors;
- paper with patterns or wrapping for gifts;
- bright cardboard for the base;
- glue in a tube.


When performing all the actions, one should not rush, everything must be done carefully, the table must first be covered with paper or oilcloth, be careful when working with scissors.
Making a postcard includes 6 steps.
- Prepare a cardboard base of the size you want.
- At the top, write the word "Congratulations!", "Happy birthday!"You can glue a piece of paper with an inscription written by adults.
- Take colored or brown paper, cut a few squares into wrapped gifts. Let them be of different sizes. Spread them out on a base to see how the gifts will best fit.
- Glue the cutout gift boxes to the bottom of the card.
- Cut a gift ribbon, attach to gifts, attach with a glue stick.
- Make beautiful bows for gifts, glue.

You can use thick colored threads, knitting yarn, twine instead of gift ribbon for bandaging gifts.

Volumetric
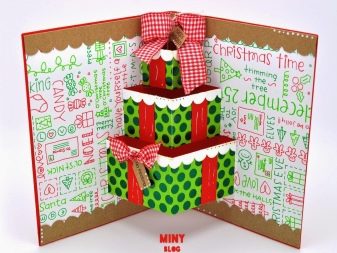
These are complex postcards, but they are beautiful, original, with a 3D effect.
For work, you need to prepare the following materials and tools:
- cardboard - several sheets of different colors;
- glue stick;
- a set of colored paper (you can with a picture);
- bow made of ribbons or paper;
- scissors.


Before the manufacturing process, do not forget to prepare a workplace - cover the table surface.
Let's describe the procedure for making a volumetric postcard.
- We make a dense cover, glue several sheets of cardboard.
- Fold it in half neatly.
- From the outside, we write congratulations directly on cardboard or on small pieces of paper, then glue them onto the cardboard.
- Open the postcard, mark up the pyramid of gifts in the center of the cover.
- To do this, fold the blank in half so that the angle from the boxes with gifts begins to protrude when you open it forward. Then we cut through the bases of the gifts, except for the places where they are fixed to the main sheet.
- We glue this blank to the cover. But we do not glue the places where the gifts will appear when opening.
- After the glue dries, you need to decorate the pyramid of gifts at your discretion, glue a beautiful bow on top.


DIY postcards are gaining popularity. A particle of heat, a special positive energy is put into them.
What can be done on March 8?
Postcards for women's day are distinguished by their tenderness and sophistication. For their manufacture, beads, beads, rhinestones, ribbons, light fabrics are used along with traditional materials.
Quilling is a good technique for making postcards with your own hands. It is not difficult to learn this technique, but the composition looks elegant and original.


You will need the following materials:
- special paper for quilling, you can find it in art stores, order on the Internet (it is more durable, double-sided, but you can also take a regular set of colored paper);
- glue;
- scissors;
- toothpicks;
- cardboard for the base;
- tweezers.


Even children can master the techniques of quilling, but you need to explain the safety precautions to them: harmless toothpicks can prick your fingers, you need to be careful, handle them carefully, do not indulge during work.

Instructions for making a postcard for March 8 are described below.
- Cooking roses. We cut strips of 5 or 10 mm wide of any length from red paper. The longer the strip is, the more magnificent the flower will turn out. If there are ready-made stripes, then we take the appropriate color.
- We wind the colored tape on a toothpick, carefully remove it from the stick.
- We relax to the desired size, fix the edge with glue.
- We make a few more of these flowers. We make the leaves in the same way as the roses, only from green paper.
- After gluing the edge of the leaf with tweezers, press the corners from different sides to form the shape of the leaf. We make several of these leaves.
- Leave a few strips untwisted for the stems, one red ribbon for the bow.
- We distribute the arrangement of flowers, stems and leaves on a cardboard folded in half.
- We glue all the details, write on the base or on a separate piece of paper and then glue “Since March 8! Congratulations! Happy Holidays! "

Inside the postcard there is a place for kind and gentle words for mom, aunt, grandmother, sister.
Valentine's Day Crafts
The most expensive Valentine's Day messages will be cards made by the hands of a man in love. You can prepare such an envelope in the shape of a heart, put notes there with confessions, gentle words, compliments, poems.


For manufacturing, you will need red paper, a pencil and scissors. You need to circle the template, cut it out, and then fold it. You can circle the heart with a felt-tip pen, as shown in the photo.

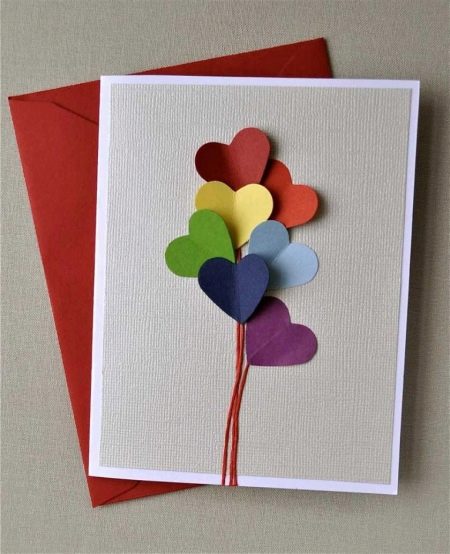
Another beautiful greeting card can be made for Valentine's Day. To do this, you need to glue many beautiful hearts made of multi-colored paper on a cardboard base. You can even sew it on with a sewing machine. How to do this is clear from the finished sample.

The more varied the paper for hearts, the more original the card will look. Do not forget about the gentle words that must be written inside.


DIY Christmas cards
For the most magical holiday of the year, you need to prepare a lot of postcards, since usually a large number of relatives and friends need to be congratulated. The original Christmas tree is made of corrugated paper.
For the manufacture of this option, you need to take as a basis cardboard of any color, decorate the top and bottom with strips of a beautiful ribbon. For six levels of the Christmas tree, cut corrugated paper approximately 3-5 cm wide. This depends on the size of the base. Approximately 6 levels should fit in height.

The levels must be carefully glued onto double-sided tape, starting from the bottom. In this case, you need to focus on the center of the postcard, collect the upper part. This is easy with corrugated paper. As a result, it will turn out that the lower part of the level and the sides remain unsticked. This is how all the levels should be placed gradually. At the end, you need to glue the star to the top. Decorate the Christmas tree itself with threads and large beads that will imitate Christmas balls.

We suggest that you familiarize yourself with another postcard for the winter holiday using the scrapbooking technique. Needed for work:
- white or colored cardboard;
- scrap paper;
- scissors;
- decorations;
- safe adhesive;
- regular pencil.


If there is no named paper, then the card will turn out beautiful from ordinary colored paper in bright colors.
- Cut 12 rectangles to a specific size. The length of 5 cm is the same for everyone, the width is from 1, 2.3, 4, 5 and up to 12 cm, adding 1 cm each.
- Roll the rectangles with a cylinder in width, screwing them onto a pencil, fastening with glue.
- Glue all the resulting tubes together along the length (from the longest to the shortest) - in the form of a Christmas tree. In this case, it is necessary to observe the center so that the Christmas tree turns out to be straight.
- Make a base from white cardboard or colored cardboard. Stick a Christmas tree on it.
Decorate with decorative elements, make congratulatory inscriptions.

More ideas
Postcards may be needed for different occasions. For example, such an original postcard can be used to congratulate a wedding anniversary or be used as an invitation to another anniversary. For manufacturing, you need to cut out templates and glue them to the base. For the lady's dress, you can use suitable wallpaper leftovers or light fabric. Flat rhinestones are suitable for decor.

Even the smallest child wants to take part in the production of a postcard. There are options when kids can participate, and the craft will turn out to be very beautiful.

For manufacturing, you will need several bright hearts cut out of colored paper, strings, you can knit yarn of bright colors, cardboard for the base, glue stick. An adult can smear a place, and a baby can put a bright heart there. So he will not get dirty with glue, he will be satisfied with the manufacturing process. This original postcard is perfect for any occasion.

Making postcards with your own hands stimulates, promotes the development of fine motor skills, brings parents and children closer together. This is an interesting process that will definitely distract children from gadgets, show them a different, more exciting world.
Ideas for paper and cardboard postcards in the video below.


