All about papier-mâché

Papier-mâché is the kind of creativity that can captivate both adults and children. Anyone can do it, because you can create beautiful and functional crafts using ordinary paper and glue.


What it is?
Papier-mâché is a technique for sculpting various shapes from paper pulp. Its name is translated from French as "chewed paper". It is quite logical, since crushed material is used to create crafts.

This technique has many advantages.
- Anyone can create paper figurines. The technique does not require any special skills or knowledge.
- It won't take a lot of money to start a new hobby. Figures can be made from waste paper and cheap homemade paste.
- Products made in any of these techniques are durable.... If you cover finished figures or household items with varnish, they will not lose their attractiveness over time.
In the papier-mâché technique, you can create almost anything. That's why it will be appreciated by both creative individuals and very practical people.

History of origin
People began to create various crafts and home decorations using the papier-mâché technique a very long time ago. Decorative articles made of paper and paste were used in the ancient world. Crafts were highly prized for their durability. Many papier-mâché products were additionally coated with natural varnishes - this made them even more durable and beautiful.
In the 17th century, this technique became popular in France and England. They began to make dolls out of paper. They turned out to be lighter than wooden ones, but at the same time not as fragile as porcelain ones.

Several decades later, papier-mâché products began to be used to decorate furniture and church utensils. In fact, they have become a cheap alternative to stucco molding.
Nowadays, papier-mâché is used for making cinema and theatrical scenery. From this material, it turns out to create jewelry, weapons, dishes and even overhead parts for makeup. At home, a large number of various toys, figurines and even functional decor are created from paper. The technique is popular with both children and adults.

What is necessary?
The following materials are used to create papier-mâché crafts.
- Paper base. In work, you can use different types of materials. For small crafts, toilet paper is suitable. Thick sheets, newspapers and magazine pages are used to create more voluminous products. Caskets, picture frames and other sustainable crafts are made from cardboard or unnecessary egg packaging.
- Glue... For the preparation of paper pulp, both PVA glue and a paste prepared at home are suitable.
- Paints... This material is used to decorate crafts. Products can be painted with both gouache and acrylic paints.
- Vegetable oil... This product is used to lubricate things that are being cast. It can also be added to the paste to make the mixture less sticky.
Various decorative little things can also come in handy in the work. But it is quite possible to do without them.

General technology
There are two main types of papier-mâché work. The first involves sticking pieces of paper onto the base, the second - sculpting products from sticky paper pulp.


Machining
This is the first type of figure creation in the popular technique. It is best to use soft paper in your work. A master class on creating such shapes consists of the following steps.
- First, the paper needs to be torn into small pieces.
- Further, the surface of the product, from which the impression will be made, must be lubricated with vegetable oil. The first layer of paper is laid on it.
- Its surface is smeared with glue. Then the procedure is repeated.
- After applying two layers, the product must be set aside for a while so that it dries.
- When the base, consisting of 10-12 layers of paper is ready, it should be left to dry overnight. In the morning, the product can be removed from the mold and painted.
This work does not take much time. At the same time, crafts are beautiful and of high quality.

Pulp modeling
You can even make a sculpting mix from cardboard or egg trays. In the course of processing, the material will still acquire the desired consistency. The mass preparation process consists of the following steps.
- To begin with, the sheets of paper must be torn and folded into a container with hot water. In this form, they need to be left for 3-4 hours. The softened material must be crushed by hand. If you have a stationary blender at home, there is no need to soak the paper for so long.
- Crumpled paper must be filtered through a colander... Next, add a mixture of PVA glue and paste to the container. All this should be mixed thoroughly. The mixture should be similar in consistency to plasticine.
- The ready-made mass is suitable for creating any figures. It can be used as clay or applied to the framework. The finished product is dried within 2-3 days.
Both schemes are good in their own way, so everyone should choose the most convenient for themselves.


Step by step diagrams for beginners
Having figured out the peculiarities of working with papier-mâché, you can start creating various figures.
Small house
Such fabulous houses made of paper and glue are suitable for decorating your home or indoor greenhouse. They need to be crafted from a dense and elastic paper pulp.

The process of creating a house consists of the following steps.
- First you need to prepare base of the building... An ordinary glass jar serves as the frame of the building.It must be covered with a plasticine mass, highlighting on the basis of the window and door.


- Next, the prepared paper surface needs "Paint" with a toothpick, paper clip or needle... A pattern of bricks or pebbles is applied to it.


- From dense paper pulp also a roof-hat and decorative details are made. To make them voluminous and stay on the base of the house better, the frame for them should be made of soft foil.


- The resulting product must be well dried... After that, you can color it as you like.
Next to the large figure, it is worth placing smaller papier-mâché products. It can be a cute hedgehog or a mushroom. This will make the composition more interesting.


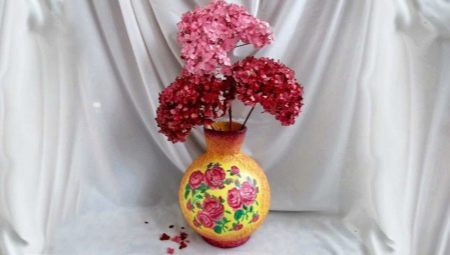
Vase
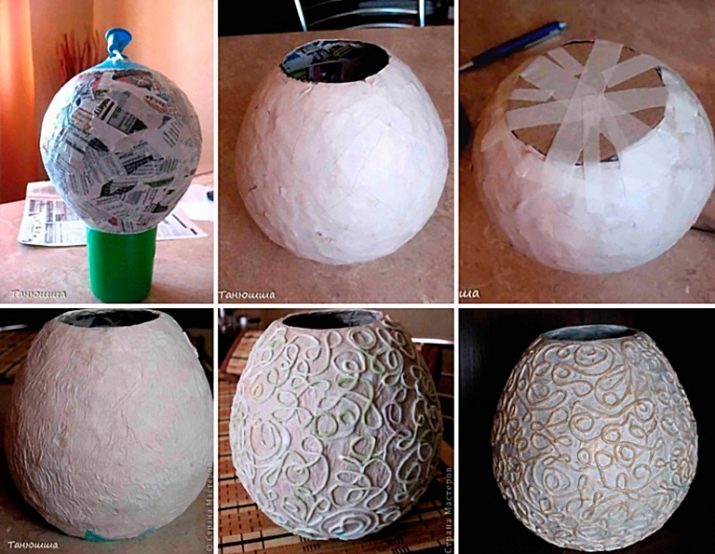
An ordinary balloon serves as the basis for creating a beautiful vase.
- Before starting work, it must be inflated to a suitable size. The prepared ball must be moistened with water.
- Next, pieces of paper are laid out on a wet base. The surface is smeared with paste. Lay out the second layer of paper on top. All pieces should be soaked in glue.
- After making about ten layers, the product must be dried. The next day, the balloon must be deflated and removed from the vase. The neck of the vase must be leveled and reinforced. To do this, pieces of newspaper are attached along the edge of the product, bent inward.
- The dried product must be immediately covered with two coats of acrylic paint. This will help strengthen it. After that, the vase can be decorated in any way. On its surface, both drawn dragons and embossed flowers or simple geometric patterns will look beautiful.

snowman
Various New Year's toys are often made from papier-mâché. A voluminous snowman made of white paper will look beautiful.
- The figurine consists of two small circles... They are made using balloons. The holes on such parts are sealed with paper and dried.
- The arms and legs of a snowman can be made from a sticky mass.... They are also glued to the base and dried for several days.
- A finished snowman can be paint on your own and decorate with a knitted hat and scarf.

Cow
A sculpture in the shape of a cow is also made on the basis of a ball.
- The inflated balloon is pasted over with several layers of paper and dried... After that, the workpiece is sanded with sandpaper. The ball at this stage must be pierced and removed.
- To make the cow's face look more realistic, it must be sculpted separately from plasticine.... The same should be done with the horns and hooves. All these parts must be covered with a layer of paper and dried.
- Further, individual parts must be attached to the base.
- When the figurine is dry, you can paint it as you like. You can decorate the craft with a string collar with decorative bells.

Apple
An excellent craft option that you can make with your child is a papier-mâché apple. To make it, the fruit must be coated with petroleum jelly. This is done to make it easier to remove the fruit from the paper frame.
- You need an apple cover with a thick layer of paper and send to dry.
- After that, another 2-3 layers of paper are applied to the surface of the apple. When they are dry, the fruit must be cut with a clerical knife. The apple halves should be removed from the paper frame and then joined. The incision must be sealed with thin toilet paper.
- When the craft dries, you can paint with ordinary gouache.
By the same principle, it is easy to make a pear, banana, or any other fruit.


Goby
In a pair of papier-mâché cows, you can also make a bull figure.
- The product is placed on a wooden base for greater stability. Having corrected its edges, the workpiece can be started to paste over with paper strips. Apply them in several layers.
- To make the craft taller, legs are attached to the base.... They can be made from wire or any other similar material. The legs are wrapped with toilet paper soaked in glue.Using it, you can control the thickness of individual parts of the shape.
- The junction of the legs with the frame is hidden by making neat hooves. After that, you can proceed to the details. From the materials at hand, the goby needs to make horns and a tail. They are also covered with a layer of toilet paper.
- Having corrected the figure, the bull can be sent to dry... The finished product can be colored at your own discretion.


Wood
This unusual sculpture will become more than just an interior decoration. On such a tree, you can store your earrings, rings and other jewelry. Even beginners will be able to cope with the creation of a figurine.
- An ordinary twig is used as the basis for the craft. It must be attached to the bottom of a plastic container with the help of high-quality glue. This can be a regular saucer or glass.
- Next, you need to paste over the base of the tree with an elastic mass.... It is not necessary to smooth the layer of paper pulp - a rough mixture is more like tree bark.
- The product must be dried in a warm place.
- After a few hours, you can start decorating papier-mâché wood... It is recommended to paint it with acrylic paints - this way it will look more realistic.
- The finished tree can be decorated with rhinestones, bows or any decorative trifles. They can also be used to decorate the plastic base.


Owl
This cute owl figurine will be a great gift for Harry Potter fans. It is made from soft paper or napkins. The mass for creating the figurine must be thick and homogeneous. The craft creation process consists of the following steps.
- First you need to sculpt the base of the figure. It should be shaped like a curved oval. This blank must be thoroughly dried.

- The hardened figurine should be well sanded.

- Next, you can start creating the bird's face. It has the shape of a rounded heart. Owl eyes can be made from colored beads or beads.

- Immediately after that, you can start forming the wings. Their tips should protrude slightly beyond the base of the bird's body. The tail is formed from two small ovals.

- Using a toothpick or a needle on the surface of the wings, you need to draw the outlines of the feathers.

- The figure, supplemented with all the necessary trifles, must be sent to dry again.

- Poultry feet are made of paper clips or wire. They are attached to the figure with glue. The junction of the legs with the body is covered with paper pulp.

- After that, the owl must be dried and painted again.
The process of creating such a bird takes a long time, but the result of the work is worth it. The finished owl looks very beautiful.

cat
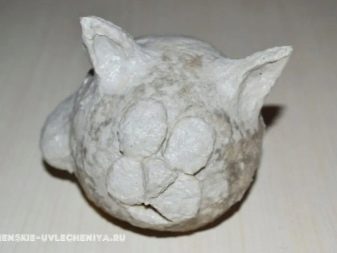
A toy in the shape of a cat's head can also be a good gift. It is done very simply, so even a small child can make such a present.
- The base of the figurine is made of several sheets of paper, crumpled into a neat ball. This blank is wrapped with a layer of foil - it helps to hide all the irregularities of the paper ball.
- Along the surface of the figure, it is necessary to distribute the elastic paper pulp. Its layer should be even.
- When the mass dries out, you can start decorating the product. To do this, cat ears, eyes and a muzzle must be fashioned from paper pulp.
- To smooth out all the irregularities, it is worth walking around the figure with a brush dipped in PVA glue.
- It is recommended to cover the finished toy with a layer of primer - this way the paint will lay down on its surface with a more even layer. After that, you can start decorating the product.


You can learn more about papier-mâché by watching the following video.


